BM 2610925945
Assembly
ATTACHING THE BLADE | Do not use wrenches with longer handles, |
!Disconnect battery pack since it may lead to over tightening of the blade WARNING from tool or place the stud.
switch in the locked or off position before |
| ||
making any assembly, adjustments or | This clutching action is provided by the friction | ||
changing accessories. Such preventive | of the OUTER WASHER against the BLADE | ||
safety measures reduce the risk of starting | and permits the blade shaft to turn when the | ||
the tool accidentally. |
| blade encounters excessive resistance. When | |
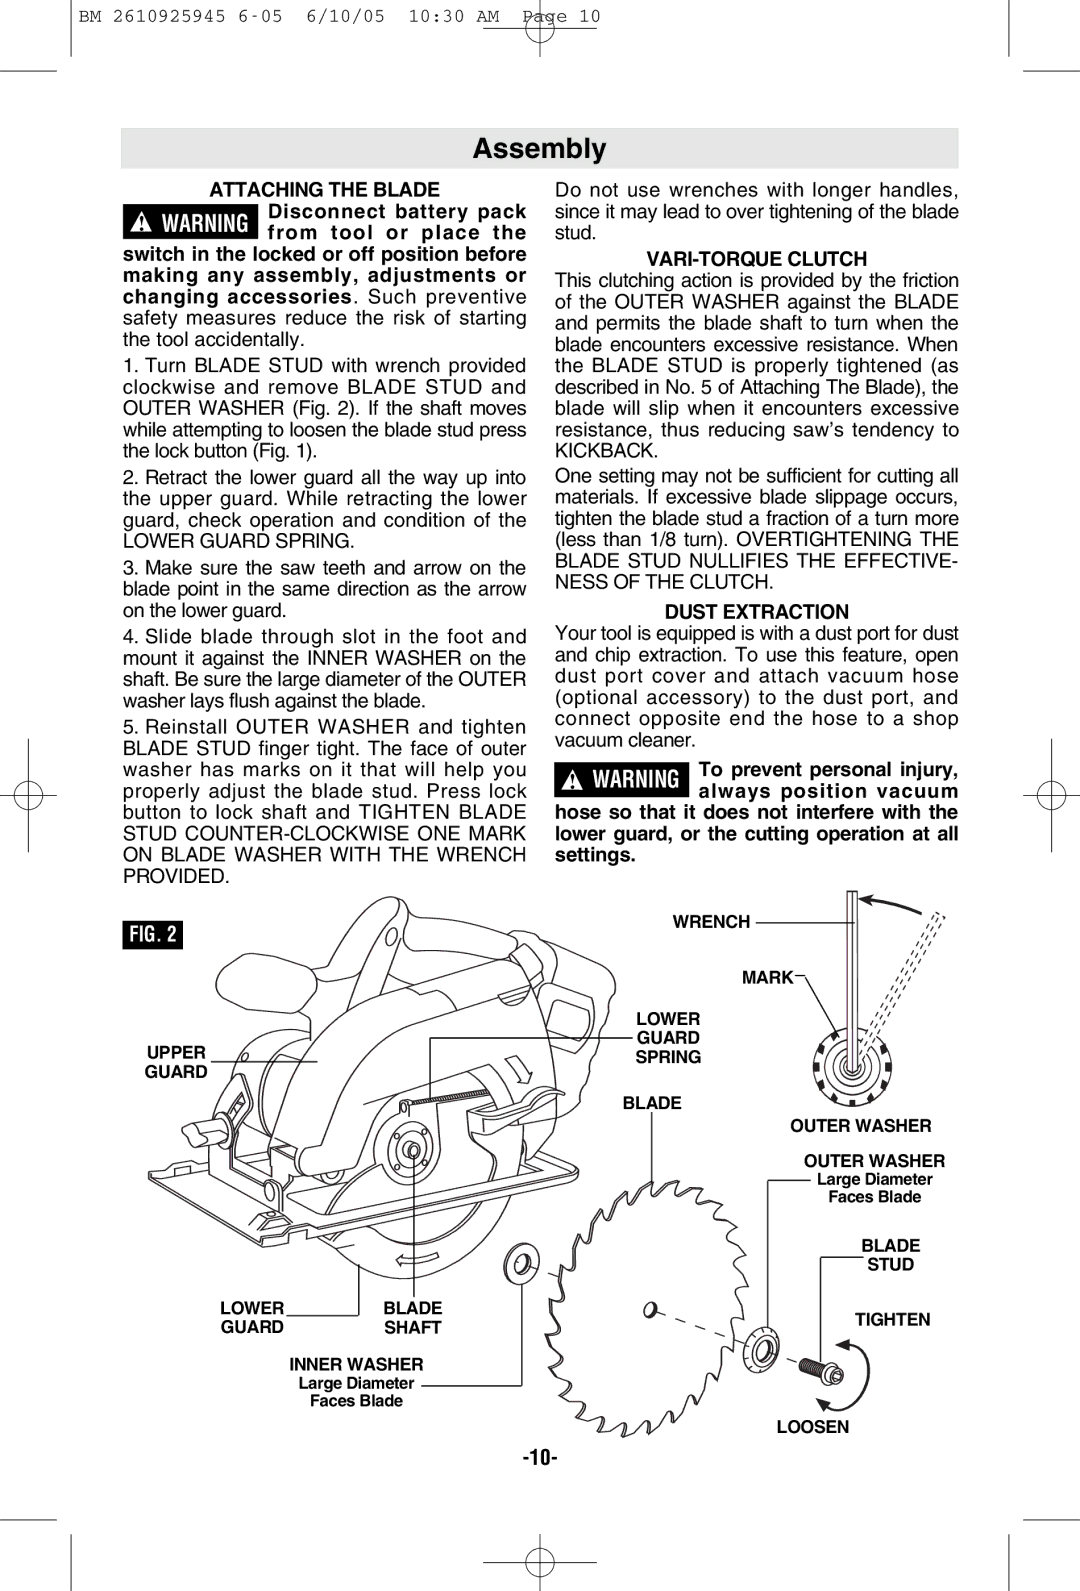
1. Turn BLADE STUD with wrench provided | the BLADE STUD is properly tightened (as | ||
clockwise and remove BLADE STUD and | described in No. 5 of Attaching The Blade), the | ||
OUTER WASHER (Fig. 2). If the shaft moves | blade will slip when it encounters excessive | ||
while attempting to loosen the blade stud press | resistance, thus reducing saw’s tendency to | ||
the lock button (Fig. 1). |
| KICKBACK. | |
2. Retract the lower guard all the way up into | One setting may not be sufficient for cutting all | ||
the upper guard. While retracting the lower | materials. If excessive blade slippage occurs, | ||
guard, check operation and condition of the | tighten the blade stud a fraction of a turn more | ||
LOWER GUARD SPRING. |
| (less than 1/8 turn). OVERTIGHTENING THE | |
3. Make sure the saw teeth and arrow on the | BLADE STUD NULLIFIES THE EFFECTIVE- | ||
NESS OF THE CLUTCH. | |||
blade point in the same direction as the arrow | |||
| |||
on the lower guard. |
| DUST EXTRACTION | |
4. Slide blade through slot in the foot and | Your tool is equipped is with a dust port for dust | ||
mount it against the INNER WASHER on the | and chip extraction. To use this feature, open | ||
shaft. Be sure the large diameter of the OUTER | dust port cover and attach vacuum hose | ||
washer lays flush against the blade. | (optional accessory) to the dust port, and | ||
5. Reinstall OUTER WASHER and tighten | connect opposite end the hose to a shop | ||
vacuum cleaner. | |||
BLADE STUD finger tight. The face of outer | |||
! WARNING To prevent personal injury, | |||
washer has marks on it that will help you | |||
properly adjust the blade stud. Press lock | always position vacuum | ||
button to lock shaft and TIGHTEN BLADE | hose so that it does not interfere with the | ||
STUD | lower guard, or the cutting operation at all | ||
ON BLADE WASHER WITH THE WRENCH | settings. | ||
PROVIDED. |
|
| |
FIG. 2 |
| WRENCH | |
|
| ||
|
| MARK | |
|
| LOWER | |
UPPER |
| GUARD | |
| SPRING | ||
GUARD |
|
| |
|
| BLADE | |
|
| OUTER WASHER | |
|
| OUTER WASHER | |
|
| Large Diameter | |
|
| Faces Blade | |
|
| BLADE | |
|
| STUD | |
LOWER | BLADE | TIGHTEN | |
GUARD | SHAFT | ||
| |||
INNER WASHER
Large Diameter
Faces Blade
LOOSEN
