Installation Start-Up
Table of Contents
Wear protective goggles, rubber apron, and rubber gloves
Safety Rules
Briggs & Stratton Power Products Standby Generator
Customer Responsibilities
Installer Responsibilities
Installation Assistance
Introduction
Oil Fill
Battery
Know Your Standby Generator
AUTO/OFF/MANUAL
Know Your Control Panel
Owner Orientation
Installation Procedures
Standby Generator Location
Shipment Contents
Required Specialty Tools/Equipment
Lifting the Generator
Device Running Watts
Essential Circuit Selection
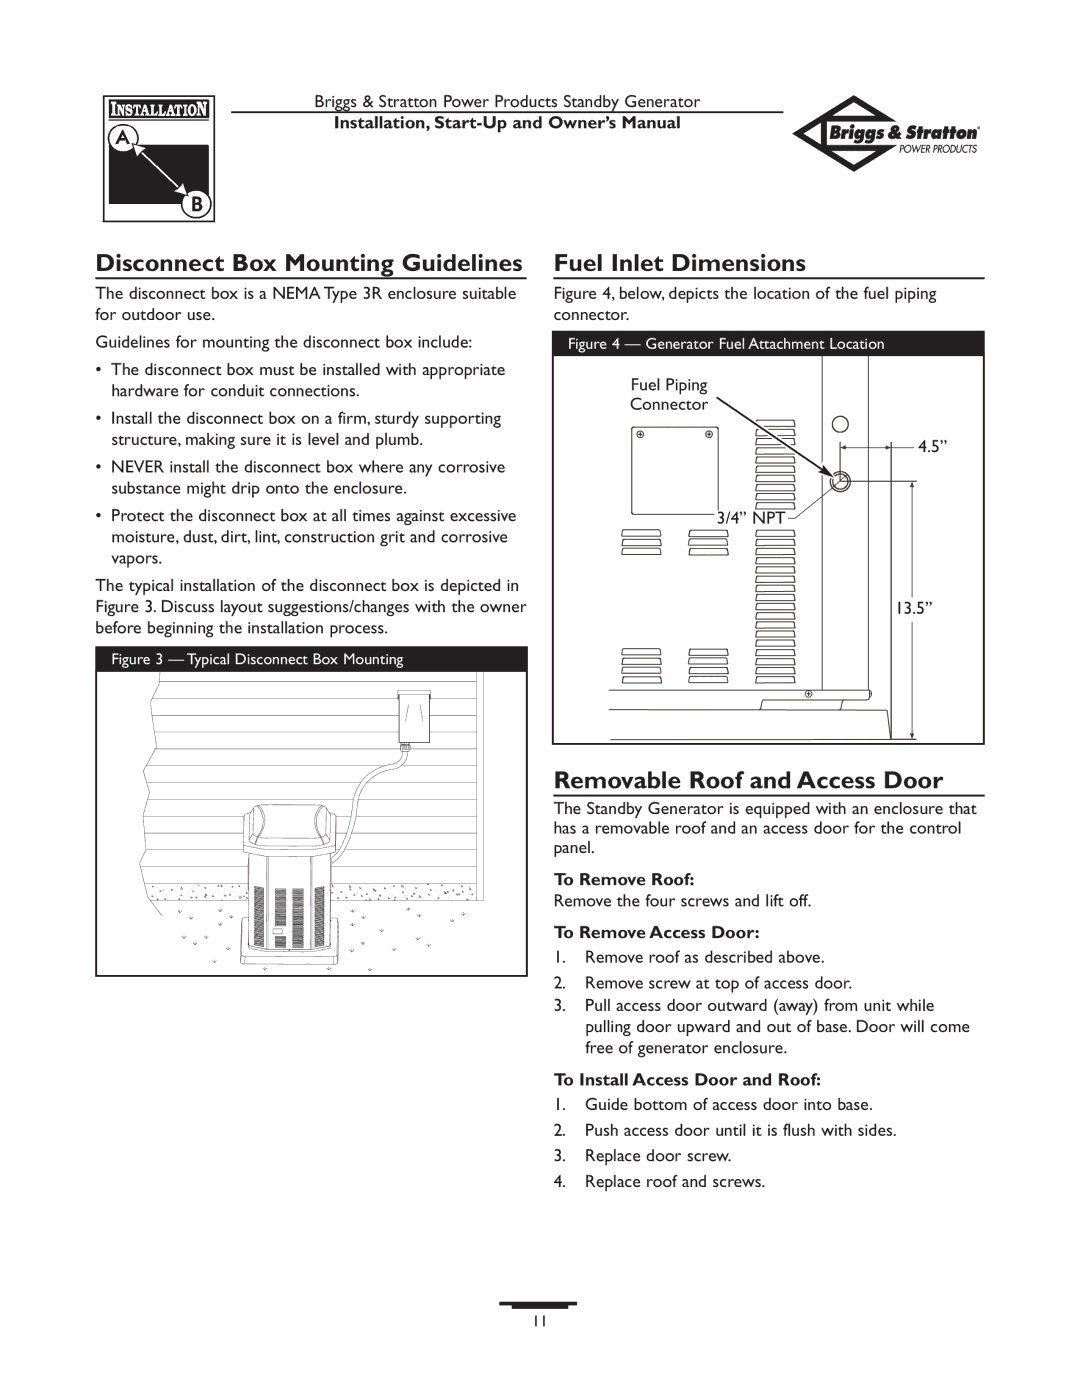
Disconnect Box Mounting Guidelines
Fuel Inlet Dimensions
Removable Roof and Access Door
Standby Generator unit has been factory set to
Gaseous Fuel System
Load
Fuel Consumption
From Fuel
10ft 15ft 20ft 30ft 40ft 50ft 60ft 70ft 80ft 90ft 100ft
Fuel Pipe Sizing
Withdrawal Rate 32F 20F 10F 30F 40F
Fuel Comparison Chart
Physical Properties Propane Natural Gas
Generator Control Circuit Connection
To install the remote LED plate
Generator AC Connection System
Grounding the Generator
Engine Oil
Battery Connection
Before Initial START-UP
Fuel System Selection
Automatic Operation Sequence
Initial START-UP no Load
To perform the Set Exercise procedure
Setting Exercise Timer
Installation Inspection
Servicing the System
Specifications
Fault Detection System
Automatic Operation
Engine Fail To Start
Number of LED Flashes Fault Description
Reset Fault Detection System
No LED Discharged Battery
Changing Oil Filter
Generator Maintenance
Changing Engine Oil and Filter
Changing Oil
Storage
To Clean the Generator
When Calling the Factory
Problem Cause Correction
Troubleshooting
Briggs & Stratton Power Products Standby Generator
Schematic
Wiring Diagram
Exploded View Main Unit
KIT, Deflector Muffler Assy w/ Hrdwr
Parts List Main Unit
Description
Items Not Illustrated
Exploded View Enclosure
Cradle
Parts List Enclosure
Exploded View Control Panel
Parts List Control Panel
SCREW, M5 .8 x 10 Taptite
Exploded View and Parts List Alternator
HARNESS,Wire DC Charge
ADAPTER, Mounting,Alternator
Year
Consumer Use Years Years or
Sistema DE Combustible Gaseoso
Tabla DE Contenido
Manual de Instalación,Arranque y Propietario
Conozca EL Panel DE Control Orientación Para EL Propietario
Advertencia
Instrucciones DE Seguridad
Peligro
Precaución
Asistencia para la instalación
Introducción
Responsabilidades DEL Cliente
Responsabilidades DEL Instalador
Tapón de Llenado y Varilla de Nivel de Aceite Permite
Conozca SU Generador DE Reserva
Etiqueta del Motor Tapón de Llenado y Varilla
De Nivel de Aceite
Fusible de 15 Amperios Protege los circuitos de control de
Conozca EL Panel DE Control
Fusible de
Disyuntor Interruptor
Procedimientos DE Instalación
Orientación Para EL Propietario
Circuitos Fundamentales
Contenido de la Caja
Elevación del Generador
Ubicación del Generador de Reserva
Dispositivo Vatiaje de
Selección de los Circuitos Fundamentales
Techo y Puerta de Acceso Desmontables
Dimensiones de la Entrada de Combustible
Directrices de Montaje del Cuadro de Desconexión
El generador de reserva viene preparado de fábrica para
Sistema DE Combustible Gaseoso Advertencia
Gas Natural Vapor de PL
Consumo de Combustible
Propano Líquido PL peso específico =
Dimensiones de la Cañería de Combustible
Gas Natural peso específico =
Tasa de consumo 32F 20F 10F 30F 40F
Cuadro de Comparación de Combustibles
Propiedades físicas Propano Gas natural
Placa de LED Remoto
Sistema de Conexión de c.a. del Generador
Conexión a Tierra del Sistema
Interconexiones del Circuito de Control
Sistema de Suministro de Combustible
Antes DEL Arranque Inicial
Selección DEL Sistema DE Combustible
Aceite de Motor
Fije el interruptor AUTO/OFF/MANUAL en la posición
Arranque Inicial SIN Carga
Secuencia DE Operación Automática
Instale el fusible de 15 Amperios en el panel de control
Inspección Posterior a LA Instalación
Ajuste DEL Temporizador DE Ejercicio
Fallas
Especificaciones
Operación Automática
Sistema DE Detección DE
Baja Presión de Aceite
Cantidad de Destellos del LED Descripción de la Falla
Restablecimiento del Sistema de Detección de Fallas
No se Enciende el LED Batería Descargada
Cambio del Aceite
Mantenimiento DEL Generador
Cambio del Aceite del Motor y del Filtro
Cambio del Filtro de Aceite
Si Llama a la Fábrica
Almacenamiento
Para Limpiar el Generador
Reparacion DE Averias
Garantía Limitada
Table DES Matières
Manuel dInstallation, Démarrage et Utilisateur
Avertissement
Règles DE Sécurité
Le contact de ces pièces risque de causer de graves brûlures
Responsabilités DE Lacheteur
Responsabilités DE Linstallateur
Aide À Linstallation
Introduction
Filtre à Air Et Jauge dHuile Filtre à lHuile
FAMILIARISEZ-VOUS Avec Votre Génératrice D’ÉTAT D’ATTENTE
Disjoncteur Interrupteur
FAMILIARISEZ-VOUS Avec LE Tableau DE Commande
15 Ampères
Conseils AU Propriétaire
Procédures Dinstallation
Soulèvement de la Génératrice
Emplacement du Génératrice d’état d’Attente
Contenu de la Boîte
Outils/Équipements Spécialisés Nécessaires
Appareil Watts
Sélection des Circuits Essentiels
Toit Amovible et Porte dAccès
Dimensions de lOrifice dAdmission du Combustible
Directives dAssemblage du Boîtier de Débranchement
Le génératrice d’état d’attente a été réglé en usine pour
LE Système DE Combustible Gazeux Avertissement
Gas Naturel Vapeur PL
Consommation de Combustible
Gaz de Pétrole Liquéfié GPL densité = 1,50
Grosseur du Tuyau de Combustible
Gaz Naturel densité = 0,65
Poids† Indice d’octane Recherche 110+
Charte de Comparaison des Combustibles
Propriétés physiques Propane Gaz naturel
Densité 36,39
Mise à la Masse du Système
Interconnexions du Circuit de Commande
Pour installer la plaque DEL à distance
Système de Branchement C.A. de la Génératrice
Branchement de la Batterie
Avant LE Démarrage Initial
Sélection DU Système DE Combustible
Huile à Moteur
Réglez linterrupteur AUTO/OFF/MANUAL sur Manual
Capteur de Prise en Charge de la Tension de Service
Démarrage Initial Sans
Séquence DE Fonctionnement Automatique
Pour Exécuter la Procédure de Réglage du Cycle dExercice
Vérification Installation
Réglage DE LA Minuterie DU Cycle Dexercice
Entretien du Système
Caractéristiques
Fonctionnement Automatique
Système DE Détection DES Pannes
Faible Pression dHuile
Clignotements Du Voyant
Réarmement du Système de Détection des Pannes
Aucun DEL Batterie déchargée
Vidange de lHuile
Entretien DU Générateur
Changement dHuile à Moteur et de Filtre
Changement du filtre à huile
Communications avec le Fabricant
Remisage
Pour Nettoyer le Générateur
Dépannage
Remarques
Garantie Limitée