Operation
Before Starting |
|
|
| IMPORTANT Mower is shipped without oil in | |||
1. Check the guards, deflectors, grass bag, and cov- |
| engine. Failure to add oil before starting will result | |||||
|
| ers to make sure all are in place and securely tight- |
| in engine damage. |
| ||
2. | ened. |
|
|
| 5. Add fuel to the tank: |
| |
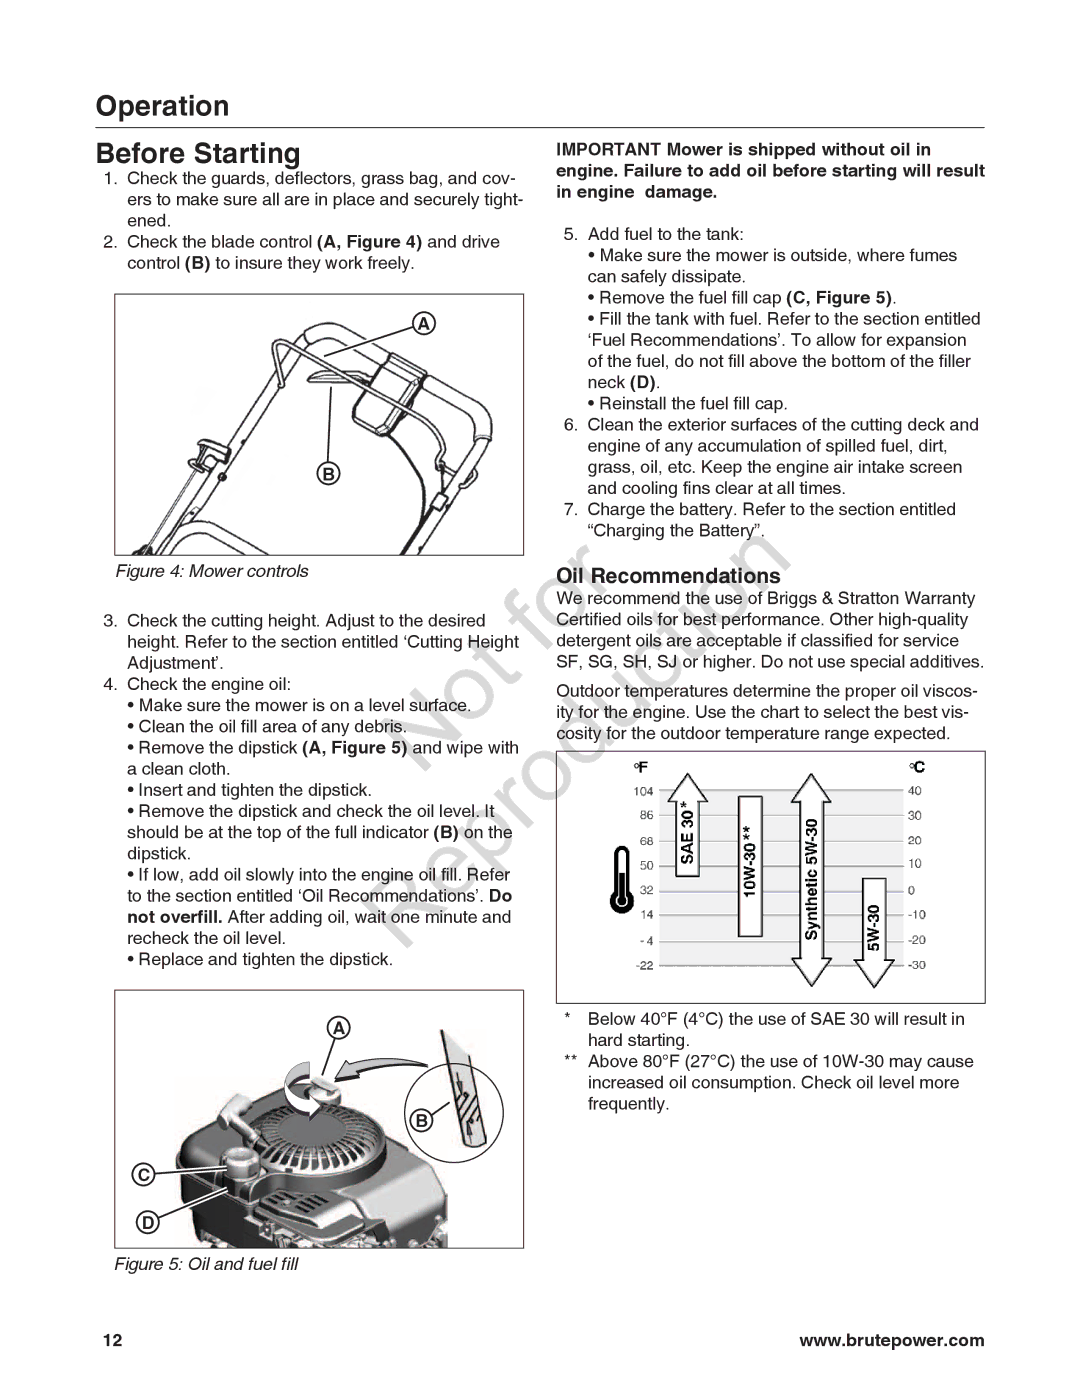
Check the blade control (A, Figure 4) and drive |
|
| |||||
|
| control (B) to insure they work freely. |
|
| • Make sure the mower is outside, where fumes | ||
|
|
|
|
|
| can safely dissipate. |
|
|
|
|
|
|
| • Remove the fuel fill cap (C, Figure 5). | |
|
|
| A |
| |||
|
|
|
|
| • Fill the tank with fuel. Refer to the section entitled | ||
|
|
|
|
|
| ‘Fuel Recommendations’. To allow for expansion | |
|
|
|
|
|
| of the fuel, do not fill above the bottom of the filler | |
|
|
|
|
|
| neck (D). |
|
|
|
|
|
|
| • Reinstall the fuel fill cap. | |
|
|
|
|
|
| 6. Clean the exterior surfaces of the cutting deck and | |
|
|
| B |
|
| engine of any accumulation of spilled fuel, dirt, | |
|
|
|
|
| grass, oil, etc. Keep the engine air intake screen | ||
|
|
|
|
|
| and cooling fins clear at all times. | |
|
|
|
|
|
| 7. Charge the battery. Refer to the section entitled | |
|
|
|
|
|
| “Charging the Battery”. | |
|
|
|
|
|
| ||
| Figure 4: Mower controls | Reproduction | |||||
|
|
|
| Oil Recomme datio s | |||
3. | Check the cutting height. Adjust to the desired |
|
| We ecommend the use | f Briggs & Stratton Warranty | ||
|
| Certified oils f r best perf | rmance. Other | ||||
|
| height. Refer to the section entitled ‘Cutting Height |
| detergent o ls are acceptable if classified for service | |||
|
| Adjustment’. |
|
|
| SF, SG, SH, SJ or higher. Do not use special additives. | |
4. | Check the engine oil: |
|
|
| O tdoor temperatures determine the proper oil viscos- | ||
|
| • Make sure the mower is on a level surface. |
|
| ity for the engine. Use the chart to select the best vis- | ||
|
| • Clean the oil fill area of any debris. |
|
| cosity for the outdoor temperature range expected. | ||
|
| • Remove the dipstick (A, Figure 5) and wipe with |
|
|
| ||
|
| a clean cloth. |
|
|
|
|
|
|
| • Insert and tighten the dipstick. |
|
|
|
| |
|
| • Remove the dipstick and check the oil level. It |
|
|
| ||
|
| should be at the top of the full indicator (B) | the |
|
|
| |
|
| dipstick. |
| fer |
|
|
|
|
| • If low, add oil slowly into the engine oil fill. R |
|
|
| ||
|
| to the section entitled ‘Oil Recomm ndations’. Do |
|
|
| ||
|
| not overfill. After adding oil, wait one minute and |
|
|
| ||
|
| recheck the oil level. |
|
|
|
|
|
|
| • Replace and tighten the dipstick. |
|
|
|
| |
A | * | Below 40°F (4°C) the use of SAE 30 will result in |
** | hard starting. | |
| Above 80°F (27°C) the use of | |
|
| increased oil consumption. Check oil level more |
| B | frequently. |
|
| |
C |
|
|
D |
|
|
Figure 5: Oil and fuel fill |
|
|
12 | www.brutepower.com |
