Installation: Rear-Facing
Installation:
Lap-Belt Installation
•Figure A illustrates a rear-facing, lap-belt installation.
•When not in use, always store the LATCH connectors in the storage slots. See page 30.
1Recline the child seat and place it rear- facing on the vehicle seat. This child seat must be in the recline position when installed
2Lift the cover and open the
3Pull the vehicle belt out, then pass it under the LATCH bar and through the
•The vehicle belt can be routed over or under cover.
4Route the vehicle belt across the child seat then through the opposite
IMPORTANT: The vehicle belt must rest behind the child seat buckle strap.
5Verify that the vehicle belt is not twisted, position the lap belt portion through the open
6Push the child seat firmly into the vehicle seat while removing slack from the vehicle belt.
7Tighten the belt, close the
•The
•To prevent damage, never extend the lock- off arm beyond its normal open position and
a |
b
c
d
| always keep the |
|
|
|
|
|
|
|
|
|
|
|
|
| |
| in use. |
|
|
|
|
|
|
• If your vehicle is equipped with an |
|
|
|
|
|
| |
| automatic locking retractor (ALR), use of |
|
|
|
|
|
|
| the |
|
|
|
|
|
|
| ALR is locked. Check your vehicle owner’s |
|
|
|
|
|
|
| manual to determine the type of retractor |
|
|
|
|
|
|
| your vehicle has, and how to lock the |
| e | ||||
| retractor. |
| |||||
8 Verify that vehicle belt is tight, locked, and |
|
|
|
|
|
| |
|
|
|
|
|
| ||
| that the child seat is secure. |
|
|
|
|
|
|
|
|
|
|
|
|
| |
|
|
|
|
|
|
| |
| WARNING! Do not install this seat |
|
|
|
|
|
|
|
|
|
|
|
|
| |
|
|
|
|
|
|
| |
with a |
|
|
|
|
|
| |
Locking Retractor (ELR) vehicle belt. |
|
|
|
|
|
| |
• The child seat is secure when it cannot be |
| f |
|
|
|
| |
|
|
|
|
| |||
| moved more than 1 in. (2.5 cm) |
|
|
|
|
|
|
|
|
|
|
|
|
| |
| back or |
|
|
|
|
|
|
child seat is not secure, repeat the procedure or use an alternate seating location.
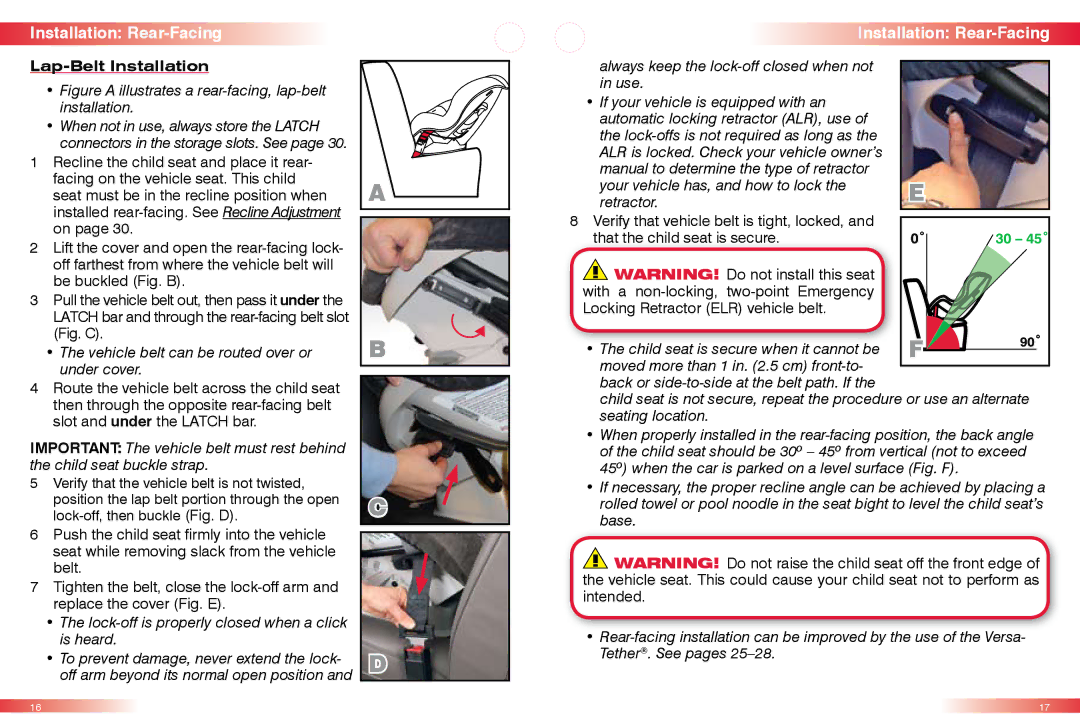
•When properly installed in the
•If necessary, the proper recline angle can be achieved by placing a rolled towel or pool noodle in the seat bight to level the child seat’s base.
![]() WARNING! Do not raise the child seat off the front edge of the vehicle seat. This could cause your child seat not to perform as intended.
WARNING! Do not raise the child seat off the front edge of the vehicle seat. This could cause your child seat not to perform as intended.
•
16 | 17 |