Product Code 884-T05
PR-650
Trademarks
Read Before DOWNLOADING, COPYING, Installing or Using
Introduction
Introduction
Page
This machine is intended for household use
For Users in the UK, EIRE, Malta Cyprus only
Important Safety Instructions
License Agreement
Label locations
Six-needle machine embroidering
Machine Structure and Features
Automatic sewing reduces sewing time
Machine Structure and Features
Differences with single-needle machines
Machine is locked
Other features
Safety mechanism
Easy-to-read and easy-to- use LCD
Various built-in patterns
Available features
USB port available as standard equipment
Moving or threading a selected needle bar at any time
Searching for information
Read when additional information is required
Manual Structure
Read before use
Contents
Hooping the Fabric in the Embroidery Frame
When You Have a Question, This May Help You
Correctly Using the Embroidery Frames
Switching the Thread Colors on the Screen
Maximum Sewing Speed Setting
Adjusting the Thread Tension
Automatic Lock Stitch Setting
Starting/Ending Position Settings
Using the Optional Bobbin Winder
Using the Settings Key
Using the Machine Operations Guide Key
Using the Optional Cap Frame
Index
Troubleshooting
Specifications
Upgrading Your Machine’s Software
Page
Front view Right-side/rear view Operation panel
Included accessories Optional accessories
Front view
Names of Machine Parts and Their Functions
Names of Machine Parts and Their Functions
Right-side/rear view
Operation panel
Included accessories
Accessories
Always use accessories recommended for this machine
Optional accessories
Accessories
Following are available as optional accessories
Setup and transporting precautions
Setting Up the Machine
Setting Up the Machine
Setup location
Foot can be turned
Setting up the machine
Loosen 2 thumb screws to bring the operation panel forward
Adjusting the operation panel position
Preparing the thread guide assembly
Remove the two thumb screws of the embroidery frame holder
Positioning the spool stand
Attaching the embroidery frame holder
This completes the preparation of the machine
Embroidering Tutorial
Power supply precautions
Operating Precautions
Checking the needle
Needle precautions
Bobbin precautions
Operating Precautions
Display recommendations
Upper thread recommendations
Fabric recommendations
Basic Procedures
Basic Procedures
Removing the bobbin case
Installing the Bobbin
Installing the bobbin
Insert the bobbin case into the hook
Installing the bobbin case
Installing the Bobbin
Insert the bobbin into the bobbin case
Carriage moves to its initial position
Turning on the Machine
LCD screen comes on
5Touch
Turning on the Machine
Understanding the screens
Basic operation flow is shown below
Screen overview
Pattern list screen, select the pattern. Refer to page 42
Turning on the Machine
Checking a preview image from the pattern selection screen
Selecting an Embroidery Pattern
Selecting an Embroidery Pattern
Selecting an embroidery pattern
1Press
Embroidering settings screen is displayed
Editing the Embroidery Pattern
Refer to Moving to the correct position
Specifying Embroidering Setting
Specifying Embroidering Setting
Position at the same time that
Preview image is displayed
Previewing the Image
Checking a preview image
Touch
Select an embroidery frame
Hooping the Fabric in the Embroidery Frame
Hooping the fabric in the embroidery frame
Hooping the Fabric in the Embroidery Frame
4Press the inner frame into the outer frame
2Loosen the screw on the outer frame
Loosen the two thumb screws on the embroidery frame holder
Attaching the Embroidery Frame to the Machine
Attaching the embroidery frame
Attaching the Embroidery Frame to the Machine
4Insert the embroidery frame until it snaps into place
For this example, align with mark
Checking the Embroidery Area
Checking the Embroidery Area
Temporarily stopping to Check the area
Embroidering screen appears
Continuing to the embroidering screen
Upper Threading
Upper Threading
Checking the needle bars and thread colors
Screen indicating that the spools be changed is closed
Path that the embroidery machine
Upper threading
Embroidering Tutorial
Thread tension disc
Hole in lower thread guide
Pressbutton.the automatic needle-threading
Threading the needle
3Passpresserthefoot.thread under the guide on
Selected needle bar moves to the embroidering position
Needle bar move screen appears
Touch the key for the needle bar that you wish to thread
Using the spool net
You can move the needle bar in the embroidering screen
Locking mechanism
Sewing the Embroidery
Starting embroidering
Sewing the Embroidery
2Press the start/stop button
Machine can be stopped during sewing
Temporarily pausing Press the start/stop button
Stopping embroidering
Continuing embroidering
If the thread breaks while sewing
Set the main power switch to
2machine 3Press the thread trimming button
Correct thread tension
Checking the Thread Tension
Checking the Thread Tension
Removing the fabric
Removing the Embroidery Frame and Fabric
Removing the embroidery frame
Turning OFF the Machine
2Unplug the power supply cord from the electrical outlet
Turning OFF the Machine
Common screen controls
Screen Quick Reference Guide
Key displays
Screen Quick Reference Guide
Understanding the pattern type selection screen
Understanding the pattern list screen
Understanding the pattern editing screen
Key Makes and edits a
Edited Enables the thread
An alphabet pattern
Being edited Changes the color
Understanding the embroidering settings screen
Multiple patterns that
When the thread is
Appliqué piece is
Outline Pattern to minimize
Understanding the embroidering screen
Specified
While sewing Embroidery, touch This key for
Machine to stop
Manually be
Wiper
When You Have a Question, This May Help You
When You Have a Question, This May Help You
Needle number
Frame came out from the carriage
Getting false thread breakage error
USB connectivity
Thread tension changed suddenly
USB port for computer USB cable connector
Double-clicking has no effect
Using a USB mouse
Mouse pointer does not appear in the screen saver
Clicking a key
Button with the pointer on / to Display the previous or next
Changing pages
Touch Rotate the pattern
Changing the size
Touch Change the size of the pattern
Rotating the pattern
Change thread spools message
Adjusting the tension of the bobbin thread
Adjusting the tension of the upper thread
Checking if thread spool changes are necessary
Turn off the embroidery machine
Changing the Needle
Replacing the needle
Changing the Needle
Embroidery frame types and applications
Correctly Using the Embroidery Frames
Inches W Sleeves and trousers Flat frame optional
Correctly Using the Embroidery Frames
Cylinder frame Mm H × 90 mm W
Optional Inches H × 3-1/2 Curved fabric, such as shirt
Attaching Iron-On Stabilizer Backing to Fabric
Loosen the screw on the outer frame
Hooping the Fabric
Hooping the Fabric
Using the embroidery sheet
Embroidering the corner of fabric
Large/small pieces of fabric
Embroidering large pieces of fabric or heavy clothing
Embroidering small pieces of fabric
Embroidery frames that cannot be used for embroidering
Embroidery Frame Position and Movement
Moving to the correct position
Embroidery Frame Position and Movement
Changing the Embroidering Position
1Touch Embroidering settings screen
Needle bar is unlocked
Adjusting the angle
Changing the Embroidering Position
Finding the sewing position
After making the desired changes, touch
2Touch the keys to adjust the pattern to the desired angle
Memo
Spool selection screen appears
Switching the Thread Colors on the Screen
To cancel the selection, touch the same needle number again
100
Time until the spools must be changed
Embroidering a Pattern Containing Seven or More Colors
Checking if thread spool changes are necessary
Embroidering a Pattern Containing Seven or More Colors
Touch Check the position
102
1Touch in the embroidering screen
Stitch navigating screen appears
Change thread spools message
This completes the changing of the thread spool
Easily changing the thread spools
104
3Touch and to go back
If the upper thread breaks
Repage-thread55.the upper thread. Refer to Touch
Touch , and then press the thread trimming button
If the bobbin thread breaks or runs out
106
4Touch
Page
2Touch
Embroidering From the Beginning or Middle Pattern
108
1Pressmachine.the start/stop button to stop
Embroidering begins from the specified point
Embroidering From the Beginning or Middle of the Pattern
110
Resume Embroidering After Turning Off the Machine
Resume Embroidering After Turning Off the Machine
112
Adjusting the Thread Tension
Adjusting the tension of the bobbin thread
Weight S is included with the optional bobbin winder
Turn the thread tension knobs Correct Thread Tension
Adjusting the tension of the upper thread
Adjusting the Thread Tension
If the thread tension setting is made
Upper thread is too loose
114
Upper thread is too tight
124
Uninterrupted embroidering using a single color 131
117
120
116
Touch , and then display page 2/5 of the settings screen
Basting Embroidery
Creating an Appliqué Piece
3Touch to return to the embroidering settings screen
Creating an Appliqué Piece
Creating an appliqué piece
5Touch to continue to the embroidering screen
4Touch to select the appliqué setting
118
Sew the outline Applique
Using a frame pattern for the outline
Frame pattern is deleted
Use to select the frame pattern Then touch
1Touch so that it changes to
Automatic Lock Stitch Setting
Setting turned on Setting turned off
122
Starting/ending position settings screen appears
Starting/Ending Position Settings
Starting/Ending Position Settings
4Touchthree times. and repeat steps 2
Repeatedly sewing a pattern along a diagonal
Example
2Sew the first embroidery pattern
7As in , select the character patterns for DEF
Embroidering linked characters
Pattern, touch Use
Point for embroidering
Embroidering for the previous pattern
8In the embroidering settings screen, touch 9Touch
126
0Touch AUse
Thread.4 Value between and changes
Maximum Sewing Speed Setting
Maximum Sewing Speed Setting
Maximum sewing speed Embroidery frame Cap frame Flat frame
1Touch in the pattern editing screen
Setting the Machine to Stop at Color Changes
Stopping the machine at the next color change
Specifying pause locations before embroidering
Any number of pauses can be specified
Setting the Machine to Stop at Color Changes
Mark appears to indicate where the machine will stop
After specifying the desired settings, touch
Embroidering continues with the specified needle bar
Temporary Needle Bar Setting
Temporary needle bar setting screen appears
130
Thread color displayed on the screen will be grayed out
Uninterrupted embroidering using a single color
Temporary Needle Bar Setting
132
Reserved Needle Bar Settings
This cancels the manual needle bar setting
Reserved Needle Bar Settings
Cancelling the setting
Wish to cancel Touch
134
140
Concerning embroidery data 136
138
139
Concerning embroidery data
Precautions
If embroidery data larger than 200 mm H × 300 mm W
Precautions
Trademarks
Concerning optional embroidery cards
Concerning USB media
Pattern list screen
General pattern selection
2Select an embroidery pattern. Touch the desired pattern
Embroidery patterns
Frame patterns
List of embroidery patterns appears
2Select the monogram design
Designs
3Select a frame pattern
Touch the desired pattern.Monogram and frame
Any other alphabet pattern without Creating a monogram
3Select the characters
Selected characters appear in the pattern display area
Select a pattern
144
Touch 8Touch
2Select a character font
Alphabet patterns
Touch to change the pattern to the same size as the letters
Font selection screen appears
146
6Touch and enter ucky
List of floral alphabet patterns appears
Floral alphabet patterns
Changing the text arrangement
Touch to return to the text input screen
3If necessary, edit the pattern
Renaissance alphabet patterns
List of Renaissance alphabet patterns appears
This confirms the pattern selection
Appliqué alphabet
2Select the text size
2Select a character pattern
Greek alphabet patterns
Embroidery patterns stored in the machine memory
List of Greek alphabet patterns appears
Store embroidery cards in the hard case
Embroidery cards optional
Deleting embroidery data
About embroidery cards optional
Touch pen
154
List of patterns on the embroidery card appears
Using embroidery card reader without the card reader holder
Compatible models
Computer USB
Select an embroidery pattern
Recalling
List of patterns is displayed
158
Windows XP Windows Vista
Before disconnecting the USB cable, click
Instead, wait until the patterns are displayed
USB media
Touch
2Select an embroidery pattern
Editing the Embroidery Pattern Pattern Editing Screen
Combining patterns
Pattern type selection screen appears again
1Touch or
Selecting the pattern to be edited
Moving a pattern
Editing the Embroidery Pattern Pattern Editing Screen
Touch so that it changes to
Flipping a pattern horizontally
Changing the size of a pattern
Pattern editing screen appears again
2Touch the keys to adjust the pattern to the desired size
Example Original size
4After making the desired changes, touch
Screen shown below appears Example Original angle
Rotating a pattern
2Touch the key of the desired text arrangement
Necessary, touch and to adjust the bend of the curve
Changing the text arrangement of a character
Changing the character spacing
Key appears as
Separating combined character patterns
Touch 2Touch
Spacing Touch
Trimming the threads between characters
Separated character pattern cannot be combined again
4Use and to select a pattern, Then use
Less Standard More
Changing the thread density
Specifying multi-color text
Selects a less thread density
64 embroidery threads table screen appears
Changing the colors of the pattern
Sewing repeated patterns
Designing repeated patterns
To widen spacing, touch To tighten spacing, touch
4Adjust the spacing of the repeated pattern
Select the direction in which the pattern will be repeated
Cut line will move
174
Touch to cut horizontally Touch to cut vertically
2Use and to select the cut line
2Touch 6Repeat the selected element
Repeated pattern will be divided into separate elements
Assigning thread marks
1Touch and then touch
Creating a custom thread table
Be sewn
Entered thread color number Thread brand
Touch to return to the original screen
178
To delete a specified color from the palette Touch
Display shows the changed colors
Choosing a color from the custom thread table
64 embroidery threads table screen displays
New color from the custom thread table
Duplicate is positioned over the original pattern
Duplicating a pattern
Deleting a pattern
Entire pattern can be rotated
Editing the Embroidery Pattern Embroidering Settings Screen
Editing the Embroidery Pattern Embroidering Settings Screen
Rotating the entire pattern
1Touch 3To select the pattern, touch 2Select
Editing a Combined Pattern
182
Which we will then edit
8After selecting the characters, touch
9Touch and adjust the position of the letters
Editing a Combined Pattern
Touch 7Type ood
Balanced
184
Example To reduce
JAfter finishing all editing, touch Then
186
Saving Embroidery Patterns
Saving Embroidery Patterns
Machine’s memory
If the embroidery pattern cannot be saved
5pattern
188
4To delete the data, touch
Primary top USB port for media USB media
Turn on your computer and select Computer My computer
Saving Embroidery Patterns
192
198
194
196
Changing the thread color information 197
Desired page is displayed.
Using the Settings Key
Understanding the settings screen
There are five pages in the settings screen. Touch
Displayed Some settings cannot be changed while sewing
Using the Settings Key
1Touch and to select the desired embroidery frame display
Example When the centerpoint if set to on
Changing the display guides
Size of the embroidery frame
Centerpoint marker is displayed as specified
Changing the thread color information
Centerpoint marker
Centerpoint is indicated with a red plus sign
Time
Specifying the thumbnail size
Sample displays Thread color number #123
Thread color name
Specifying jumpstitch trimming / DST jump codes for trimming
Select the background color from the 66 settings available
200
1Touch or to select the desired setting
Desired setting is displayed
Specifying the remaining length of thread
Changing the screen saver settings
1Touch and to select the setting
Deleting short stitches
202
Touch a file name to select image and then
1setting
Turning on or OFF the sewing light
Select the device that is connected
Specifying thread sensor
Changing the speaker volume
1Touch and to select the desired speaker volume
1Touchsetting. or to select the desired
1Touch and to select the desired measurement units
Changing the pointer shape when a USB mouse is used
Changing the units of measurements
Changing the language
Basic Operation
Using the Machine Operations Guide Key
206
List of basic operations appears
Using the Machine Operations Guide Key
Example To learn how to thread the upper thread Touch
Machine operations guide screen appears
Screen that was displayed before Was touched appears
After checking the procedure, touch Touch
208
Cleaning the thread paths Upper threads 248
Using a frame pattern to create
Installing the embroidery frame
Setting up the optional bobbin Winder 241
Sewing appliqué patterns
This section describes the procedure for sewing appliqués
Procedure for sewing appliqués
Appliqué Sewing
7Finish sewing the embroidery
Using a frame pattern to create appliqués
Appliqué Sewing
212
Select the satin-stitched frame pattern with the same shape
Select the sections in alphabetical order
Sewing Large-size Split Embroidery Patterns
214
2Select section to be embroidered, then Touch
Be sure to select fabric of the size of combined pattern
Sewing Large-size Split Embroidery Patterns
3If necessary, edit the pattern. Then, touch
216
Touch 2Touch 1 time, and then touch
Helpful Tips for the Operation of the Machine
Checking the thread tension of built-in patterns
Helpful Tips for the Operation of the Machine
2Setleft thecorner.beginning of stitching in the lower
1Touch in the embroidering settings screen
Sewing a pattern aligned with a mark on the fabric
3Withfabric.a fabric marker, mark this point on
Colors of Tajima .dst embroidery data
Color thread table
Creating Beautiful Embroidery
Creating Beautiful Embroidery
Threads
Stabilizers backing
Frame Basics
Hooping techniques
Backing must not be visible in the finished product
Or foam cap fronts Dress shirt
Fabric/stabilizer compatibility chart
Away Cotton
Headwear Optional
224
Optional Accessories
Using the Optional Cap Frame
Using the Optional Cap Frame
Cap frame and its accessories
Types of caps
Cap fabric not recommended for embroidering
Fabric precautions
Installing the cap frame driver
Preparing to use the cap frame
228
This completes the installation of the cap frame driver
Adjusting the cap frame driver
Do not loosen them too far
Preparing the mounting jig
230
Firmly tighten the screws
Attach the needle plate spacer to the needle plate
For the standard type
Check that there is no looseness
2Release the snap lock on the cap frame down
Attaching the cap frame
This completes the preparation of the mounting jig
Pins
234
ERemovejig. the cap frame from the mounting
DAdjust the brim so that it maintains a rounded shape
This completes the positioning of the cap in the cap frame
Removing the cap frame
236
Attaching the cap frame to the embroidery machine
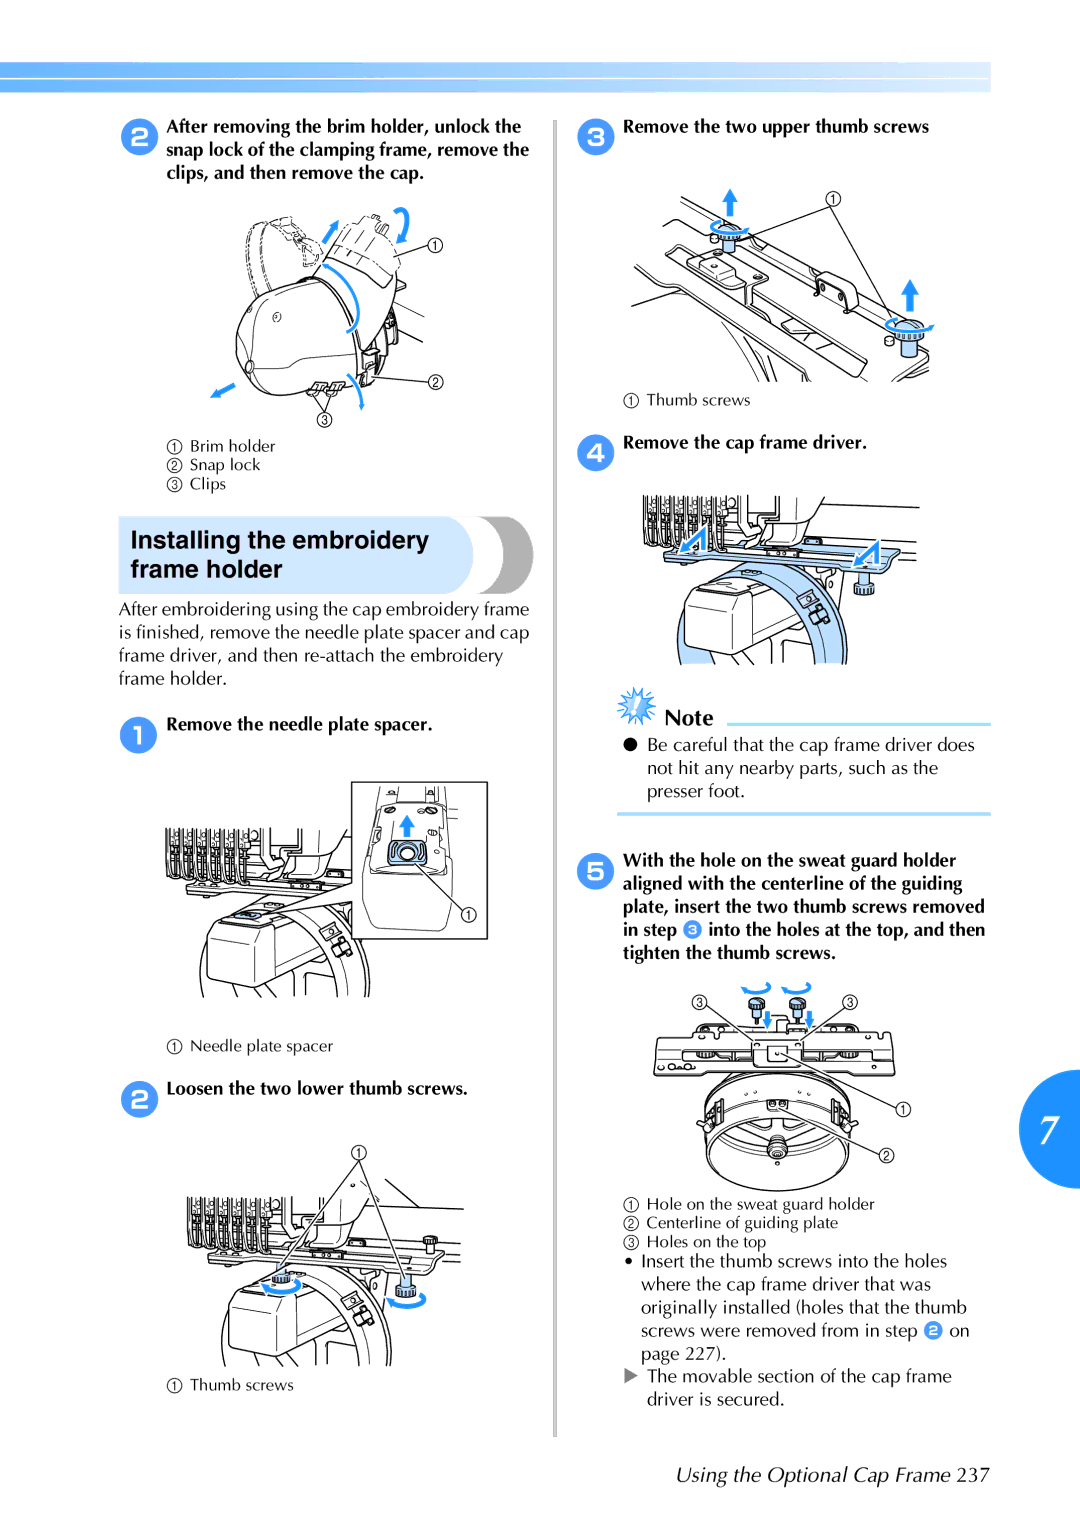
3Remove the two upper thumb screws
Installing the embroidery frame holder
Remove the needle plate spacer
2Loosen the two lower thumb screws
Secure the embroidery frame holder with the two thumb screws
Additional digitizing information
Don’t sew more than four overlapping layers
For precautions concerning the power supply, refer to
Using the Optional Bobbin Winder
Precautions
Optional bobbin winder and its accessories
2Insert the thread guide
Setting up the optional bobbin winder
Connecting the AC adapter
Using the Optional Bobbin Winder
2Set the thread spool on the spool pin
Winding the bobbin
Start winding the bobbin
Press the main power switch to start winding the bobbin
8Slideplace.the bobbin holder, until it clicks into
If bobbin winding is stopped before it is finished
244
ARemove the bobbin
Correctly, otherwise the needle may break
Cleaning the hook
Maintenance
Cleaning the LCD
Cleaning the machine surface
Cleaning around the needle plate
Cleaning the bobbin case
Cleaning the thread paths of the upper threads
3Reassembling the tension unit
Disassembling and cleaning the tension unit
Put a drop of oil onto the hook
Oiling the machine
Oiling the needle bars
About the maintenance message
On-screen troubleshooting
Troubleshooting
Troubleshooting
Troubleshooting
Upper thread is catching
254
Metallic thread Sewing speed
Using a weak thread like a Slow down the machine
Needle is touching the needle plate Upper thread
Breaks Authorized dealer
Upper or middle thread guide
256
Area
Needle plate or in the hook Plate
Clean the hook and the needle Skipped
Correct position
258
Second page of the settings
Is incorrect
Up under the stitching Tautly frame soft knits using a
260
Fabrics. Use stabilizer on top
Bobbin thread broke or ran out
Error messages
Installed embroidery frame is too small
Change the text arrangement or the embroidery frame
Needle bar case could not be moved to its initial position
262
Needle has stopped at an incorrect position
Needle bar case motor has locked up
Touch To return
Selected pattern is going to be Deleted because was touched
Sewing, then turned on again
Colors were being changed
Previously saved pattern
264
Touch to use the thread trimming function
Machine is retrieving a
Pattern has too many stitches and cannot be used
You tried to save a copyright
USB media in which
Pattern is saved has been changed. a computer
Load USB media
Clean the moving cutter. Refer to
266
Troubleshooting
268
4Turn the machine off, and on again
If the machine does not respond when a key is pressed
Start/stop button is red Adjustments screen appears
Embroidery machine specifications
Specifications
Touch 3Insert the USB media into the primary top
Upgrade procedure using USB media
Upgrading Your Machine’s Software
Upgrading Your Machine’s Software
Removable Disk will appear in Computer My computer
Upgrade procedure using computer
4Copy the upgrade file to Removable Disk 5Touch
Remove the USB media, and turn the machine off and on again
Index
Index
274
78, 128
Page
Page
Support and answers to frequently asked questions FAQs