Computerized Sewing and Quilting Machine
Important Safety Instructions
For Users in the UK, EIRE, Malta Cyprus only
Page
Congratulations on Choosing OUR Machine
To sew utility stitches
HOW to USE this Manual
To sew characters and patterns
Contents
Appendix 137
Page
Front View
Names of Machine Parts and Their Functions
Right-side/Rear View
Needle and Presser Foot Section
Operation Buttons
Screw
How to Assemble the Spool Stand
Memo
Ball point needle gold colored
Part Code
Options
Getting Ready
Turn the main power switch to O to turn off the machine
Turn the main power switch to I to turn on the machine
Turning the Machine ON/OFF
LCD Screen
Display Precautions
To change
Key Functions
Screen
Press
Using the Machine Setting Mode Key
Using the Machine Operation Mode Key
Using the Pattern Explanation Key
Set the supplemental spool pin in the up position
Using the Supplemental Spool Pin
LOWER/UPPER Threading
Winding the Bobbin
Cut the thread, and then remove the bobbin
Pass the thread through the thread guide
Winding the Bobbin Using the Spool Pin
Follow steps g through j on
Pulling Up the Bobbin Thread
Setting the Bobbin
Attach the bobbin cover
Upper Threading
Pass the thread through the needle bar thread guide marked
Press the Needle Position button to raise the needle
Release the needle threader lever
Pass the thread through the thread guide disks marked
Press
Using the Twin Needle
Press , or press in the screen Select a stitch
Press to select the setting for twin needle sewing
Or press
Changing the Presser Foot
Removing the Presser Foot
Attaching the Presser Foot
Checking the Needle
Changing the Needle
Or press
Fabric/Thread/Needle Combinations
About the Needle
When you are finished using the wide table, remove it
Install the wide table
Sewing Large Pieces of Fabric
Sewing Basics
Sewing a Stitch
Sewing
Lower the presser foot lever
Release the foot controller to stop the machine
Using the Foot Controller
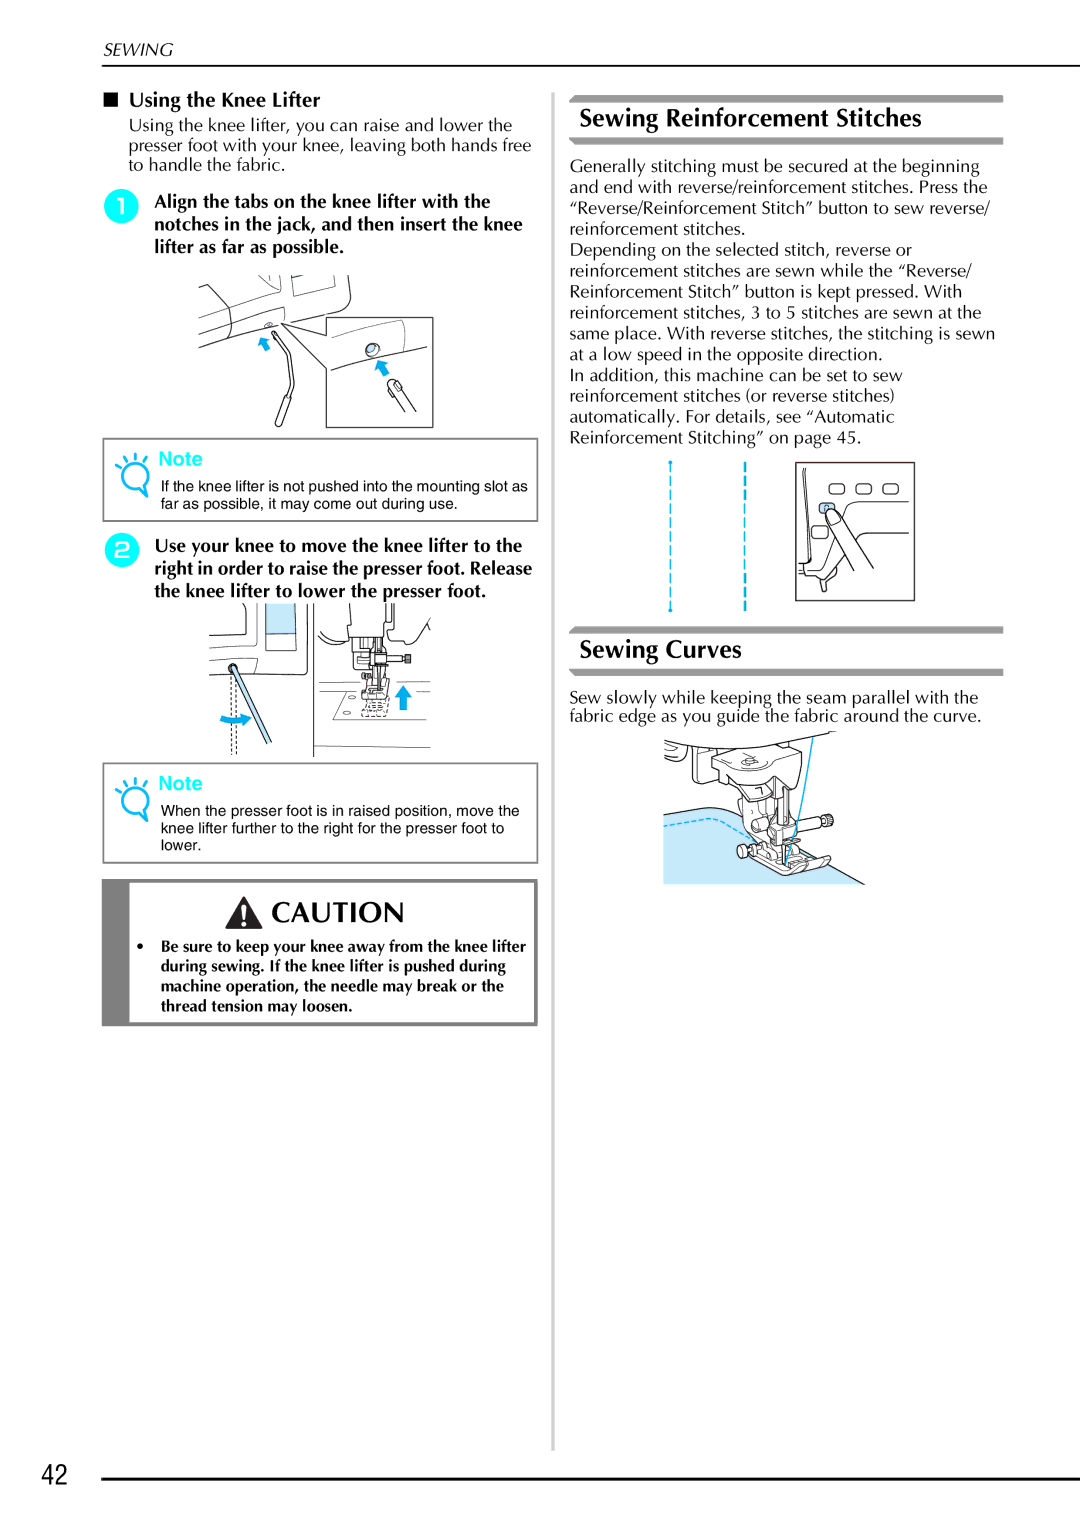
Sewing Reinforcement Stitches
Using the Knee Lifter
Sewing Curves
Sewing Lightweight Fabric
Sewing Heavyweight Fabric
Changing Sewing Direction
Adjusting the Stitch Width
Adjusting Stitch Settings
Adjusting the Stitch Length
Useful Functions
Adjusting the Thread Tension
Automatic Reinforcement Stitching
Automatic Thread Cutting
Pivoting
Automatic Fabric Sensor System
Select a stitch Press to select the pivot setting
Rotate the fabric, and then press the Start/ Stop button
Press to return to the original screen
Locking the Screen
Useful Functions
Utility Stitches
Stitch Selection Screens
Selecting a Utility Stitch
Using the Mirror Image Key
Saving Stitch Settings
Selecting a Stitch
Using the Sewing Type Selection Key
Follow the directions to sew the stitch
When you have finished sewing, press
Quilting
Sewing the Stitches
Stitch Name
Press , and then attach the 1/4 piecing foot with guide
Piecing Using the 1/4 Quilting Foot with Guide
Piecing
Press or , and then attach presser foot J
Follow the steps on page 34 to remove the presser foot
Quilting
Appliqués
Using the Quilting Guide
Quilting with Satin Stitches
When you are finished sewing, set Width Control back to OFF
Select or
Free-motion Quilting
Remove the presser foot holder see
Remove the presser foot holder see
Mm approx /4 inch Mm approx /8 inch
Echo Quilting
Pressmode. to cancel the free-motion sewing
Auto Manual
Straight Stitches
Reverse stitches
Select a stitch Attach presser foot J
Basting
Needle Plate and Needle Plate Cover Marks
Sew while lightly guiding the fabric
Darts Seams
Flat Fell Seams
Gathering
Spread out the fabric along the seam line
Iron the folds in the same direction
Pintucks
Overcasting
Zigzag Stitches
Remove the bobbin cover from the machine see
Using the Cord Guide Bobbin Cover
Patchwork Crazy Quilts
Sewing Curves
Tape/Elastic Attaching
Elastic Zigzag Stitches
Overcasting
Overcasting Using Presser Foot G
Sew along the presser foot guide
Overcasting Using Presser Foot J
Overcasting Using the Optional Side Cutter
→ a seam allowance is cut while the stitching is sewn
Start sewing
Fold the fabric again, as shown
Blind Hem Stitches
Press or
Appliqués
If the Needle Does Not Catch the Fold
If the Needle Catches Too Much of the Fold
Scalloping
Shell Tuck Stitching
Sewing Sharp Curves
Select a straight stitch, and then attach presser foot J
Top Stitching
Smocking
Trim along the seam, making sure not to cut the stitches
Fagoting
Pull out the threads for the straight stitches
Tape or Elastic Attaching
Insert the wing needle 130/705H, size
Heirloom Stitching
Hemstitching 1 Daisy Stitch
Hemstitching 2 Drawn Work
Press to create a mirror image of the stitch
Hemstitching 3 Drawn Work
Buttonhole Stitches
Pull down the buttonhole lever
Mark the position and length of the buttonhole on the fabric
Pin Eyelet punch
Buttons That Do Not Fit into the Button Holder Plate
Sewing Stretch Fabrics
Use darning stitches for mending and other applications
Darning
Bar Tacks
Bar Tacks on Thick Fabrics
Buttons with 2 or 4 holes can be sewn on
Button Sewing
Attaching a 4-Hole Button
Eyelets
Attaching a Button with a Shank
Press , and then sew seam
Multi-Directional Sewing Straight Stitch and Zigzag Stitch
Centered Zipper
Zipper Insertion
Topstitch around the zipper, and then remove the basting
Inches from the edge of the fabric, then stop the machine
Side Zipper
Inch of sewing space
Set the presser foot in the 3 mm approx /8 inch margin
Sewing the Stitches
100
Character Decorative 4Stitches
102
Selecting Stitch Patterns
Alphabet Patterns
103
To combine patterns, select the next pattern
Press Press , then
104
Basic Sewing
Sewing Stitch Patterns
105
Sewing Attractive Finishes
Screen
Adjusting Patterns
106
APress Then press
DPress
107
108
Editing Stitch Patterns
Creating a Vertical Mirror Image
109
Changing the Pattern Size
Changing the Pattern Length Mm Satin Stitch Patterns Only
Selecting a Single/Repeating Pattern
110
Presssewing.the Start/Stop button to continue
111
Returning to the Beginning of the Pattern
Press the Start/Stop button to stop Machine, and then press
Combining Patterns from Different Categories
Combining Stitch Patterns
112
Before Combining Patterns
EPress
113
CPress Again, and then press
114
Combining Stitch Patterns of Different Sizes
Example APress BPress
Combining Stitch Patterns of Different Orientations
115
Example APress CPress Again, and then press
Combining Stitch Patterns of Different Lengths
116
APress BPress , and then press once so that It appears as
Press again, and then press
117
Creating Step Patterns 7 mm Satin Stitch Patterns Only
Press , and then press
Examples of Pattern Combinations
118
Saving Stitch Patterns Machine’s Memory
Using the Memory Function
Stitch Data Precautions
119
Select a stitch pattern to be deleted
120
If the Memory Is Full
Press to continue
Saving Stitch Patterns to Computer
121
Retrieving Stitch Patterns from the Machine’s Memory
122
Select a stitch pattern to be retrieved
Retrieving Stitch Patterns from the Computer
123
124
128
126
Decide the spacing of the stitch
Designing a Stitch
126
Draw the stitch design on the grid sheet part code SA507
Examples of Custom Stitches
127
128
Entering Stitch Data
Press to add the point indicated by
129
Press CUse To move
First point on the grid sheet
APress or to move to the point that you want to move
130
Moving a Point
HPress
Moving Part or All of the Design
131
CPress or to move the section DPress BPress
Inserting New Points
132
APress BPress
Using Stored Custom Stitches
133
Saving Custom Stitches in the Machine’s Memory
Saving Custom Stitches to the Computer
134
Select a custom stitch to be deleted
Select a custom stitch to be retrieved
135
Retrieving Custom Stitches from the Machine’s Memory
Retrieving Custom Stitches from the Computer
136
148
140
142
145
Cleaning the Race
Care and Maintenance
Cleaning the LCD
Cleaning the Machine Casing
139
Cleaning the Bobbin Case
Touch Panel Is Malfunctioning
Adjusting the Screen
140
Screen Visibility Is Low
141
142
Troubleshooting
143
Problem Cause Solution
144
145
Error Messages
146
147
Alarm
148
Specifications
Upgrading Your MACHINE’S Software
When the screen shown in step a appears Again, press
149
150
When the following screen appears, upgrading is completed
151
Stitch Setting Chart
152
Auto Manual Straight stitch Left
153
154
155
156
157
158
159
Index
Needle
160
English 882-U60 XE0783-001