Brother XL-3510, XL-2620, XC6771-021 operation manual Making a Buttonhole, Stitch Pattern

Models: XC6771-021 XL-2620 XL-3510

1 51
Download 51 pages 58.87 Kb
Page 36
Image 36

XL2600.book Page 34 Thursday, November 4, 2004 9:46 PM

SEWING BUTTONHOLES AND BUTTONS ————————————————————————————————————————————

4SEWING BUTTONHOLES AND BUTTONS

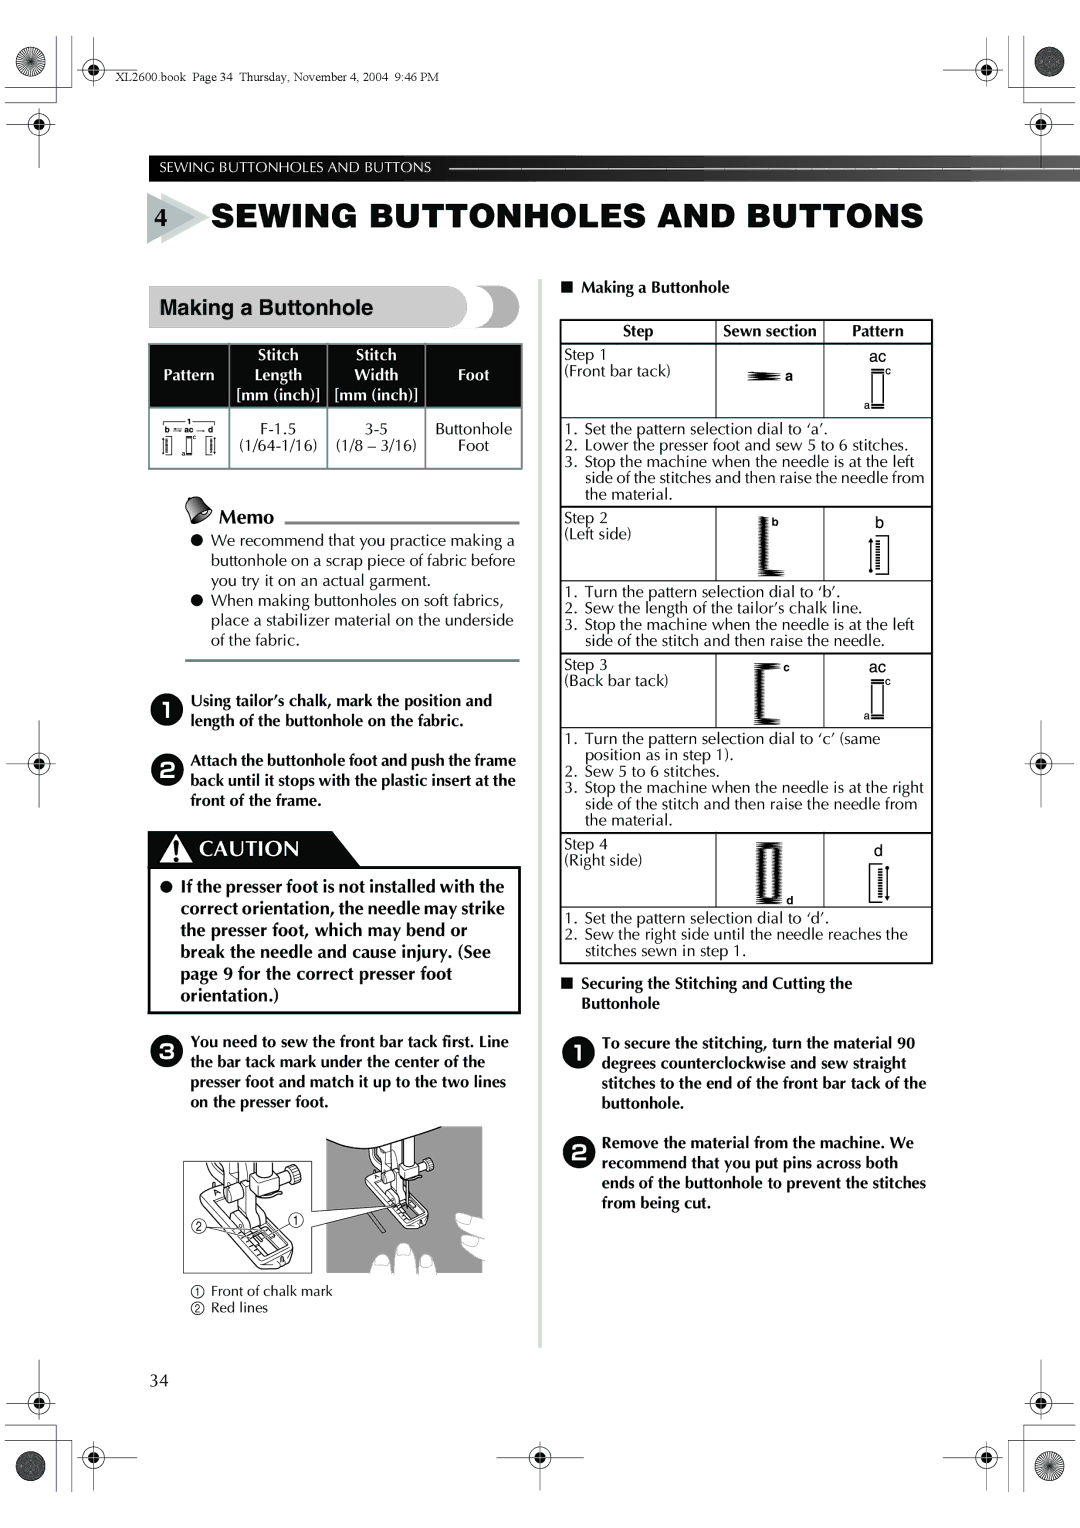
Making a Buttonhole


Stitch

Stitch


Pattern

Length

Width

Foot


[mm (inch)]

[mm (inch)]


F-1.5

3-5

Buttonhole


(1/64-1/16)

(1/8 – 3/16)

Foot


Memo

We recommend that you practice making a buttonhole on a scrap piece of fabric before you try it on an actual garment.

When making buttonholes on soft fabrics, place a stabilizer material on the underside of the fabric.

1Using tailor’s chalk, mark the position and length of the buttonhole on the fabric.

2Attach the buttonhole foot and push the frame back until it stops with the plastic insert at the front of the frame.

CAUTION

If the presser foot is not installed with the correct orientation, the needle may strike the presser foot, which may bend or break the needle and cause injury. (See page 9 for the correct presser foot orientation.)

3You need to sew the front bar tack first. Line the bar tack mark under the center of the presser foot and match it up to the two lines on the presser foot.

Making a Buttonhole

Step

Sewn section

Pattern

Step 1


(Front bar tack)

a


1.Set the pattern selection dial to ‘a’.

2.Lower the presser foot and sew 5 to 6 stitches.

3.Stop the machine when the needle is at the left side of the stitches and then raise the needle from the material.

Step 2

b


(Left side)


1.Turn the pattern selection dial to ‘b’.

2.Sew the length of the tailor’s chalk line.

3.Stop the machine when the needle is at the left side of the stitch and then raise the needle.

Step 3

c


(Back bar tack)


1.Turn the pattern selection dial to ‘c’ (same position as in step 1).

2.Sew 5 to 6 stitches.

3.Stop the machine when the needle is at the right side of the stitch and then raise the needle from the material.

Step 4 (Right side)

d

1.Set the pattern selection dial to ‘d’.

2.Sew the right side until the needle reaches the stitches sewn in step 1.

Securing the Stitching and Cutting the Buttonhole

1To secure the stitching, turn the material 90 degrees counterclockwise and sew straight stitches to the end of the front bar tack of the buttonhole.

2Remove the material from the machine. We recommend that you put pins across both ends of the buttonhole to prevent the stitches from being cut.

1Front of chalk mark

2 Red lines

34

Page 36
Image 36
Brother XL-3510, XL-2620, XC6771-021 operation manual Making a Buttonhole, Stitch Pattern

XC6771-021, XL-2620, XL-3510 specifications

The Brother XL-3510, XL-2620, and XC6771-021 are popular sewing machines that cater to a wide range of sewing enthusiasts, from beginners to more experienced users. Each model brings unique features and technologies, making them excellent choices depending on the specific needs of the user.

The Brother XL-3510 is renowned for its versatility and user-friendly design. This machine comes equipped with 35 built-in stitches, including essential, decorative, and heirloom stitches, giving users the flexibility to tackle a variety of projects. Its easy-to-use stitch selector allows crafters to switch between stitch types effortlessly. This model also features a one-step buttonhole function, enabling even novices to create professional-looking buttonholes with ease. Additionally, an automatic needle threader simplifies setup, reducing frustration and saving time. The free arm design facilitates sewing cuffs, collars, and other hard-to-reach areas, making it an excellent option for clothing alterations.

On the other hand, the Brother XL-2620 is another solid choice for those eager to explore their sewing capabilities. This model boasts 26 built-in stitches, including stretch stitches for knit fabrics. An easy bobbin winding system and automatic needle threader enhance convenience and efficiency. The XL-2620 also includes a four-step buttonhole feature that provides users with precise and reliable buttonholes. The lightweight design and carrying handle make it portable, which is an asset for those who attend sewing classes or workshops.

The Brother XC6771-021 stands out for its advanced features, catering specifically to quilting and sewing enthusiasts. With the capability to work on various fabrics, this model supports quilting with a designated walking foot and an oversized extension table that provides ample workspace for larger projects. The XC6771-021 includes an impressive array of 60 built-in sewing stitches, including decorative appliqué and quilt stitches. The intuitive LCD display allows for easy navigation through stitching options, while the speed control feature enables users to adjust sewing speeds for precise control.

In summary, the Brother XL-3510, XL-2620, and XC6771-021 each have distinct advantages that appeal to different sewing needs. From beginners looking for simplicity to advanced users seeking specialized features, these machines are designed to enhance creativity and ease of use, making them valuable tools in any sewing room.