SERVICE (cont.)

Electronic Controls (cont.)

Electronic Controls Removal and Replacement

NOTE - Each electronic control assembly is calibrated to a temperature sensor probe. Both components MUST be replaced as a set.

1.Remove all wires from the electronic control as- sembly terminals.

2.Remove the two 8-32 screws holding the electronic control assembly to the component bracket.

3.Disconnect the temperature sensor, overflow tube temperature sensor, and indicator wires from the left side of the electronic control assembly board.

4.Remove the temperature sensor from the grom- met in the tank lid.

5.Install the new temperature sensor into the grom- met on the tank lid. Route the wires to the location of the new electronic control assembly.

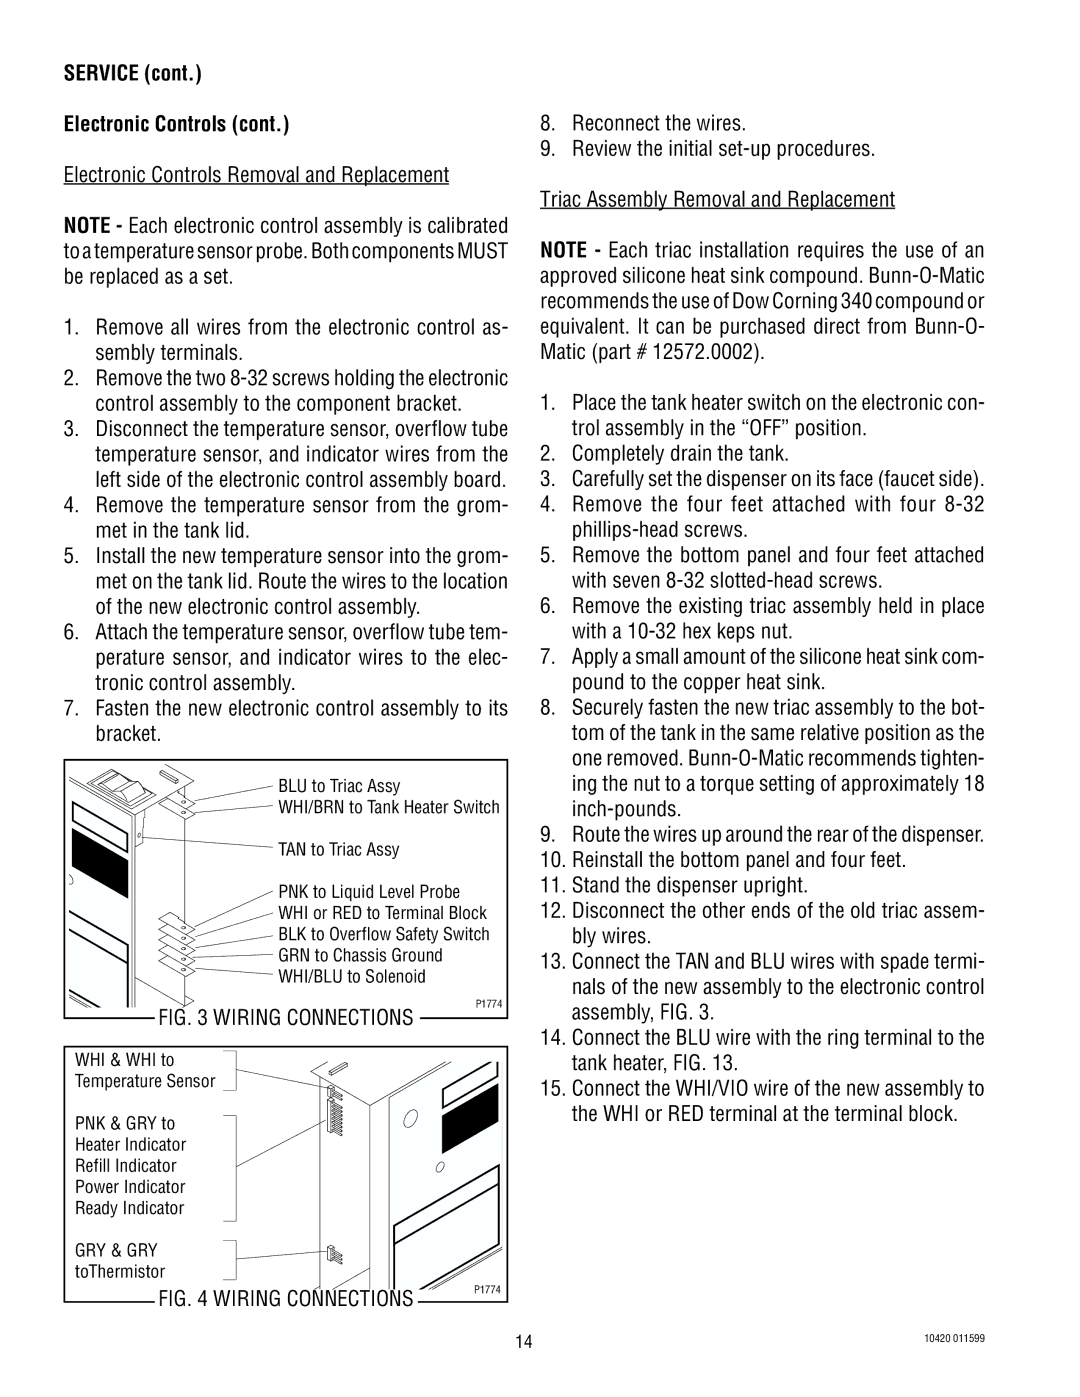
6.Attach the temperature sensor, overflow tube tem- perature sensor, and indicator wires to the elec- tronic control assembly.

7.Fasten the new electronic control assembly to its bracket.

BLU to Triac Assy

WHI/BRN to Tank Heater Switch

TAN to Triac Assy

PNK to Liquid Level Probe

WHI or RED to Terminal Block

BLK to Overflow Safety Switch

GRN to Chassis Ground

WHI/BLU to Solenoid

P1774

FIG. 3 WIRING CONNECTIONS

WHI & WHI to


Temperature Sensor


PNK & GRY to


Heater Indicator


Refill Indicator


Power Indicator


Ready Indicator


GRY & GRY


toThermistor


FIG. 4 WIRING CONNECTIONS

P1774


8.Reconnect the wires.

9.Review the initial set-up procedures.

Triac Assembly Removal and Replacement

NOTE - Each triac installation requires the use of an approved silicone heat sink compound. Bunn-O-Matic recommends the use of Dow Corning 340 compound or equivalent. It can be purchased direct from Bunn-O- Matic (part # 12572.0002).

1.Place the tank heater switch on the electronic con- trol assembly in the “OFF” position.

2.Completely drain the tank.

3.Carefully set the dispenser on its face (faucet side).

4.Remove the four feet attached with four 8-32 phillips-head screws.

5.Remove the bottom panel and four feet attached with seven 8-32 slotted-head screws.

6.Remove the existing triac assembly held in place with a 10-32 hex keps nut.

7.Apply a small amount of the silicone heat sink com- pound to the copper heat sink.

8.Securely fasten the new triac assembly to the bot- tom of the tank in the same relative position as the one removed. Bunn-O-Matic recommends tighten- ing the nut to a torque setting of approximately 18 inch-pounds.

9.Route the wires up around the rear of the dispenser.

10.Reinstall the bottom panel and four feet.

11.Stand the dispenser upright.

12.Disconnect the other ends of the old triac assem- bly wires.

13.Connect the TAN and BLU wires with spade termi- nals of the new assembly to the electronic control assembly, FIG. 3.

14.Connect the BLU wire with the ring terminal to the tank heater, FIG. 13.

15.Connect the WHI/VIO wire of the new assembly to the WHI or RED terminal at the terminal block.

14

10420 011599


Page 14
Image 14
Bunn H5E H5X service manual Wiring Connections

H5E H5X specifications

The Bunn H5E and H5X coffee brewers are renowned for their high-quality brewing capabilities, designed to meet the demands of both commercial and specialty coffee environments. These brewers stand out due to their innovative features, reliable performance, and user-friendly designs, making them a preferred choice for cafes, restaurants, and other establishments.

One of the primary features of the Bunn H5E and H5X models is their high-efficiency brewing system. These machines utilize a digital brewing control that ensures precise water temperatures and accurate brew times. This technology allows baristas to achieve optimal extraction from coffee grounds, resulting in a consistent, flavorful cup of coffee every time. The machines are equipped with a stainless-steel hot water tank, allowing for rapid brewing and serving for high-volume coffee demands.

The H5E model focuses on versatility in brewing methods. It can accommodate a wide range of coffee types, from traditional drip coffee to specialty brews. With its adjustable brew basket size, users can easily switch between smaller and larger batches, making it suitable for various business sizes and needs. Additionally, the H5X variant features a high-volume design, perfect for busy environments where efficiency and speed are crucial.

Both models incorporate advanced technology such as the Cold Brew Activation feature, allowing users to make cold brew coffee efficiently. The programmable settings enable baristas to customize brewing parameters according to their specific coffee recipes, providing the ability to create unique flavor profiles that cater to customer preferences.

Durability is another significant characteristic of the Bunn H5E and H5X brewers. Built with heavy-duty materials, these machines are designed to withstand the rigorous demands of a high-traffic environment. They also feature an easy-to-clean design, ensuring that maintenance is fast and straightforward.

In summary, the Bunn H5E and H5X coffee brewers are optimized for efficiency, adaptability, and durability, making them ideal for any coffee-serving establishment. Their innovative brewing technologies and user-friendly features empower baristas to deliver exceptional coffee while minimizing downtime, ensuring that every customer enjoys a perfect cup of coffee crafted to perfection.