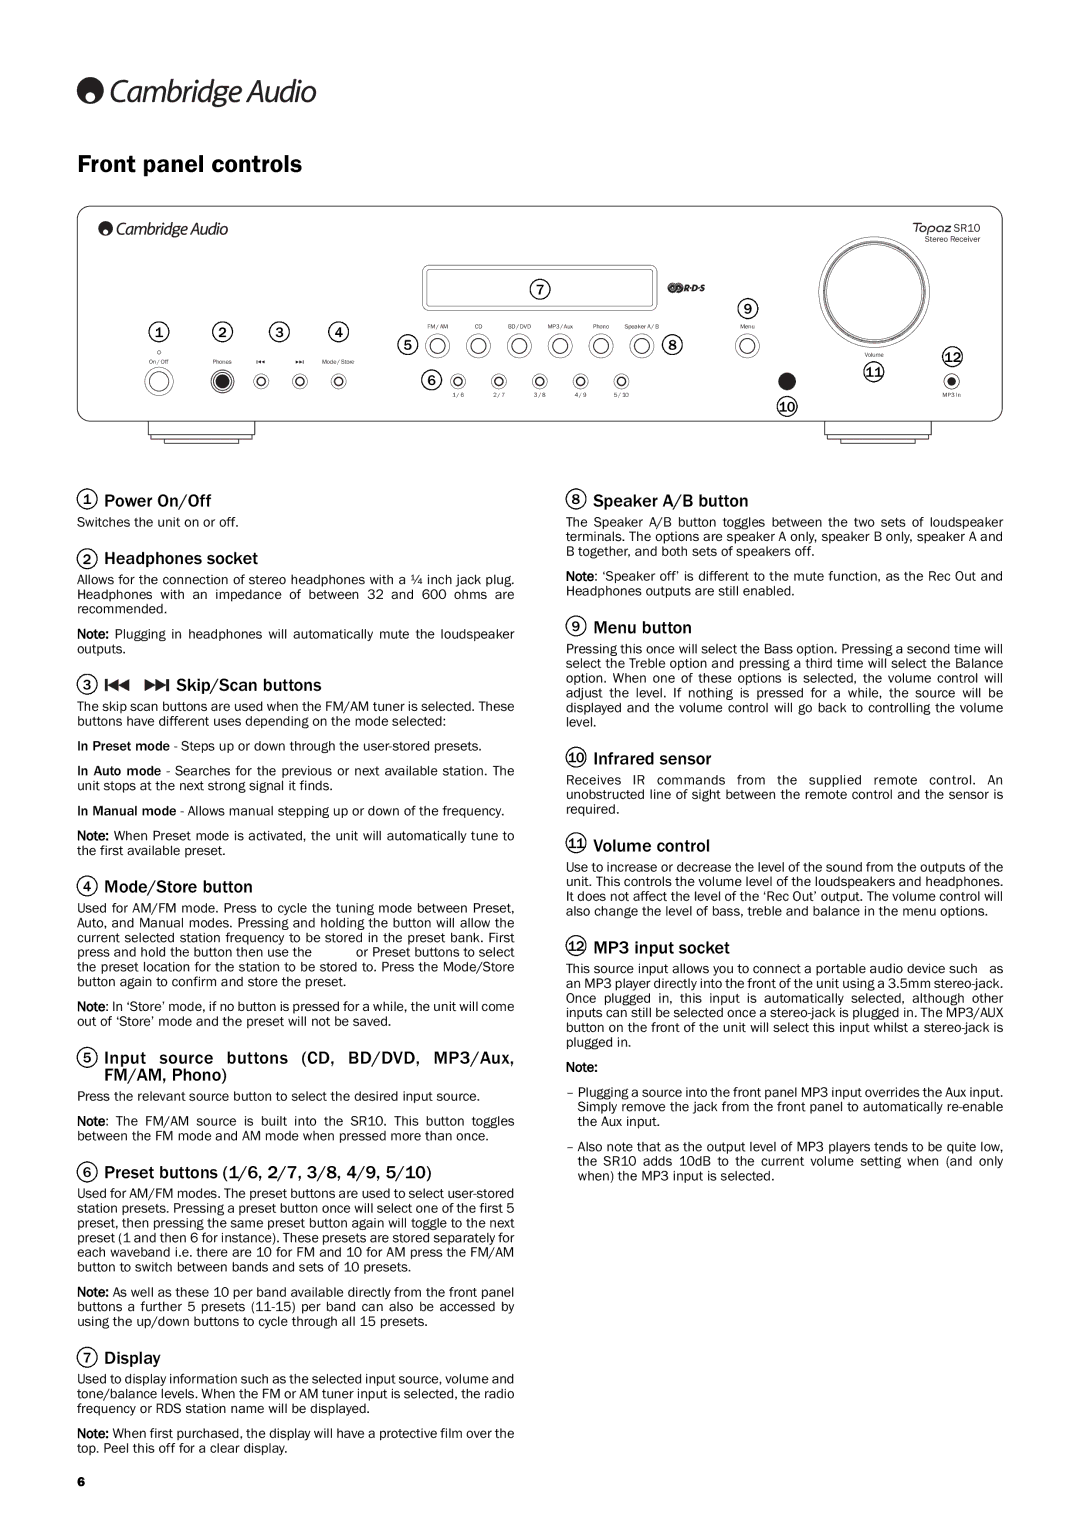
Cambridge Audio SR10 user manual Front panel controls

Models: SR10

1 12
Download 12 pages 30.32 Kb
Page 6
Image 6
Front panel controls

Front panel controls

Manual backgroundManual backgroundManual background SR10

Stereo Receiver

7


9


1

2

3

4

FM / AM

CD

BD / DVD MP3 / Aux

Phono

Speaker A / B

Menu


5


8


12

On / Off

Phones


Mode / Store


Volume


11


6


1 / 6

2 / 7

3 / 8

4 / 9

5 / 10


MP3 In

10

1Power On/Off

Switches the unit on or off.

2Headphones socket

Allows for the connection of stereo headphones with a ¼ inch jack plug. Headphones with an impedance of between 32 and 600 ohms are recommended.

8Speaker A/B button

The Speaker A/B button toggles between the two sets of loudspeaker terminals. The options are speaker A only, speaker B only, speaker A and B together, and both sets of speakers off.

Note: ‘Speaker off’ is different to the mute function, as the Rec Out and Headphones outputs are still enabled.

Note: Plugging in headphones will automatically mute the loudspeaker outputs.

3Manual backgroundManual backgroundManual backgroundManual background Skip/Scan buttons

The skip scan buttons are used when the FM/AM tuner is selected. These buttons have different uses depending on the mode selected:

In Preset mode - Steps up or down through the user-stored presets.

In Auto mode - Searches for the previous or next available station. The unit stops at the next strong signal it finds.

In Manual mode - Allows manual stepping up or down of the frequency.

Note: When Preset mode is activated, the unit will automatically tune to the first available preset.

4Mode/Store button

Used for AM/FM mode. Press to cycle the tuning mode between Preset, Auto, and Manual modes. Pressing and holding the button will allow the current selected station frequency to be stored in the preset bank. First press and hold the button then use the ￿ ￿ or Preset buttons to select the preset location for the station to be stored to. Press the Mode/Store button again to confirm and store the preset.

Note: In ‘Store’ mode, if no button is pressed for a while, the unit will come out of ‘Store’ mode and the preset will not be saved.

5 Input source buttons (CD, BD/DVD, MP3/Aux, FM/AM, Phono)

Press the relevant source button to select the desired input source.

Note: The FM/AM source is built into the SR10. This button toggles between the FM mode and AM mode when pressed more than once.

6Preset buttons (1/6, 2/7, 3/8, 4/9, 5/10)

Used for AM/FM modes. The preset buttons are used to select user-stored station presets. Pressing a preset button once will select one of the first 5 preset, then pressing the same preset button again will toggle to the next preset (1 and then 6 for instance). These presets are stored separately for each waveband i.e. there are 10 for FM and 10 for AM press the FM/AM button to switch between bands and sets of 10 presets.

Note: As well as these 10 per band available directly from the front panel buttons a further 5 presets (11-15) per band can also be accessed by using the up/down buttons to cycle through all 15 presets.

7Display

9Menu button

Pressing this once will select the Bass option. Pressing a second time will select the Treble option and pressing a third time will select the Balance option. When one of these options is selected, the volume control will adjust the level. If nothing is pressed for a while, the source will be displayed and the volume control will go back to controlling the volume level.

10Infrared sensor

Receives IR commands from the supplied remote control. An unobstructed line of sight between the remote control and the sensor is required.

11Volume control

Use to increase or decrease the level of the sound from the outputs of the unit. This controls the volume level of the loudspeakers and headphones. It does not affect the level of the ‘Rec Out’ output. The volume control will also change the level of bass, treble and balance in the menu options.

12MP3 input socket

This source input allows you to connect a portable audio device such as an MP3 player directly into the front of the unit using a 3.5mm stereo-jack. Once plugged in, this input is automatically selected, although other inputs can still be selected once a stereo-jack is plugged in. The MP3/AUX button on the front of the unit will select this input whilst a stereo-jack is plugged in.

Note:

Plugging a source into the front panel MP3 input overrides the Aux input. Simply remove the jack from the front panel to automatically re-enable the Aux input.

Also note that as the output level of MP3 players tends to be quite low, the SR10 adds 10dB to the current volume setting when (and only when) the MP3 input is selected.

Used to display information such as the selected input source, volume and tone/balance levels. When the FM or AM tuner input is selected, the radio frequency or RDS station name will be displayed.

Note: When first purchased, the display will have a protective film over the top. Peel this off for a clear display.

6

Page 6
Image 6
Cambridge Audio SR10 user manual Front panel controls