Operating Instructions
DG470800CK
General Power Tool Safety Warnings
(Continued)
Save all warnings and instructions for future reference.
The term “power tool” in the warnings refers to your
Water entering a power tool will increase the risk of electric shock.
Do not abuse
the cord. Never use the cord for carry- ing, pulling or unplugging the power tool. Keep cord away from heat, oil, sharp edges or moving parts. Damaged or entangled cords increase the risk of electric shock.
• Double insulated tools are equipped |
with a polarized plug. This plug will |
fit in a polarized outlet one way only. |
If the plug does not fit fully in the |
outlet, reverse the plug. If it still does |
not fit, contact a qualified electrician |
to install a polarized outlet. Do not |
change the plug in any way. Double |
insulation eliminates the need for the |
Ensamblaje
(Continuacion)
Mientras la herramienta está encendida, puede presionar el botón Lock (bloqueo) que mantendrá la herramienta encendida cuando suelte el interruptor ON/OFF. Para apagar o desbloquear la rectificadora, simplemente presione el interruptor ON/OFF para soltar el botón de bloqueo.
power tool or
WORK AREA SAFETY
Keep work area clean and well lit. Cluttered or
dark areas invite accidents.
Do not operate power tools in explosive atmospheres, such as in the presence of flammable liquids, gases or dust. Power tools create sparks which may ignite the dust or fumes.
Keep children
and bystanders away while operating a power tool. Distractions can cause you to lose control.
Do not operate
the power tool near flammable materials. Sparks could ignite these materials.
ELECTRICAL SAFETY
Power tool plugs must match the outlet. Never modify the plug in any way. Do not use any adapter plugs with earthed (grounded) power tools. Unmodified plugs and matching outlets will reduce risk of electric shock.
Avoid body
contact with earthed or grounded sur- faces, such as pipes, radiators, ranges and refrigerators. There is an increased risk of electric shock if your body is earthed or grounded.
Do not expose power tools to rain or wet conditions.
When operat-
ing a power tool outdoors, use an extension cord suitable for outdoor use. Use of a cord suitable for outdoor use reduces the risk of electric shock.
If operat- ing a
power tool in a damp location is unavoidable, use a residual current device (GFCI) protected supply. Use of a GFCI reduces the risk of electric shock.
•Do not use accessories that require liquid coolants. Using water or other liquid coolants may result in electrocution or shock.
•Make sure cord is located so that it will not be stepped on, tripped over, or otherwise subjected to damage or stress.
•Do not use an extension cord unless absolutely necessary. Use of improper extension cord could result in a risk of fire and electric shock. If an extension cord must be used, make sure:
•That the size of the cord is at least as specified in chart titled “Minimum Wire Size (AWG) of Extension Cord for Grinder.”
•That the pins on plug of extension cord are the same number, size and shape as those of plug on power tools.
•That the extension cord is properly wired and in good electrical condition.
•If an extension cord is to be used outdoors it must be marked with the suffix
three wire grounded power cord and |
grounded power supply system. |
PERSONAL SAFETY
Stay alert,
watch what you are doing and use com- mon sense when operating a power tool. Do not use a power tool while you are tired or under the influence of drugs, alcohol or medication. A moment of inattention while operating power tools may result in serious personal injury.
Use personal protective equipment. Always wear eye protection. Protective equip-
ment such as dust mask,
Prevent uninten- tional starting. Ensure the switch is in
the
Remove any
adjusting key or wrench before turning the power tool on. A wrench or a key left attached to a rotating part of the power tool may result in personal injury.
Do not overreach. Keep prop- er footing and balance at all times. This enables better
control of the power tool in unexpect- ed situations.
Dress properly.
Do not wear loose clothing or jew- ellery. Keep your hair, clothing and
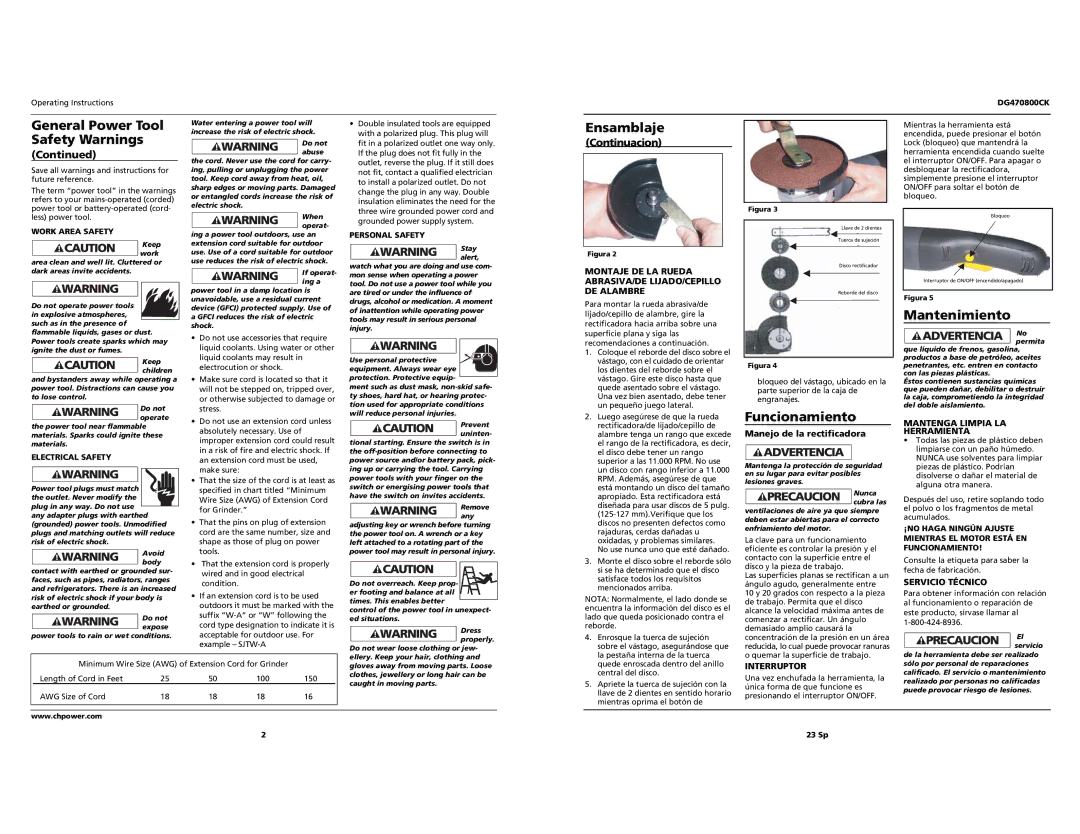
Figura 2
MONTAJE DE LA RUEDA ABRASIVA/DE LIJADO/CEPILLO DE ALAMBRE
Para montar la rueda abrasiva/de lijado/cepillo de alambre, gire la rectificadora hacia arriba sobre una superficie plana y siga las recomendaciones a continuación.
1.Coloque el reborde del disco sobre el vástago, con el cuidado de orientar los dientes del reborde sobre el vástago. Gire este disco hasta que quede asentado sobre el vástago. Una vez bien asentado, debe tener un pequeño juego lateral.
2.Luego asegúrese de que la rueda rectificadora/de lijado/cepillo de alambre tenga un rango que excede el rango de la rectificadora, es decir, el disco debe tener un rango superior a las 11.000 RPM. No use un disco con rango inferior a 11.000 RPM. Además, asegúrese de que está montando un disco del tamaño apropiado. Esta rectificadora está diseñada para usar discos de 5 pulg.
No use nunca uno que esté dañado.
3.Monte el disco sobre el reborde sólo si se ha determinado que el disco satisface todos los requisitos mencionados arriba.
NOTA: Normalmente, el lado donde se encuentra la información del disco es el lado que queda posicionado contra el reborde.
4. Enrosque la tuerca de sujeción |
sobre el vástago, asegurándose que |
la pestaña interna de la tuerca |
Figura 3
LlaveSpannerde 2 dientes
ClampTuerca de sujeciónNut
Disco rectificadorg Disc
DiscRebordeFlangedel disco
Figura 4
bloqueo del vástago, ubicado en la parte superior de la caja de engranajes.
Funcionamiento
Manejo de la rectificadora
Mantenga la protección de seguridad en su lugar para evitar posibles lesiones graves.
Nunca cubra las
ventilaciones de aire ya que siempre deben estar abiertas para el correcto enfriamiento del motor.
La clave para un funcionamiento eficiente es controlar la presión y el contacto con la superficie entre el disco y la pieza de trabajo.
Las superficies planas se rectifican a un ángulo agudo, generalmente entre
10 y 20 grados con respecto a la pieza de trabajo. Permita que el disco alcance la velocidad máxima antes de comenzar a rectificar. Un ángulo demasiado amplio causará la concentración de la presión en un área reducida, lo cual puede provocar ranuras o quemar la superficie de trabajo.
BloqueoLock
InterruptorON/OFFde ON/OFFSwitch(encendido/apagado)
Figura 5
Mantenimiento
No permita
que líquido de frenos, gasolina, productos a base de petróleo, aceites penetrantes, etc. entren en contacto con las piezas plásticas.
Éstos contienen sustancias químicas que pueden dañar, debilitar o destruir la caja, comprometiendo la integridad del doble aislamiento.
MANTENGA LIMPIA LA
HERRAMIENTA
•Todas las piezas de plástico deben limpiarse con un paño húmedo. NUNCA use solventes para limpiar piezas de plástico. Podrían disolverse o dañar el material de alguna otra manera.
Después del uso, retire soplando todo el polvo o los fragmentos de metal acumulados.
¡NO HAGA NINGÚN AJUSTE MIENTRAS EL MOTOR ESTÁ EN FUNCIONAMIENTO!
Consulte la etiqueta para saber la fecha de fabricación.
SERVICIO TÉCNICO
Para obtener información con relación al funcionamiento o reparación de este producto, sírvase llamar al
El servicio
de la herramienta debe ser realizado
Minimum Wire Size (AWG) of Extension Cord for Grinder
Length of Cord in Feet | 25 | 50 | 100 | 150 |
AWG Size of Cord | 18 | 18 | 18 | 16 |
gloves away from moving parts. Loose clothes, jewellery or long hair can be caught in moving parts.
quede enroscada dentro del anillo |
central del disco. |
5. Apriete la tuerca de sujeción con la |
llave de 2 dientes en sentido horario |
mientras oprima el botón de |
INTERRUPTOR
Una vez enchufada la herramienta, la única forma de que funcione es presionando el interruptor ON/OFF.
sólo por personal de reparaciones calificado. El servicio o mantenimiento realizado por personas no calificadas puede provocar riesgo de lesiones.
www.chpower.com
2 | 23 Sp |