Cámara HDV
Manuel d’instruction
Manual de Instrucciones
HDV Camcorder Caméscope HDV
Important Usage Instructions
Introduction
Important Safety Instructions
Example of Antenna Grounding AS
Enjoying High-Definition Video
What is High-Definition Video?
How to play back your HDV recordings?
What is the Cinema Mode?
Table of contents
External Connections
Editing Functions
Do’s and Don’ts
Additional Information
Trademark Acknowledgements
Trouble?
Conventions Used in the Manual
About this Manual
Introduction
Operation
Switch
About the Joystick and the Joystick Guide
About the Operating Modes
Receive information on new products and promotions
Supplied Accessories
Getting to Know the Camcorder
Introduction Protect your product
Left side view Right side view Front view
Components Guide
OPEN/EJECT
Back view Top view Bottom view
Getting to Know the Camcorder
DC in terminal
Pause
Wireless Controller WL-D87
Date Search
REW
Recording Movies Recording Still Images
Screen Displays
Recording program White balance Image effect
Remaining tape
Remaining battery charge
Card Access Display
Recording reminder
END Search Date Search
Playing Movies Viewing Still Images
Getting Started
Charging the Battery Pack
Disconnect the compact power adapter from the camcorder
Getting Started
Preparations
Charging, Recording and Playback Times
Use only commercially available miniSD cards
Inserting and Removing a Tape
Insert the cassette
Inserting and Removing a Memory Card
Preparing the Camcorder
Wireless Controller
Hold DISP. pressed down for more than 2 seconds
Adjusting the LCD Screen
You can also adjust the brightness of the LCD from the menu
LCD Backlight
Selecting an Option from the Setup Menus
Using the Menus
Selecting an Option from the FUNC. Menu
Changing the Language
First Time Settings
Changing the Time Zone
DATE/TIME JAN , 2007 1200 AM
Setting the Date and Time
DATE/TIME Setup
Select DATE/TIME Setup and press Select DATE/TIME and press
Recording Movies
Recording
Press Photo fully
Down, set Switch to
Recording Still Images
Holding the lock button pressed Basic
To zoom in telephoto
Speed 3 when Variable is selected
Zooming
10x Optical Zoom
Press / to begin the playback
Playback
Playing Back Movies
Press to rewind or to fast forward the tape
PLAY/OUT SETUP2 AV/PHONES AV
Adjusting the Volume Speaker and Headphones
Push the joystick toward + or to adjust the volume
Using Headphones
Returning to a Pre-marked Position
Locating the End of the Last Scene
Stop the playback before using this function
Press or on the wireless controller
Locating Scenes by Recording Date
Basic Functions
Viewing Still Images
Image Jump
Push the joystick or and hold it pressed down
Move the zoom lever toward T
Magnifying the Playback Image
Slideshow
Slideshow
FUNC. Menu Options
Menu Options Lists
LW FINE/1920x1080
FINE/640x480
SW FINE/848x480
Functions
Setup Menus
With Instant AF the autofocus
Normal AF
Dvnormal
Auto
OFF
HDV
2sec
NO, YES
CANCEL, INITIALIZE, COMPL.INIT
Normal TV
480i, 1080i/480i
AV, Phones
Advanced Functions
Settings for Video Output from the HDV/DV Terminal
Settings for Video Output from the Component OUT Terminal
Camera Data
Gridgry
OFF
Peaking
DEUTSCH, ENGLISH, ESPAÑOL, FRANÇAIS, ITALIANO, Polski
LOW VOLUME, OFF
Türkçe
Blurring other distracting Being underexposed Only Details
Using the Recording Programs
This mode to record Use this mode to record
Recording Programs
FUNC. Desired option
Only settings other than Cine Mode Mode switch
Icon of the currently selected
Recording Program
Portrait
Available Aperture Values
SHUTTER-PRIO.AE
APERTURE-PRIO.AE
Automatic Backlight Correction
Adjusting the Picture Exposure, Focus and Color
Adjusting the Picture Exposure, Focus and Color
Manual Exposure Adjustment
Manual Focus Adjustment
Press Focus . MF appears
Mode switch except for the Special Scene recording programs
Focus Assist Functions
White Balance
White Balance
Press FUNC. to save the setting and close the menu
Procedure below
Image Effects
Image Effect
Still Image Recording Options
Selecting the Size and Quality of Still Images
Still Image Recording Options
Image Quality/Size
Capturing a Still Image while Recording Movies
Still I.REC OFF
Capturing a Still Image from the Playback Picture
Light Metering Mode
Recording option
Press Photo
Automatic Focus Priority
Light Metering Mode
Camera Setup Focus PRI
ONAiAF Mode switch
SINGLE
Drive Mode
Mode switch except for Fireworks recording program
Continuous Shooting and Exposure Bracketing
Functions
Other Functions
On-Screen Displays
Selecting the Data Code
To OFF
Flash
Reading the Histogram Display
Pixel Count Shadows Highlights
Mini Video Light
Advanced accessory shoe, will appear on the screen
Press Light
Audio Recording Level
Self Timer
Camera Setup Self Timer
Manual Adjustment of the Audio Recording Level
Using an External Microphone
Adjust the audio level as necessary
Press to save the setting and hide the joystick guide
Display Setup Audio Level
Power supply. You can connect almost
Digital Effect
Setting
Applying
Erasing a Single Image
Still Image Options
Erasing Still Images
Protecting Still Images
Card Operations Initialize COMPL.INIT
Initializing the Memory Card
FUNC. Protect
Press Protect The image selection screen appears
HDV/DV Terminal
Connecting to a TV or VCR
Connection Diagrams
AV/ Terminal Component OUT Terminal
Hdmi cable Commercially available
High Definition TV Sets Hdtv
External Connections
Pin
Standard Definition TV Sets
Terminal on Connecting Cable Camcorder
DV Cable Pin Commercially available
Playback Turn on the camcorder and the connected TV or VCR
PLAY/OUT Setup menu option list
Connecting
Playback on a TV Screen
Recording to a VCR or Digital Video Recorder
Setting
Analog Line-In Recording
Press to stop recording Connected device Stop the playback
When the scene you wish to record appears, press
Digital Video Dubbing
While recording, press / to pause the recording
Connected devices
Copyright Signal
Analog/Digital Conversion
Converting the Video
Connecting to a TV or VCR
Open the LCD panel cover to access
Connecting to a Computer
PC Connection Diagrams
Connecting to a Computer
Transferring Video Recordings
Connecting Start the computer Set the camcorder to mode
Equipment and System Requirements
Pressing print/share
Install the supplied Digital Video Software
Set the auto-launch setting
Transferring Still Images Direct Transfer
Images are transferred and displayed on the computer
To cancel the transfer, select Cancel and press or press
Transfer Orders
Select a transfer option Press
Card Operations TRANS.ORD.ALL Erase
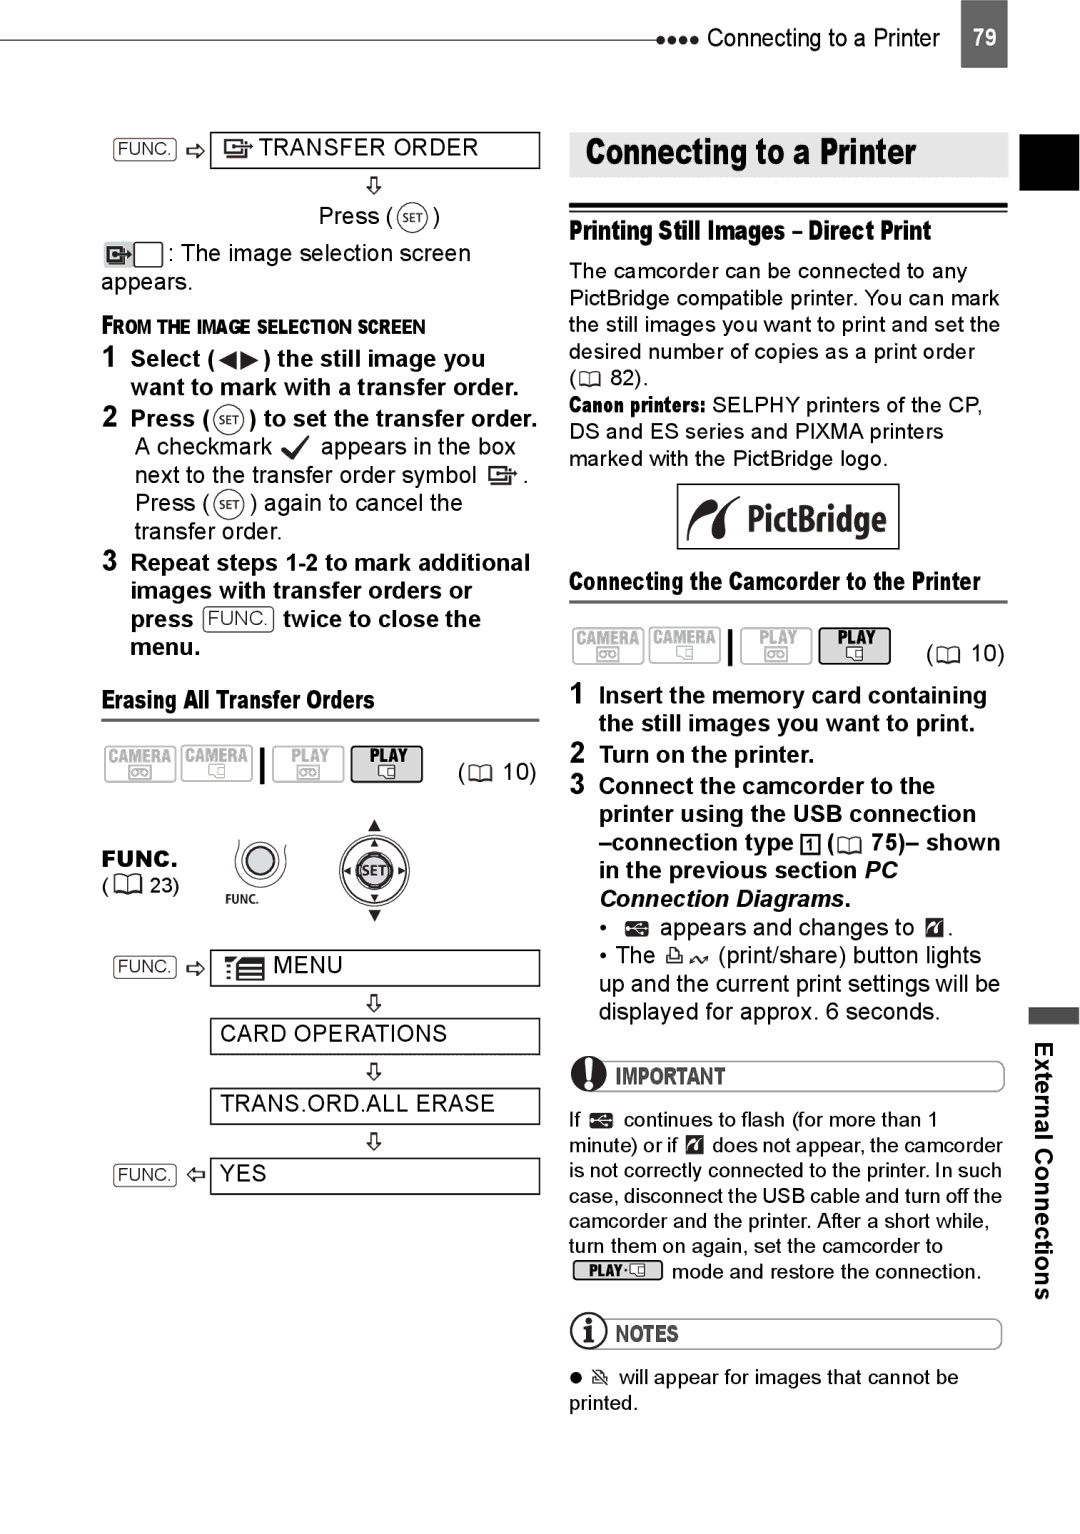
Connecting to a Printer
Printing Still Images Direct Print
FUNC. Transfer Order
Select the still image you wish to print Press
Selecting the Print Settings
Trimming settings 82 Paper settings
Printing with the Print/Share Button
16-UP1
Select the desired setting option and press
Select , Print and press
9- or
Change the size of the trimming frame
Trimming Settings
Print setting menu Select , Trimming and press
Print Orders
Erasing All Print Orders
Printing the Still Images Marked with Print Orders
Select Print and press
Make sure that Print is selected and press
Trouble?
Troubleshooting
Power Source
Problem Solution
SET the Time ZONE, Date
Additional Information
Stop playback/dubbing Camcorder is connected
When connecting the camcorder to an Hdtv using
Specification for the COMP.OUT setting
Input Video heads are dirty. Clean the video heads
Others
Memory Card Operation Problem
Printing
Editing
List of Messages
Message Explanation/Solution
Direct Print Related Messages
Paper Lever Error
Readjust Trimming
Printer Error
Hardware Error
Camcorder
Handling Precautions
Battery Pack
Treat the battery pack with care
Protecting Tapes from Accidental Erasure
About the battery terminal cover
Cassette
Memory Card
Built-in Rechargeable Lithium Battery
Lithium Button Battery
Hours with the switch set to
Storage
Maintenance/Others
Cleaning the Video Heads
Cleaning the Camcorder
Power Sources
Using the Camcorder Abroad
Playback on a TV Screen
General Information
System Diagram Availability differs from area to area
Use of genuine Canon accessories is recommended
Optional Accessories
Battery Packs
CB-2LW Battery Charger
VL-3 Video Light
WD-H43 Wide-converter
FS-43U/FS-43U II Filter Set
VFL-1 Video Flash Light
WS-20 Wrist Strap
Shoulder Strap
SC-2000 Soft Carrying Case
CTC-100 Component Cable 1719B001AA
Provided Accessories
Optional Accessories
Product Codes
Memory Card
Specifications
HV20
System
Input/Output Terminals
CA-570 Compact Power Adapter
BP-2L13 Battery Pack
Power/Others
HDV/DV terminal Headphones High-speed continuous shooting
End Search Erasing still images Error messages
Index
Night recording program Normal TV 43
USB terminal
Additional Information
106
Canada
Canon INC Canon U.S.A., INC. NEW Jersey Office


 TRANSFER ORDER
 )
) : The image selection screen appears.