Citrix NetScaler Hardware Installation and Setup Guide
Copyright and Trademark Notice
Contents
Preparing for Installation
Lights Out Management Port of the NetScaler Appliance
Contents
Formatting Conventions for NetScaler Documentation
This Preface
Formatting Conventions Meaning Boldface
Documentation Available on the NetScaler Appliance
Convention Meaning
To view the documentation
Getting Service and Support
NetScaler Documentation Feedback
To provide feedback at the Knowledge Center home
Preface
Introduction to the Hardware Platforms
Topics
Booting Screen
Common Hardware Components
LCD Display
Startup Screen
LCD Startup Screen Out-of-Service Screen
Http Statistics Screen
LCD Http Statistics Screen Network Traffic Statistics Screen
10.Port Information for a 10-port Appliance
Row abbreviation/symbol Indicates
Ports
RS232 Serial Port
Copper Ethernet Ports
Management Ports
1G SFP, 10G SFP+, and XFP Ports
Copper 1G SFP Distance Specifications
Short Reach Fiber 1G SFP Distance Specifications
1G Pluggable Media
Pack
Single
Long Reach Fiber 1G SFP Distance Specifications
Short Reach Fiber 10G SFP+ Distance Specifications
GE Pluggable Media
Short Reach XFP 10G Distance Specifications
10.Long Reach Fiber 10G SFP+ Distance Specifications
11.Long Reach Fiber XFP 10G Distance Specifications
LED Port-Status Indicators
Description Products
Introduction to the Hardware Platforms
Port Type LED Location LED Function LED Color LED Indicates
Power Supply
Field Replaceable Units
Power Supply Type LED Color LED Indicates
Amber
Replacing an AC Power Supply
Replacing a DC Power Supply
13.Removing the Existing DC Power Supply
CompactFlash Card
Replacing a CompactFlash Card
15.Removing the Existing CompactFlash Card
Solid-State Drive
To replace a solid-state drive
Shutdown -p now
17.Removing the Existing Solid-State Drive
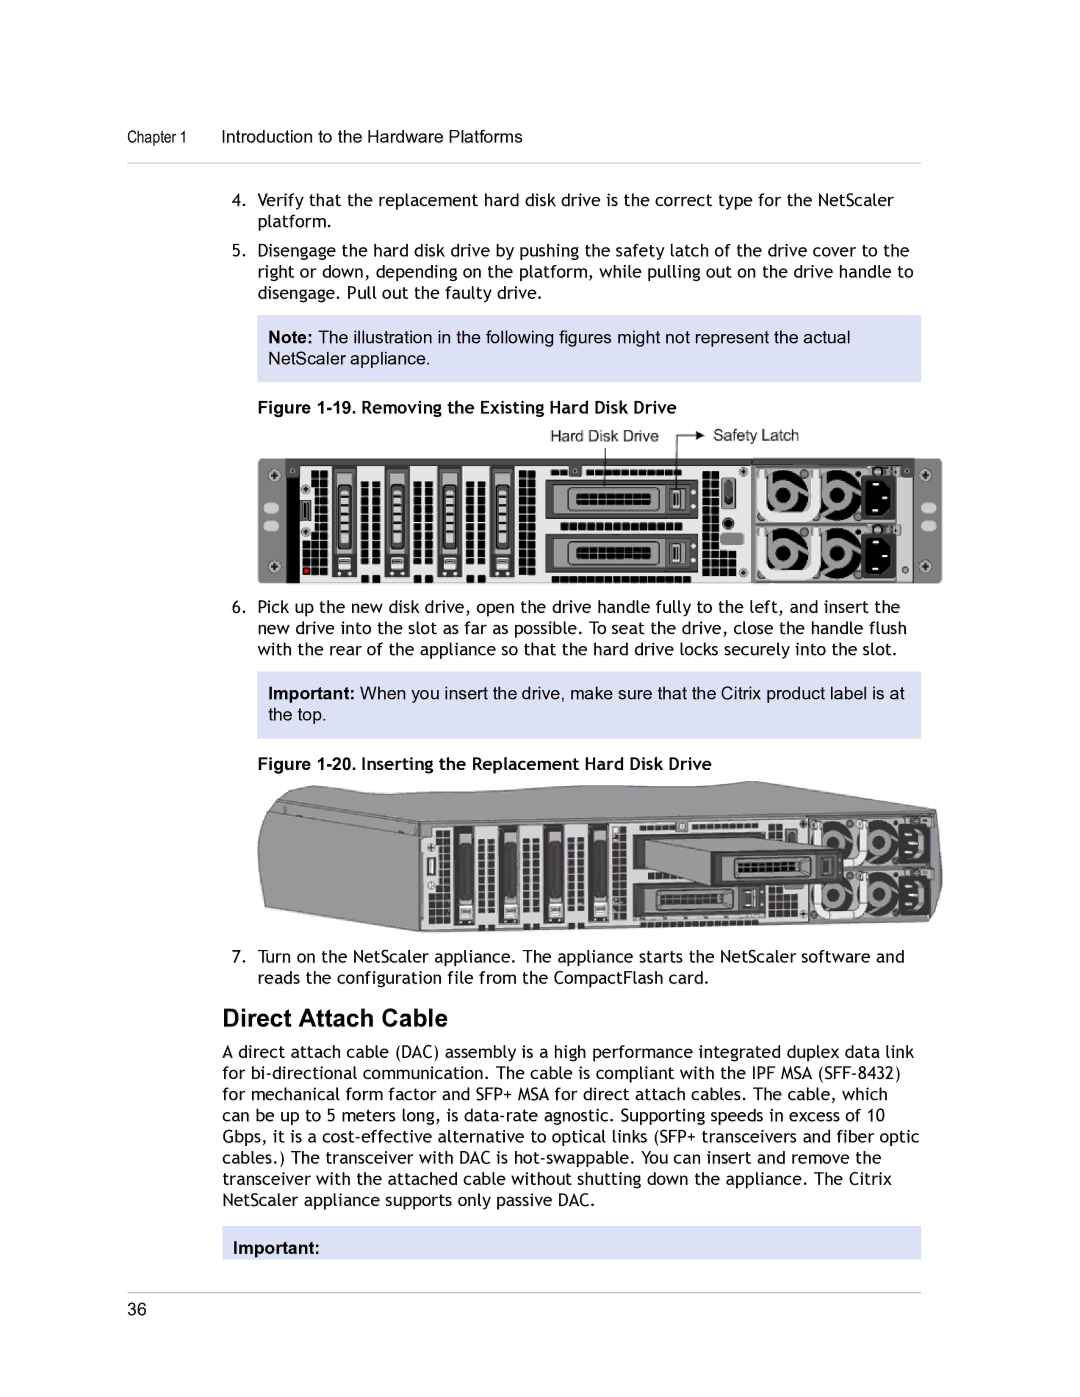
To install a hard disk drive
Hard Disk Drive
Direct Attach Cable
19.Removing the Existing Hard Disk Drive
To install or remove a direct attach cable
21.Inserting a DAC into the 10G port
Hardware Platforms
Citrix NetScaler 9010 Fips
Citrix NetScaler 12000-10G
25.Citrix NetScaler 9010 Fips appliance, back panel
26.Citrix 12000-10G appliance, front panel
Citrix NetScaler MPX
28.Citrix NetScaler MPX 5500, front panel
Citrix NetScaler MPX 5550 and MPX
29.Citrix NetScaler MPX 5500, back panel
Citrix NetScaler MPX 7500 and MPX
31.Citrix NetScaler MPX 5550/5650 appliance, back panel
34.Citrix NetScaler MPX 7500/9500, back panel
Citrix NetScaler MPX 8200, MPX 8400, MPX 8600, and MPX
Introduction to the Hardware Platforms
Citrix NetScaler MPX 9700, MPX 10500, MPX 12500, and MPX
38.Citrix NetScaler MPX 9700/10500/12500/15500, front panel
Introduction to the Hardware Platforms
Page
Introduction to the Hardware Platforms
Citrix NetScaler MPX
44.Citrix NetScaler MPX 15000 appliance, front panel
Citrix NetScaler MPX
Citrix NetScaler MPX 17500, MPX 19500, and MPX
47.Citrix NetScaler MPX 17000 appliance, back panel
Citrix NetScaler Hardware Installation and Setup Guide
Citrix NetScaler MPX 17550, MPX 19550, MPX 20550, and MPX
Citrix NetScaler Hardware Installation and Setup Guide
Introduction to the Hardware Platforms
Summary of Hardware Specifications
16.Standard Platform Summary Fips 12000-10G
Fips 12000-10G
17.MPX Platform Summary MPX 5550/MPX MPX 7500/MPX 5650 9500
8x10/100/1000B
Ase-T copper
Citrix NetScaler Hardware Installation and Setup Guide
MPX MPX 5550/MPX MPX 7500/MPX 5650
18.MPX Platform Summary contd MPX 8200/MPX MPX 9700/MPX
Ten network 6x1G SFP +
Port model 6x10/100/1000
MPX MPX 8200/MPX MPX 9700/MPX
10G and Fips
2x10G SFP+ 6x10/100/1000 Base-T copper Ethernet model
Four network 2x10G SFP+ 10G and Fips
UL & TUV-C CSA
19.MPX Platform Summary contd MPX 17500/MPX
MPX 22040/MPX
12x1G SFP + 24x10G
SFP+ model
TUV CSA
MPX
Introduction to the Hardware Platforms
Preparing for Installation
Unpacking the Appliance
Preparing the Site and Rack
Site Requirements
Rack Requirements
Electrical Safety Precautions
Space requirements
Appliance Precautions
Rack Precautions
Installing the Hardware
Rack Mounting the Appliance
Platform Number of rack units
To remove the inner rails from the rail assembly
To attach the inner rails to the appliance
To install the rack rails on the rack
Attaching inner rails
To install the appliance in the rack
Installing the Rail Assembly to the Rack
Installing and Removing 1G SFP Transceivers
Rack Mounting the Appliance
To install a 1G SFP transceiver
Installing a 1G SFP transceiver
Installing and Removing XFP and 10G SFP+ Transceivers
To remove a 1G SFP transceiver
To install an XFP/10G SFP+ transceiver
To remove an XFP/10G SFP+ transceiver
Locking an XFP transceiver
Connecting the Cables
Connecting the Ethernet Cables
Connecting the Console Cable
Connecting the Power Cable
To connect the console cable to a computer or terminal
Switching on the Appliance
To switch on the appliance
To connect the appliance to the power source
11.Power switch on back panel
Initial Configuration
Using the LCD Keypad
LCD Key Functions
Using the NetScaler Serial Console
To configure initial settings by using a serial console
Reboot Example
Citrix NetScaler
Citrix Application Firewall
Using the Setup Wizard
To configure initial settings by using the Setup Wizard
Access Gateway
Using Dhcp for Initial Access
Prerequisites
Sample Dhcp configuration dhcpd.conf
Killall dhcpd dhcpd
To find the Snip address from the NetScaler console
To find the Snip address from the Dhcp server
Using Dhcp When a Configuration File is Present
Accessing a NetScaler by Using SSH Keys and No Password
At the shell prompt, change the directory to /nsconfig/ssh
Changing the Administrative Password
Example
Lights Out Management Port NetScaler Appliance
Accessing the LOM Port by using a Web Browser
Configuring the LOM Port
To Configure the NetScaler LOM Port
To access the LOM by using a web browser
Power Cycling the Appliance
Accessing the Appliance by using the Access Console
To power cycle the appliance
Performing a Core Dump
Obtaining Properties of the Host
Obtaining Health Monitoring Information
Under Options, click Console Redirection
To obtain health monitoring information
Power Control Operations using the LOM Port
To perform power control operations
Lights Out Management Port of the NetScaler Appliance 108
To migrate a configuration
To migrate a configuration