GIID __ ...

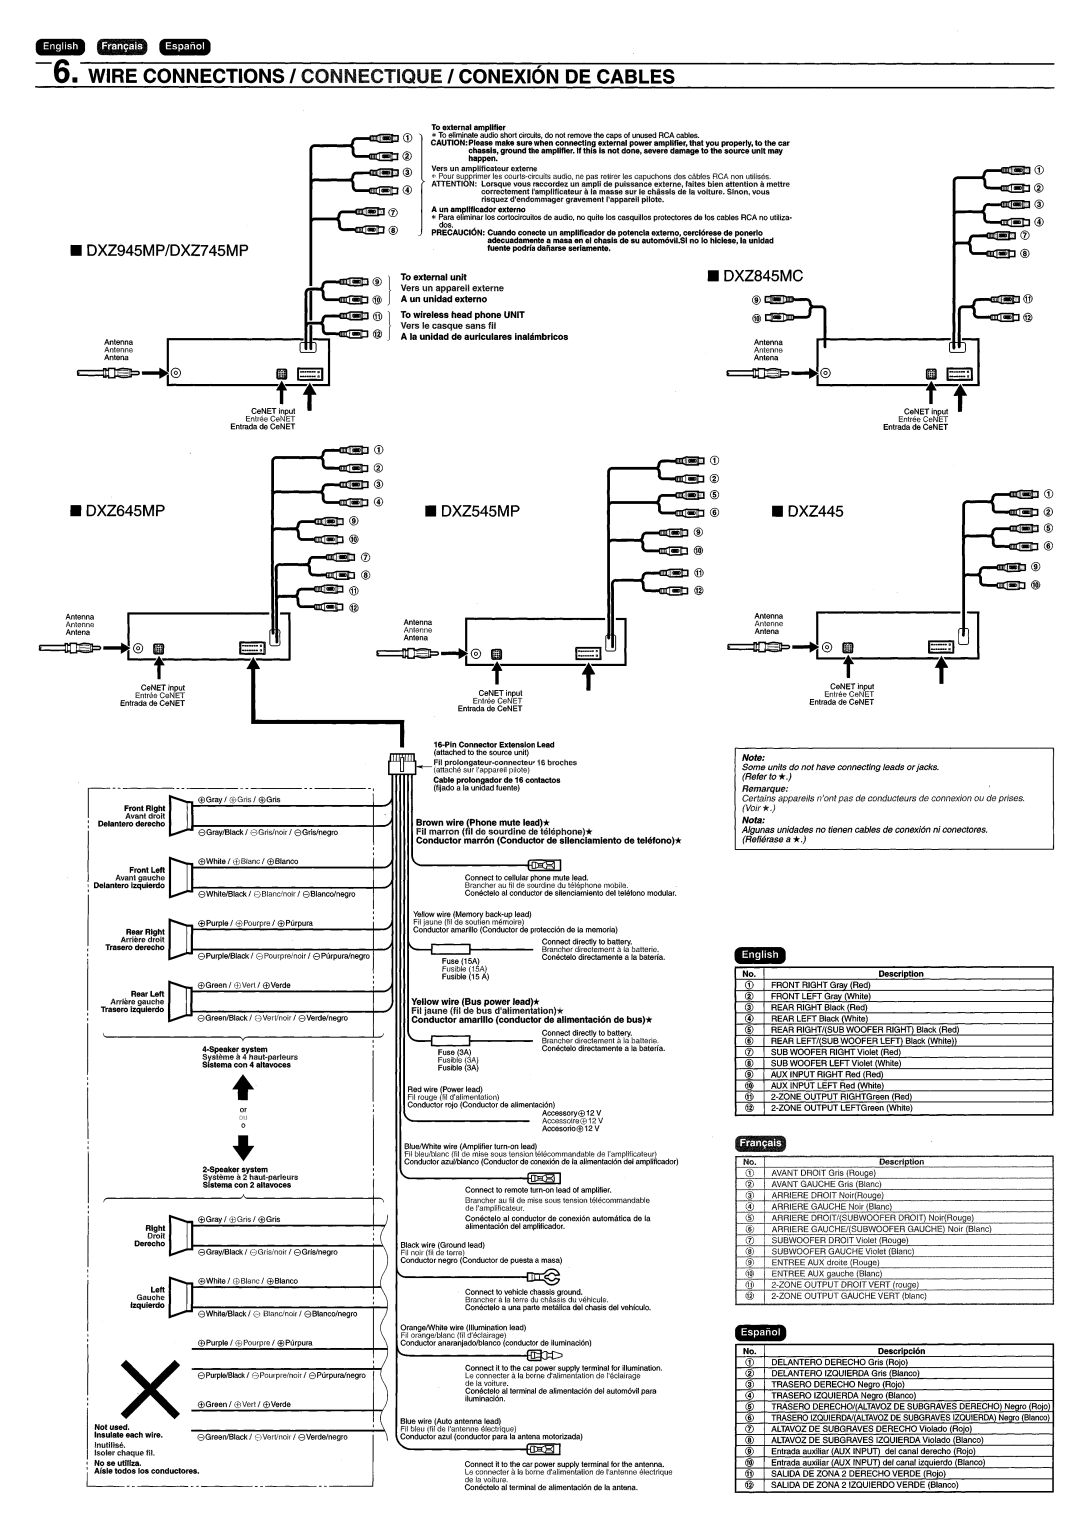
-6. WIRE CONNECTIONS I CONNECTIQUE I CONEXION DE CABLES


To external amplifier


...

®

*To eliminate audio short circuits, do not remove the caps of unused RCA cables.


CAUTION: Please make sure when connecting external power amplifier, that you properly, to the car


®

happen.


chassis, ground the amplifier. If this is not done, severe damage to the source unit may


••

®

Vers un amplificateur externe


" Pour supprimer les courts-circuits audio, ne pas retlrer les capuchons des cables RCA non utilises.


...

@

ATTENTION: Lorsque vous raccordez un ampli de puissance externe, laltes bien attention Ii mettre


correctement I'amplificateurIi la masse sur Ie chilssis de la voiture. Sinon. vous


risquez d'endommagergravement I'appareilpilote.


®


A un ampllficador externo


* Para ehminar los cortocircuitos de audio. no quite los casquillos protectores de los cables RCA no utiliza-


...

®


dos.


PRECAUCI6N: Cuando conecte un amplificador de potencla externo, cerciorese de ponerlo


.DXZ945MP/DXZ745MP


adecuadamente a mase en el chasls de su automovil.SI no 10 hiclese, la unldad


fuente podrla daiiarse seriamente.


_


To external unit


.DXZ845MC


Vers un appareil externe


®


A un unidad externo


To wireless head phone UNIT

@ ...


~~1VersA la unidadIe casquede auricularessans til

inalambricos


AntennaAntenne

I

__

~


AntennaAntenna

Antena


Antena

,-oIIIICE!!!IIlJ@

'--'lIIIIl...!!tI@

~

~~®

,

1:::::1

nDa=»

II 1::::::1


CeNET input

f

L..-------C-e-N-ETtput

f


Entree CeNET


Entree CeNET


Entrada de CeNET


Entrada de CeNET


®


:....


G)


®®

...

®


~oCIIII!illj~®

...


@

®

.DXZ445

...

®

• DXZ645MP


.DXZ545MP

...

®

®


®


®

@


...

®

®

...

@


...

®

...

@


@


@


AntennaAntenne I


@


~

AntennaAntenne I

~

Antena


f---f


Antena


nooJP---+j®

CeNET input

Entree CeNET

Entrada de CeNET

I"-Front Right

EEl Gray I C£,Gris I EElGris

I

Avant droit


Delantero derecho

8Gray/BIack I ,'C)Gris/noirI 8Grls/negro


Front Left

EElWhite I (£) BianG I EElBlanco


Avant gauche


Delantero Izquierdo

8 White/Black I () Blanc/noir I 8 Blanco/negro


Rear Right

EElPurple I (t)Pourpre / EEl Purpura


CeNET input

Entree CeNET

Entrada de CeNET

16-Pin Connector Extension Lead (attached to the source unit)

Fil prolongateur-connecteu'16 broches (attache sur i'apparsilpliote)

Cable prolongador de 16 contactos (fijado a la unidad luente)

Brown wire (Phone mute lead)*

Fil marron (1i1 de sourdine de telepl1one)*

Conductor marr6n (Conductor de sllenclamiento de teh~1ono)*

Connect to cellular phone mute lead.

Brancher au fii de sourdine du telephone mobile.

Conectelo al conductor de silenciamiento del telelono modular.

Yellow wire (Memory back-up lead) Fil jaune (Iii de soutien memoire)

Conductor amarillo (Conductor de proteccion de la memoria)

Note:

Some units do not have connecting leads orjacks. (Refer to *.)

Remarque:

Certains appareils n'on! pas de condllcteurs de connexion Oll de prises. (Voir 1<.)

Nota:

Algunas unidades no tienen cables de conexi6n ni conectores. (Refierase a *.)

Arrlere droit

Trasero derecho

8Purpie/BIack / 8 Pourpre/noir / 8 Purpura/negro

EEl Green / (i)Vert / (i)Verde

Fuse (15A)

Fusible (15A)

Fusible (15 A)

Connect directly to battery. Brancher directement ala baUerie. Conectelo directamente a la baterla.

No.Description

(IJ FRONT RIGHT Gray (Red)

Rear Left

Arrlere gauche

Trasero izqulerdo

8Green/Black/ OVert/noir / 8Verde/negro

Yellow wire (Bus power lead)*

Fil jaune (fil de bus d'allmentation)*

Conductor amarillo (conductor de alimentaci6n de bus)*

®

FRONT LEFT Gray (White)

®

REAR RIGHT Black (Red)

@

REAR LEFT Black (White)

@

REAR RIGHT/(SUB WOOFER RIGHT) Black (Red)

4·Speakersystem

Systeme a4 haut-parleurs

Sistema con 4 altavoces

Fuse (3A)

Fusible (3A)

Fusible (3A)

Connect directly to battery. Brancher dir9ctement ala batterie. Conectelo directamente a la baterla.

®

REAR LEFT/(SUB WOOFER LEFT) Black (White»

(j) SUB WOOFER RIGHT Violet (Red)

@ SUB WOOFER LEFT Violet (White)

®

AUX INPUT RIGHT Red (Red)

@l AUX INPUT LEFT Red (White)


or


o


2·Speakersystem


+


Systeme a2 haut-parleurs


Sistema con 2 altavoces


r----EEl Gray / (i)Gris I EElGris


Right


II


: (


DerechoDroit


~ 8Gray/Black I

(';)GrisinoirI 8Grislnegro

!


Left

r----EElWhite / CD Blanc / EElBlanco


IzquierdoGauche


II


:\


.......... 8White/Black / Cl Blandnoir I 8Blanco/negro

(


Not used.X

EElPurple / CfJPourpre I EEl Purpura


,)


8 Purple/Black / (ee) Pourpre/nair / 8Purpura/negro

)


EElGreen / (DVerl / EElVerde


, (


Insulate each wire.


8Green/BIack / ()Vert/noir / 8 Verde/negro


inutilise.


--~


Isoler chaque m.


,

No se utlllza.


i

AIsle tOd~~ los conductor~s~

_


Red wire (Power lead)

Fil rouge (Iii d'alimentation)

Conductor rojo (Conductor de alimentacion)

AccessoryEEl12 V

Accessoire (tl 12 V

AccesorioEEl12 V

BluelWhite wire (Amplifier turn-on lead)

Fil bieu/blfJl1C (n; de mise sous tension telecommandable de i'amplilicateur) Conductor azul/blanco (Conductor de conexion de la alfmentacion del ampliflcador)

Connect to remote turn-on lead 01 amplilier.

Brancher au Iii de mise saus tension telecommandabie de I'amplificateur.

Conectelo al conductor de conexion automatlca de la alimentacion del amplificador.

Black wire (Ground lead)

Fil noir (fil de terre)

Conductor negro (Conductor de puesta amasa)

Connect to vehicle chassis ground.

Brancher a Ie terre du chassis du vehlcule.

Conectelo a una parte metalfca del chasis del vehfculo.

OrangelWhile wire (Illumination lead)

Fil omn(Jeiblanc (iii d'eclairage)

Conductor anaranjado/blanco (conductor de i1uminacion)

Connect it to the car power supply terminal for illumination. La connecter ala borne d'alimentationde I'eclairage

de ia vaiture.

Conectelo al terminal de alimenlacion del automovil para

iluminaci6n.

Blue wire (Auto antenna lead)

Fil blau (fil de I'antennaelactrique)

Conductor azul (conductor para la antena motorizada)

Connect It to the car power supply terminal lor the antenna.

La connecter aIe borne d'alimentationde l'antenneelectrlque

de Ja voiture,

Conectelo al terminal de alimentacion de la antena.

@

2-Z0NE

OUTPUT RIGHTGreen (Red)

@

2-Z0NE

OUTPUT LEFTGreen (White)

No.

Descripcion

(IJ

DELANTERO DERECHO Gris (Rojo)

®DELANTERO IZQUIERDA Gris (Blanco)

®TRASERO DERECHO Negro (Rojo)

@TRASERO IZQUIERDA Negro (Blanco)

@TRASERO DERECHO/(ALTAVOZ DE SUBGRAVES DERECHO) Negro (Rojo)

®TRASERO IZQUIERDAI(ALTAVOZ DE SUBGRAVES IZQUIERDA) Nearo (Blanco)

(j)ALTAVOZ DE SUBGRAVES DERECHO Violado (Rojo)

®ALTAVOZ DE SUBGRAVES IZQUIERDA Violado (Blanco)

®Entrada auxiliar (AUX INPUT) del canal derecho (Rojo) @l Entrada auxiliar (AUX INPUT) del canal IZQuierdo (Blanco)

@ SALIDA DE ZONA 2 DERECHO VERDE (Roio)

@ SALIDA DE ZONA 2 IZQUIERDO VERDE (Blanco)

Page 37
Image 37
Clarion DXZ645MP owner manual Giid, OIIIICE!!!IIlJ@

DXZ645MP specifications

The Clarion DXZ645MP is a versatile and feature-rich car audio receiver that stands out in the crowded field of automotive sound systems. Designed for those who appreciate high-quality audio, this model combines various technologies and user-friendly characteristics, making it an attractive option for music enthusiasts.

One of the standout features of the DXZ645MP is its advanced MP3/WMA playback capabilities. This allows users to enjoy their favorite digital music formats with ease. The unit is equipped with a front-panel USB input, enabling direct connection of USB drives, which offers a convenient way to access extensive music libraries while driving. Additionally, the inclusion of a CD player ensures compatibility with traditional media formats, catering to diverse listening preferences.

The DXZ645MP boasts an impressive 4 x 50 watts of peak power output, which means that the audio experience is both powerful and clear. It supports multiple audio adjustments, including a 3-band parametric equalizer and built-in electronic crossover. This allows users to fine-tune their sound settings based on personal preferences or the acoustics of their vehicle.

Clarion has incorporated various technologies to enhance audio clarity and performance in the DXZ645MP. The unit features high-pass and low-pass filters that help in eliminating unwanted frequencies, contributing to a more balanced audio output. In addition, it has a subwoofer output, which can be connected to an external amplifier, enabling users to enhance the bass experience even further.

For convenience, the DXZ645MP is designed with a detachable faceplate, providing security on the go. The bright display is easy to read, even in direct sunlight, ensuring visibility during driving. The user interface is intuitive, allowing drivers to navigate through music options without distractions.

Moreover, the receiver is compatible with iPods and other external devices, providing even more entertainment options. The radio tuner supports AM/FM bands, with presets that allow users to save their favorite stations for quick access.

In summary, the Clarion DXZ645MP offers a blend of advanced features and user-friendly characteristics, making it an excellent choice for anyone looking to upgrade their car audio experience. With its robust performance, flexible playback options, and sound customization capabilities, this receiver delivers an impressive listening experience for all road trips and daily commutes.