| | Negro |
CD Changer (Sold separately) | Vehicle side antenna terminal | Antenna input |
Borne d’antenne côté véhicule |
Changeur CD (Vendu séparément) | Terminal de la antena al lado del veh’culo | Entrée d’antenne |
Cambiador de discos compactos (Vendido separadamente) | Entrada de la antena |
13 pin
13 broches
13 patillas
13 pin C-BUS cable | Black |
Câble d’ C-BUS à 13 broches | Noir |
Cable de C-BUS de 13 patillas | Negro |
| Display Unit | 8 pin |
| 8 broches |
| Unité d’affichage |
| 8 patillas |
| Unidad del visualizador |
| |
Black
Noir
Negro
Ground cable
Connect to a metal part of the vehicle.
Câble de masse
Raccordez à une partie métallique du véhicule.
Cable de masa
Conectar a una parte metálica del veh’culo.
Accessories power cable
Connect this to the terminal that supplies the power when the ignition key is at ACC-ON.
Câble d’alimentation des accessoires
Raccordez ce câble à la borne qui fournit le courant lorsque la clé de contact est en position ACC-ON.
Cable de alimentación eléctrica de accesorios
Conecte este cable al terminal que suministra electricidad cuando la llave de contacto está en la posición ACC-ON (Accesorio-En cendido).
13pin 13 broches 13 patillas
Black
Noir
Negro
Red
Rouge
Rojo
Fuse (3A)
Fusible (3A)
Fusible (3A)
Yellow
Jaune
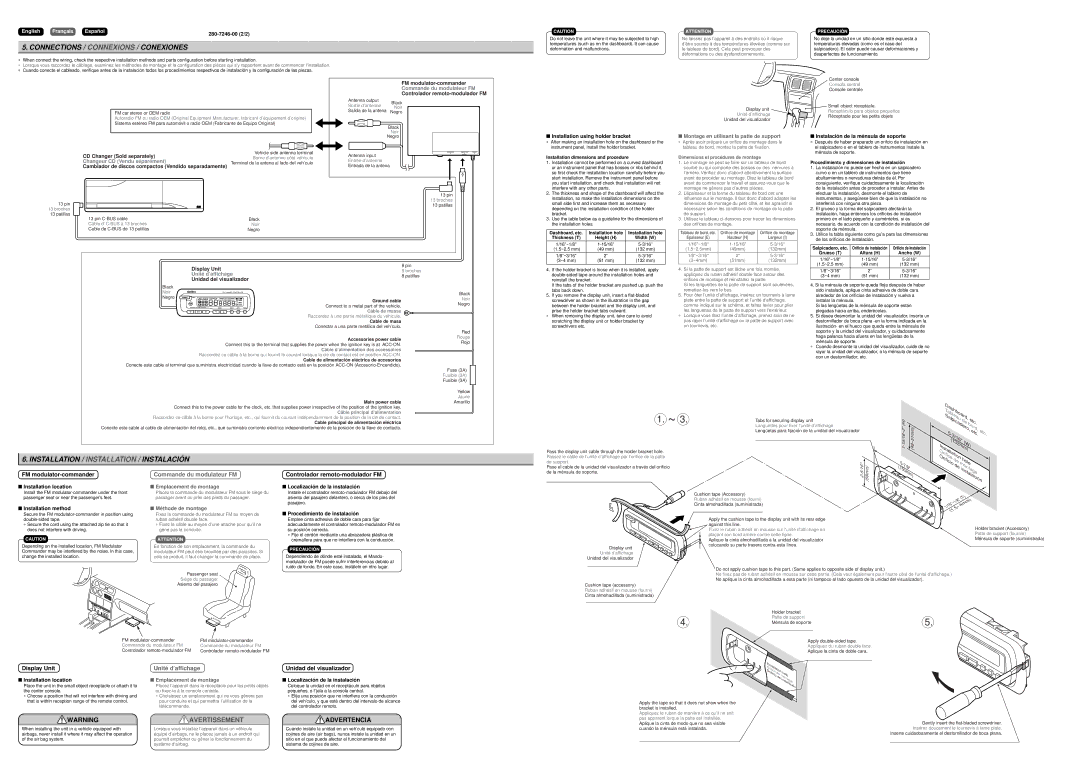
■Installation using holder bracket
∗After making an installation hole on the dashboard or the instrument panel, install the holder bracket.
Installation dimensions and procedure
1.Installation cannot be performed on a curved dashboard or an instrument panel that has bosses or ribs behind it, so first check the installation location carefully before you start installation. Remove the instrument panel before you start installation, and check that installation will not interfere with any other parts.
2.The thickness and shape of the dashboard will affect the installation, so make the installation dimensions on the small side first and increase them as necessary depending on the installation condition of the holder bracket.
3.Use the table below as a guideline for the dimensions of the installation holes.
Dashboard, etc. | Installation hole | Installation hole |
Thickness (T) | Height (H) | Width (W) |
1/16”~1/8” | 1-15/16” | 5-3/16” |
(1.5~2.5 mm) | (49 mm) | (132 mm) |
| | |
1/8”~3/16” | 2” | 5-3/16” |
(3~4 mm) | (51 mm) | (132 mm) |
| | |
4.If the holder bracket is loose when it is installed, apply double-sided tape around the installation holes and reinstall the bracket.
If the tabs of the holder bracket are pushed up, push the tabs back down.
5.If you remove the display unit, insert a flat-bladed screwdriver as shown in the illustration in the gap
between the holder bracket and the display unit, and prise the holder bracket tabs outward.
∗When removing the display unit, take care to avoid scratching the display unit or holder bracket by screwdrivers etc.
■Montage en utilisant la patte de support
∗ Après avoir préparé un orifice de montage dans le tableau de bord, montez la patte de fixation.
Dimensions et procédures de montage
1.Le montage ne peut se faire sur un tableau de bord courbé ou qui comporte des bosses ou des nervures à l’arrière. Vérifiez donc d’abord attentivement la surface avant de procéder au montage. Otez le tableau de bord avant de commencer le travail et assurez-vous que le montage ne gênera pas d’autres pièces.
2.L’épaisseur et la forme du tableau de bord ont une influence sur le montage. Il faut donc d’abord adapter les dimensions de montage du petit côté, et les agrandir si nécessaire selon les conditions de montage de la patte de support.
3.Utilisez le tableau ci-dessous pour tracer les dimensions des orifices de montage.
Tableau de bord, etc. | Orifice de montage | Orifice de montage |
Epaisseur (E) | Hauteur (H) | Largeur (l) |
| | |
1/16"~1/8" | 1-15/16" | 5-3/16" |
(1.5~2.5mm) | (49mm) | (132mm) |
| | |
1/8"~3/16" | 2" | 5-3/16" |
(3~4mm) | (51mm) | (132mm) |
| | |
4.Si la patte de support est lâche une fois montée, appliquez du ruban adhésif double face autour des orifices de montage et réinstallez la patte.
Si les languettes de la patte de support sont soulevées, remettez-les vers le bas.
5.Pour ôter l’unité d’affichage, insérez un tournevis à lame plate entre la patte de support et l’unité d’affichage,
comme indiqué sur le schéma, et faites levier pour plier les languettes de la patte de support vers l’extérieur.
∗Lorsque vous ôtez l’unité d’affichage, prenez soin de ne pas rayer l’unité d’affichage ou la patte de support avec un tournevis, etc.
■Instalación de la ménsula de soporte
∗Después de haber preparado un orifcio de instalación en el salpicadero o en el tablero de instrumentos instale la ménsula de soporte.
Procedimiento y dimensiones de instalación
1.La instalación no puede ser hecha en un salpicadero curvo o en un tablero de instrumentos que tiene abultamientos o nervaduras detrás de él. Por consiguiente, verifique cuidadosamente la localización de la instalación antes de proceder a instalar. Antes de efectuar la instalación, desmonte el tablero de instrumentos, y asegúrese bien de que la instalación no interferirá con ninguna otra pieza
2.El grueso y la forma del salpicadero afectarán la instalación, haga entonces los orificios de instalación primero en el lado pequeño y auméntelos, si es necesario, de acuerdo con la condición de instalación del soporte de ménsula.
3.Utilice la tabla siguiente como gu’a para las dimensiones de los orificios de instalación.
Salpicadero, etc. | Orificio de instalación | Orificio de instalación |
Grueso (T) | Altura (H) | Ancho (W) |
1/16”~1/8” | 1-15/16” | 5-3/16” |
(1.5~2.5 mm) | (49 mm) | (132 mm) |
1/8”~3/16” | 2” | 5-3/16” |
(3~4 mm) | (51 mm) | (132 mm) |
4.Si la ménsula de soporte queda floja después de haber sido instalada, aplique cinta adhesiva de doble cara alrededor de los orificios de instalación y vuelva a instalar la ménsula.
Si las lengüetas de la ménsula de soporte están plegadas hacia arriba, enderécelas.
5.Si desea desmontar la unidad del visualizador, inserte un destornillador de boca plana -en la forma indicada en la ilustración- en el hueco que queda entre la ménsula de soporte y la unidad del visualizador, y cuidadosamente haga palanca hacia afuera en las lengüetas de la
ménsula de soporte.
∗Cuando desmonte la unidad del visualizador, cuide de no rayar la unidad del visualizador, o la ménsula de soporte con un destornillador, etc.
double-sided tape. |
∗ Secure the cord using the attached zip tie so that it |
does not interfere with driving. |
CAUTION
Depending on the installed location, FM Modulator Commander may be interfered by the noise. In this case, change the installed location.
ruban adhésif double face. |
∗ Fixez le câble au moyen d’une attache pour qu’il ne |
gêne pas la conduite. |
ATTENTION
En fonction de son emplacement, la commande du modulateur FM peut être brouillée par des parasites. Si cela se produit, il faut changer la commande de place.
Emplee cinta adhesiva de doble cara para fijar |
adecuadamente el controlador remoto-modulador FM en |
su posición correcta. |
∗ Fije el cordón mediante una abrazadera plástica de |
cremallera para que no interfiera con la conducción. |
PRECAUCIÓN
Dependiendo de dónde esté instalado, el Mando- modulador de FM puede sufrir interferencias debido al ruido de fondo. En este caso, instálelo en otro lugar.
Display unit Unité d’affichage Unidad del visualizador
Apply the cushion tape to the display unit with its rear edge against this line.
Fixez le ruban adhésif en mousse sur l'unité d'affichage en plaçant son bord arrière contre cette ligne.
Aplique la cinta almohadillada a la unidad del visualizador colocando su parte trasera contra esta línea.
Holder bracket (Accessory) Patte de support (fournie) Ménsula de soporte (suministrada)
Display Unit
■Installation location
Place the unit in the small object receptacle or attach it to the center console.
∗Choose a position that will not interfere with driving and that is within reception range of the remote control.
 WARNING
When installing the unit in a vehicle equipped with airbags, never install it where it may affect the operation of the air bag system.
Unité d’affichage
■Emplacement de montage
Placez l’appareil dans le réceptacle pour les petits objets ou fixez-le à la console centrale.
∗Choisissez un emplacement qui ne vous gênera pas pour conduire et qui permettra l’utilisation de la télécommande.
 AVERTISSEMENT
Lorsque vous installez l’appareil dans un véhicule équipé d’airbags, ne le placez jamais à un endroit qui pourrait empêcher ou gêner le fonctionnement du système d’airbag.
Unidad del visualizador
■Localización de la instalación
Coloque la unidad en el receptáculo para objetos pequeños, o f’jela a la consola central.
∗Elija una posición que no interfiera con la conducción del veh’culo, y que esté dentro del intervalo de alcance del controlador remoto.
 ADVERTENCIA
Cuando instale la unidad en un veh’culo equipado con cojines de aire (air bags), nunca instale la unidad en un sitio en el que pueda afectar el funcionamiento del sistema de cojines de aire.
OrificeInstallation | hole |
Orificiode |
demontage |
| instalación |
Apply the tape so that it does not show when the | |
bracket is installed. | |
Appliquez le ruban de manière à ce qu’il ne soit | |
pas apparent lorque la patte est installée. | Gently insert the flat-bladed screwdriver. |
Aplique la cinta de modo que no sea visible |
cuando la ménsula está instalada. | Insérez doucement le tournevis à lame plate. |
| Inserte cuidadosamente el destornillador de boca plana. |