Manuals
/
Conceptronic
/
Computer Equipment
/
Printer
Conceptronic
C54PSERVU user manual Select “Exceptions” tab and click “Add Program…”
Models:
C54PSERVU
1
72
74
74
Download
74 pages
30.13 Kb
67
68
69
70
71
72
73
74
<
>
Install
Configuration Utility
Wireless Print Server
Network Ports Quick Setup
Windows Add Printer Procedure
SSID Default
Click “Save” to finish setting
Safety
Upgrade Firmware from Browser
Enable Print Server’s TCP/IP Support
Page 72
Image 72
Step4. Select “
Exceptions
” tab and click “
Add Program…
”.
Step5. Click “
Browse
” to add a new program.
67
Page 71
Page 73
Page 72
Image 72
Page 71
Page 73
Contents
Version
Wireless Print Server
Conceptronic C54PSERVU
User’s Manual
COPYRIGHT
Federal Communication Commission Interference Statement
FCC Caution
Federal Communication Commission FCC Radiation Exposure Statement
Safety
DISCLAIMER
R&TTE Compliance Statement
EU Countries Intended for Use
Contents
HARDWARE INSTALLATION
INTRODUCTION
WINDOWS PEER-TO-PEER NETWORK
10. WINDOWS XP SP2 SETUP
7. CONFIGURATION UTILITY
9. IPP PRINTING
8. WEB MANAGEMENT
1 . I n t r o d u c t i o n
1.1 Product Introduction
1.2 Product Package
1.3 Network Printing Architecture
1.3.1 Print Server Network Functions
1.3.2 Network Printing Functions for Clients
PTPP
Windows
Print Server
MIS-2
1.3.3 Network Printing Functions for Network Server
1.4 Network Printing Environment
NetWare Network see below
1.5 Contents of the User’s Manual
1.6 Firmware & Printing Function
2 . H a r d w a r e I n s t a l l a t i o n
3 . W i n d o w s P e e r - t o - P e e r N e t w o r k
3.1 System Architecture
3.2 Administrator Installation and Setup
Page
The system will start to install the utilities automatically
Page
Install all utilities and drivers to the administrator’s PC
Add the network port of the print server to the administrator’s PC
3.3 Administrator Utilities
3.4 Client Installation and Setup
The system will start to install the utilities automatically
The Client Installation procedure is completed. Click “Finish”
3.5.1 Network Ports Quick Setup
3.5 Client Utilities
3.5.2 Remote Ports Utility
Step3. The new remote print port is displayed as follows
3.6 Windows Add Printer Procedure
Page
Step7. Name your printer and setup the default printer, click “Next”
Page
4 . W i n d o w s N T / 2 0 0 0 / 2 0 0 3 N e t w o r k
4.2 Windows NT/2000/2003 Server Installation and Setup
4.1 System Architecture
4.3 User Installation and Setup
5 . N e t W a r e N e t w o r k
5.2 NetWare 3.x/4.x/5.x Installation & Setup
5.2.1 Installation Using PCONSOLE
5.2.1.1 Configuring as Print Server Mode
10. Select Print Server Configuration
11. Select Printer Configuration
7. Select Print Server Information
9. Press Enter to select the newly created print server
multiple print queues and printer objects
6 . U N I X S y s t e m N e t w o r k
6.2 Enable Print Server’s TCP/IP Support
6.3 Setup Print Server’s IP Address
6.3.2 BOOTP
6.5 Configure Remote LPD Printing on the Host
6.4 Verify Print Server’s IP Address
203.66.191.12pserver
mkdir /var/spool/lpd/pserverd chown daemon /var/spool/lpd/pserverd
chgrp daemon /var/spool/lpd/pserverd
chmod 775 /var/spool/lpd/pserverd
lp=\ rm=203.66.191.186\ rp=lpt1\ lf=/var/spool/lpd/pserverd.log\
7 . C o n f i g u r a t i o n U t i l i t y
7.1 Introduction
7.2 Search for All Available Print Server
7.3 Status of Print Server
7.4 Setup the Print Server
7.5 AppleTalk Configuration
7.6 General Configuration
7.7 Netware Print Server Configuration
Printer Server Name SMB Group Name
7.8 System Configuration
7.9 TCP/IP Configuration
7.10 Wireless Configuration
SSID Default
Infrastructure Mode
Ad Hoc Mode
Page
WEP Security Mode
For example “01234567890123456789abcdef“ or “administrator“
“WEPHEX”
WPA-shared key Security Mode
7.11 SNMP Configuration
7.12 Wizard
Page
Step 7 Click “Save” to finish setting
7.13 Report
Click “Report” icon on the tool bar, the Report window will pop up
8 . W e b M a n a g e m e n t
8.2 Login
8.1 Introduction
8.3 Device Status 8.3.1 System
8.3.2 Printer
This page lists the SMB group setting of the print server
8.3.3 TCP/IP
8.3.4 SMB
8.3.5 SNMP
8.3.6 NetWare
8.4 Setup Wizard 8.4.1 System
8.3.7 AppleTalk
8.4.2 Advanced Settings
8.4.3 Wireless
8.4.3.1 General Setting
WEP Security Mode
8.4.3.2 Encryption
WPA-PSK Security Mode
8.4.4 TCP/IP
8.4.3.3 Site Survey
8.4.5 SMB
8.4.6 SNMP
8.4.7 NetWare
8.4.9 Save Settings
AppleTalk Enable Enable or disable “AppleTalk”
8.4.8 AppleTalk
8.5 System Tools 8.5.1 Load Default
8.5.2 Upgrade Firmware from Browser
9 . I P P P r i n t i n g
9.2 System Setup 9.2.1 Print Server Side
9.1 Introduction
9.2.2 Client Side
Page
Page
Page
1 0 . W i n d o w s X P S P 2 S e t u p
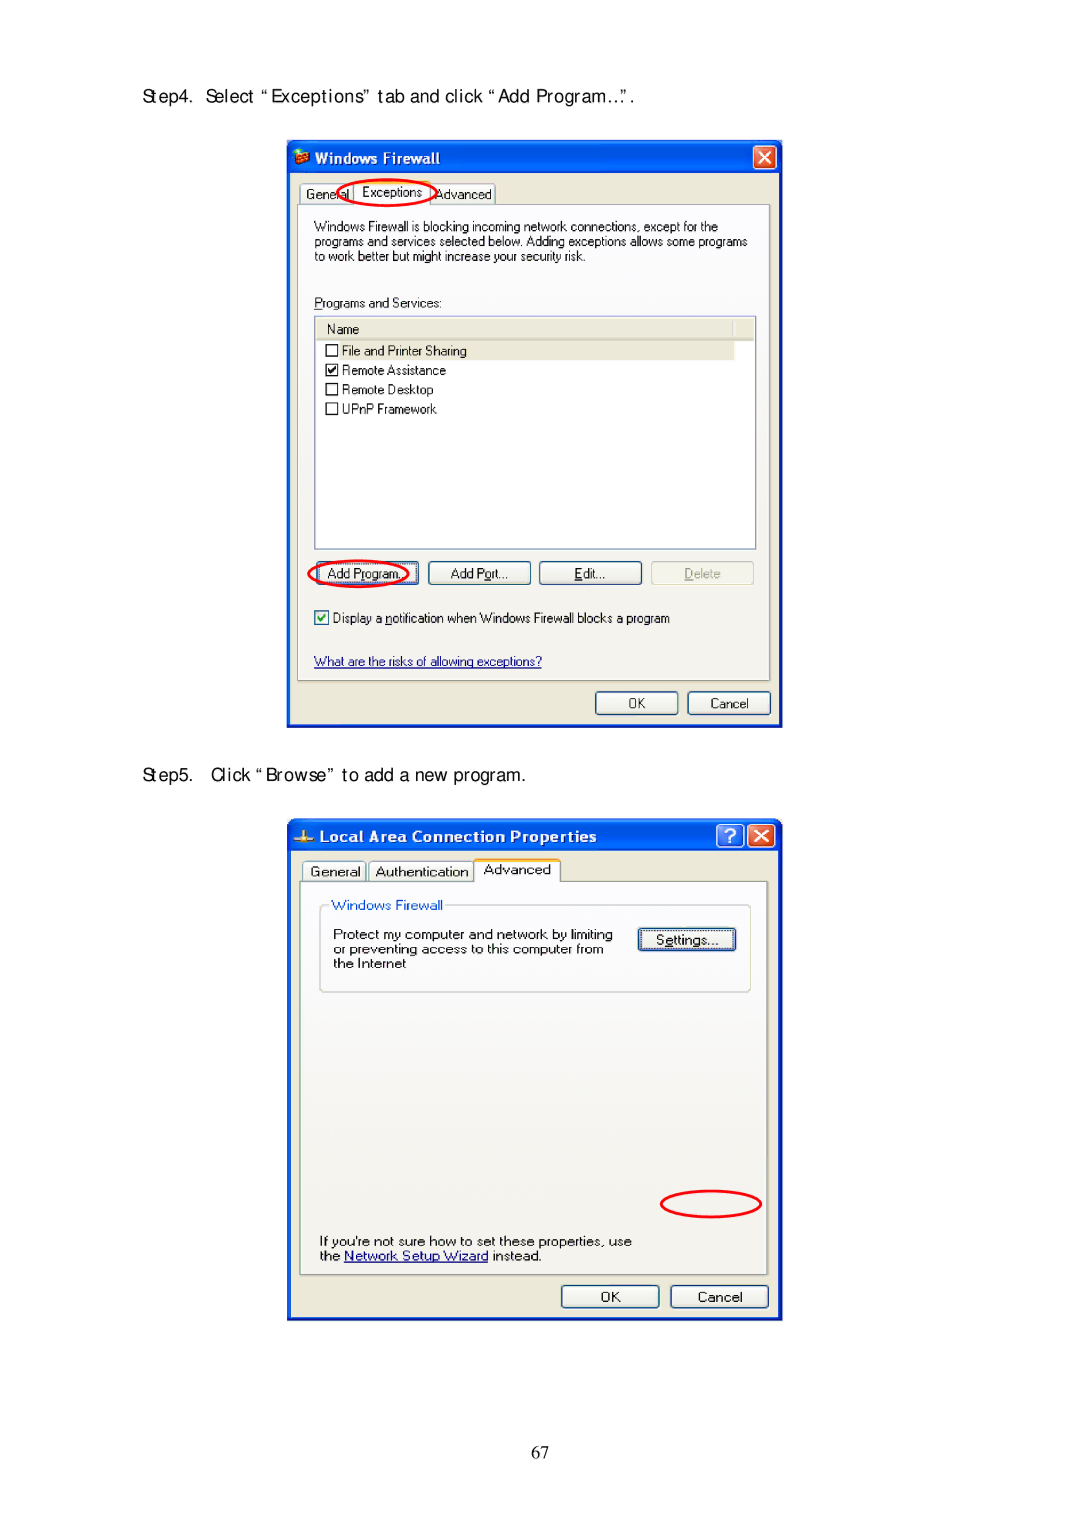
Step4. Select “Exceptions” tab and click “Add Program…”
Step5. Click “Browse” to add a new program
Step6. Open the “NPUtil” file from “C\Program Files\Conceptronic\C54PSERVU\Server Manager\” where C\ is the system drive, if you have installed the Server Manager