![]() VTX200SH
VTX200SH
The Front Panel:
1 | 2 | 3 | 4 | 5 | 6 | 7 | 8 | 9 | 10 | 11 | 12 | 13 | 14 |
REVERB |
| DELAY |
|
|
|
|
| EFFECTS |
| ||||||||||
TAP / SAVE |
|
| O |
| PI |
|
|
|
|
|
|
| E |
|
|
|
|
| |
|
|
|
|
|
|
|
|
|
|
| G |
|
| P |
|
| |||
|
| H | 4 |
| N |
|
|
|
|
|
| N | 4 |
|
|
| |||
| C | 3 | 1 | G |
|
|
| A | 3 | 1 | H |
| |||||||
|
|
|
|
|
|
| A |
| |||||||||||
| E | 2 |
|
|
| 2 | P | F | L | 2 |
|
|
| 2 | S | ||||
|
|
|
|
|
| O |
|
|
|
| E | ||||||||
| 1 |
|
|
|
|
| 3 |
| N |
| 1 |
|
|
|
|
| 3 | R | |
| 4 |
|
|
|
|
| 4 |
| G | S | 4 |
|
|
|
|
| 4 |
| |
E | 3 |
|
|
|
|
| 1 |
|
| S | 3 |
|
|
|
|
| OC |
| |
|
|
|
|
|
|
| U |
|
|
|
|
| T- | ||||||
L |
|
|
|
|
|
| P |
|
|
|
|
| |||||||
G | 2 |
|
|
| 2 |
|
| R |
|
|
|
| WPHAS | ||||||
N | 1 |
| 3 | C | E |
| O 2 | 1 |
| W |
| ||||||||
| I |
|
|
|
|
|
|
| H |
| AH E |
| |||||||
| S |
|
|
| I |
|
|
|
|
| C |
|
| A |
|
|
| ||
|
|
|
|
|
| A |
|
|
|
|
|
|
|
| H |
|
| ||
|
|
|
|
| L |
|
|
|
|
|
|
|
|
|
|
|
|
| |
| LEVEL | GAIN |
3HIGH | MID | LOW |
MUTE
POWER
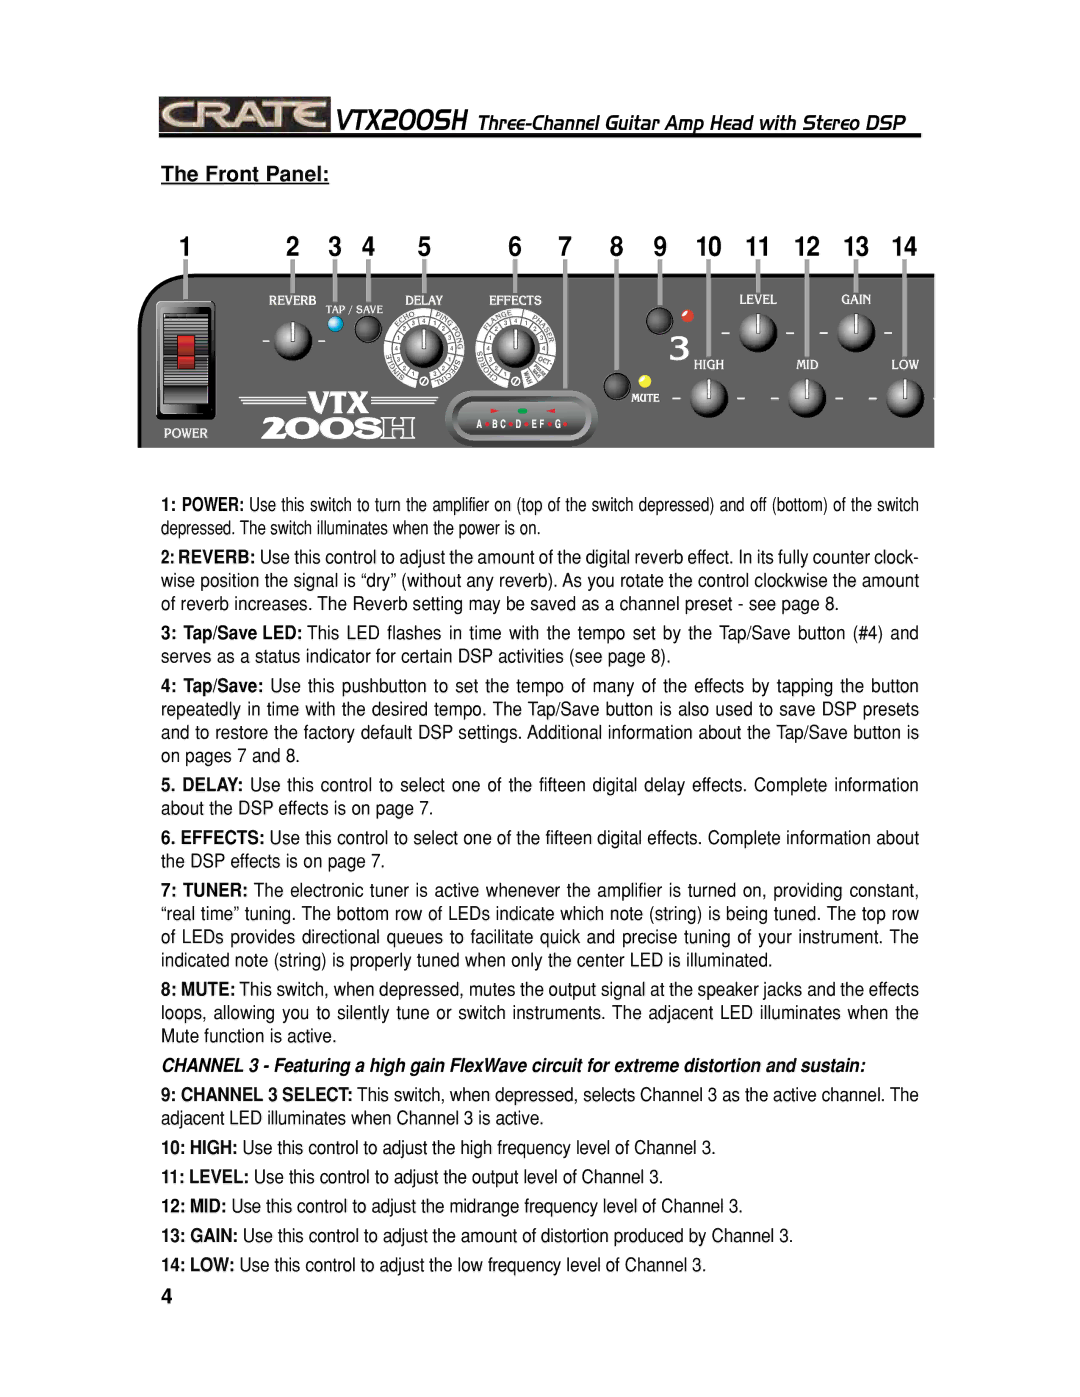
1:POWER: Use this switch to turn the amplifier on (top of the switch depressed) and off (bottom) of the switch depressed. The switch illuminates when the power is on.
2:REVERB: Use this control to adjust the amount of the digital reverb effect. In its fully counter clock- wise position the signal is “dry” (without any reverb). As you rotate the control clockwise the amount of reverb increases. The Reverb setting may be saved as a channel preset - see page 8.
3:Tap/Save LED: This LED flashes in time with the tempo set by the Tap/Save button (#4) and serves as a status indicator for certain DSP activities (see page 8).
4:Tap/Save: Use this pushbutton to set the tempo of many of the effects by tapping the button repeatedly in time with the desired tempo. The Tap/Save button is also used to save DSP presets and to restore the factory default DSP settings. Additional information about the Tap/Save button is on pages 7 and 8.
5.DELAY: Use this control to select one of the fifteen digital delay effects. Complete information about the DSP effects is on page 7.
6.EFFECTS: Use this control to select one of the fifteen digital effects. Complete information about the DSP effects is on page 7.
7:TUNER: The electronic tuner is active whenever the amplifier is turned on, providing constant, “real time” tuning. The bottom row of LEDs indicate which note (string) is being tuned. The top row of LEDs provides directional queues to facilitate quick and precise tuning of your instrument. The indicated note (string) is properly tuned when only the center LED is illuminated.
8:MUTE: This switch, when depressed, mutes the output signal at the speaker jacks and the effects loops, allowing you to silently tune or switch instruments. The adjacent LED illuminates when the Mute function is active.
CHANNEL 3 - Featuring a high gain FlexWave circuit for extreme distortion and sustain:
9:CHANNEL 3 SELECT: This switch, when depressed, selects Channel 3 as the active channel. The adjacent LED illuminates when Channel 3 is active.
10:HIGH: Use this control to adjust the high frequency level of Channel 3.
11:LEVEL: Use this control to adjust the output level of Channel 3.
12:MID: Use this control to adjust the midrange frequency level of Channel 3.
13:GAIN: Use this control to adjust the amount of distortion produced by Channel 3.
14:LOW: Use this control to adjust the low frequency level of Channel 3.
4
