Component Video & Progressive Scan Connections
3 Connecting to a TV with Component Video Inputs
Component Video separates the Video Signal into three separate “components”, resulting in a higher quality picture than
Component Video
Connectors
Y
Cb
Cr
Step 1: Connect the DVD Player using the Composite or
In order to Switch your DVD Player’s Video Output to Component Video, you must first connect using the Composite or
For Help on Using the Setup Menu, see pg 29.
Step 2: Enter the Setup Menu to Change the Video Setting
With disc play stopped, press the SETUP button on the Remote Control to enter the DVD Player’s
SYSTEM | NTSC |
LANG. | 4:3 PS |
ASPECT | |
VIDEO | YCbCr |
OUT PUT | |
AUDIO | AUTO |
FORMAT | |
CHILD |
|
OTHERS |
|
EXIT |
|
ENTER RETURN SETUP |
|
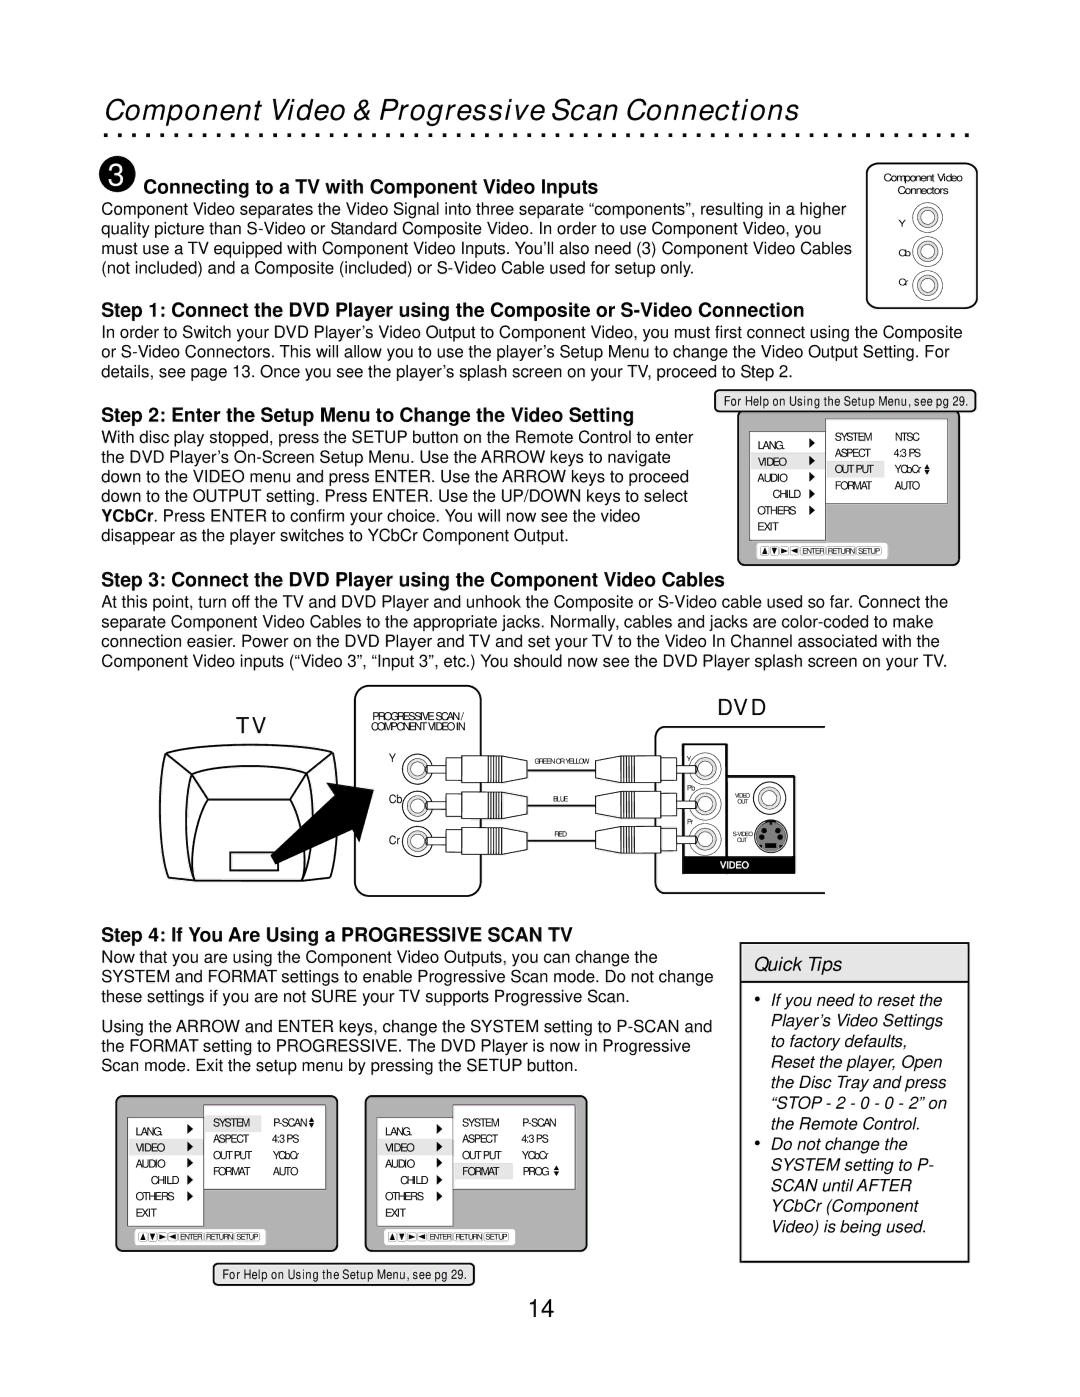
Step 3: Connect the DVD Player using the Component Video Cables
At this point, turn off the TV and DVD Player and unhook the Composite or
TV
PROGRESSIVE SCAN / COMPONENT VIDEO IN
Y
Cb ![]()
Cr
| DVD |
GREEN OR YELLOW | Y |
| |
| Pb |
BLUE | VIDEO |
OUT | |
| Pr |
RED | |
| OUT |
VIDEOVIDEO
Step 4: If You Are Using a PROGRESSIVE SCAN TV
Now that you are using the Component Video Outputs, you can change the SYSTEM and FORMAT settings to enable Progressive Scan mode. Do not change these settings if you are not SURE your TV supports Progressive Scan.
Using the ARROW and ENTER keys, change the SYSTEM setting to
SYSTEM | SYSTEM | ||
LANG. | 4:3 PS | LANG. | 4:3 PS |
ASPECT | ASPECT | ||
VIDEO | YCbCr | VIDEO | YCbCr |
OUT PUT | OUT PUT | ||
AUDIO | AUTO | AUDIO | PROG |
FORMAT | FORMAT | ||
CHILD |
| CHILD |
|
OTHERS |
| OTHERS |
|
EXIT |
| EXIT |
|
ENTER RETURN SETUP |
| ENTER RETURN SETUP |
|
Quick Tips
ŸIf you need to reset the Player’s Video Settings to factory defaults, Reset the player, Open the Disc Tray and press “STOP - 2 - 0 - 0 - 2” on the Remote Control.
ŸDo not change the SYSTEM setting to P- SCAN until AFTER YCbCr (Component Video) is being used.
For Help on Using the Setup Menu, see pg 29.
14