7REMOTE CONTROL UNIT
2The included remote control unit
ENGLISH
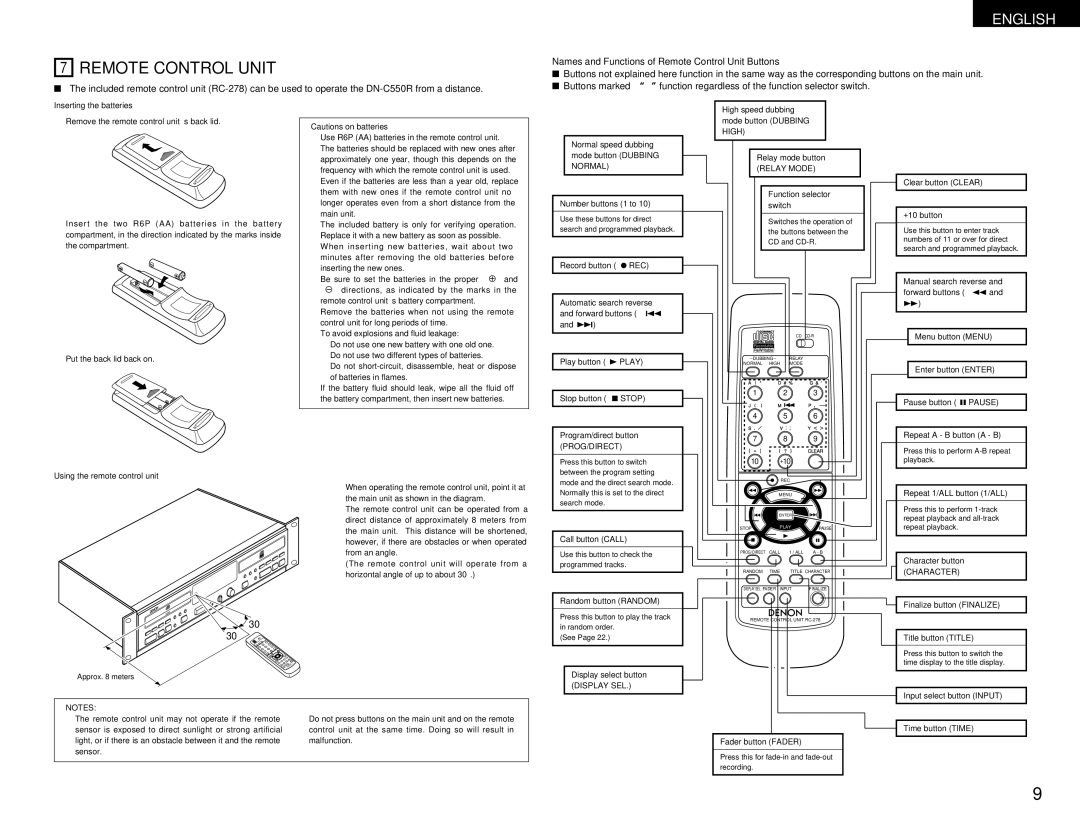
Names and Functions of Remote Control Unit Buttons
2Buttons not explained here function in the same way as the corresponding buttons on the main unit.
2Buttons marked “✽” function regardless of the function selector switch.
Inserting the batteries
qRemove the remote control unit’s back lid.
wInsert the two R6P (AA) batteries in the battery compartment, in the direction indicated by the marks inside the compartment.
ePut the back lid back on.
Cautions on batteries
•Use R6P (AA) batteries in the remote control unit.
•The batteries should be replaced with new ones after approximately one year, though this depends on the frequency with which the remote control unit is used.
•Even if the batteries are less than a year old, replace them with new ones if the remote control unit no longer operates even from a short distance from the main unit.
•The included battery is only for verifying operation. Replace it with a new battery as soon as possible.
•When inserting new batteries, wait about two minutes after removing the old batteries before inserting the new ones.
•Be sure to set the batteries in the proper “<” and “>” directions, as indicated by the marks in the remote control unit’s battery compartment.
•Remove the batteries when not using the remote control unit for long periods of time.
•To avoid explosions and fluid leakage:
•Do not use one new battery with one old one.
•Do not use two different types of batteries.
•Do not
•If the battery fluid should leak, wipe all the fluid off the battery compartment, then insert new batteries.
✽Normal speed dubbing mode button (DUBBING NORMAL)
Number buttons (1 to 10)
Use these buttons for direct search and programmed playback.
Record button (4 REC)
Automatic search reverse and forward buttons (8 and 9)
Play button (1 PLAY)
Stop button (2 STOP)
Program/direct button (PROG/DIRECT)
✽High speed dubbing mode button (DUBBING HIGH)
✽Relay mode button
(RELAY MODE)
Function selector switch
Switches the operation of the buttons between the CD and
CD
_ DUBBING _ |
| RELAY |
| ||
NORMAL HIGH | MODE |
| |||
A | ! | " | D # % | G & ' | |
| 1 |
| 2 |
| 3 |
J | ( | ) | M ✽ + | P , – | |
| 4 |
| 5 |
| 6 |
S . |
| V : | ; | Y < > | |
| 7 |
| 8 |
| 9 |
[ | = | ] | { ? | } | CLEAR |
Clear button (CLEAR)
+10 button
Use this button to enter track numbers of 11 or over for direct search and programmed playback.
Manual search reverse and forward buttons (6 and 7)
✽Menu button (MENU)
✽Enter button (ENTER)
Pause button (3 PAUSE)
Repeat A - B button (A - B)
Press this to perform
Using the remote control unit
• When operating the remote control unit, point it at the main unit as shown in the diagram.
• The remote control unit can be operated from a direct distance of approximately 8 meters from the main unit. This distance will be shortened, however, if there are obstacles or when operated from an angle.
(The remote control unit will operate from a horizontal angle of up to about 30°.)
30° |
|
|
|
30° | 3 |
|
|
2 |
| 6 |
|
1 | 5 | 9 |
|
4 |
| 8 |
|
| 7 | +10 |
|
|
| 10 |
|
|
|
| B |
Approx. 8 meters |
|
|
|
NOTES: |
|
|
|
• The remote control unit may not operate if the remote | • Do not press buttons on the main unit and on the remote | ||
sensor is exposed to direct sunlight or strong artificial | control unit at the same time. Doing so will result in | ||
light, or if there is an obstacle between it and the remote | malfunction. | ||
sensor. |
|
|
|
Press this button to switch between the program setting mode and the direct search mode. Normally this is set to the direct search mode.
Call button (CALL)
Use this button to check the programmed tracks.
Random button (RANDOM)
Press this button to play the track in random order.
(See Page 22.)
✽Display select button (DISPLAY SEL.)
10 +10
REC
67
MENU
8 | ENTER 9 |
|
STOP | PLAY | PAUSE |
23 ![]()
PROG/DIRECT | CALL | 1 / ALL | A - B |
RANDOM | TIME | TITLE CHARACTER | |
DISPLAY SEL . FADER INPUT | FINALIZE | ||
B
REMOTE CONTROL UNIT
Fader button (FADER)
Press this for
playback.
Repeat 1/ALL button (1/ALL)
Press this to perform
Character button
(CHARACTER)
Finalize button (FINALIZE)
Title button (TITLE)
Press this button to switch the time display to the title display.
Input select button (INPUT)
Time button (TIME)
9