OWNER’S MANUAL

SERVICE

PROCEDURE

WARNING: Never service heater while it is plugged in, con- nected to propane supply, oper- ating, or hot. Severe burns and electrical shock can occur.

CLEANING FAN

Clean fan every 500 hours of operation or as needed.

1.Remove screws on side cover using 5/16" nut-driver.

2.Remove side cover.

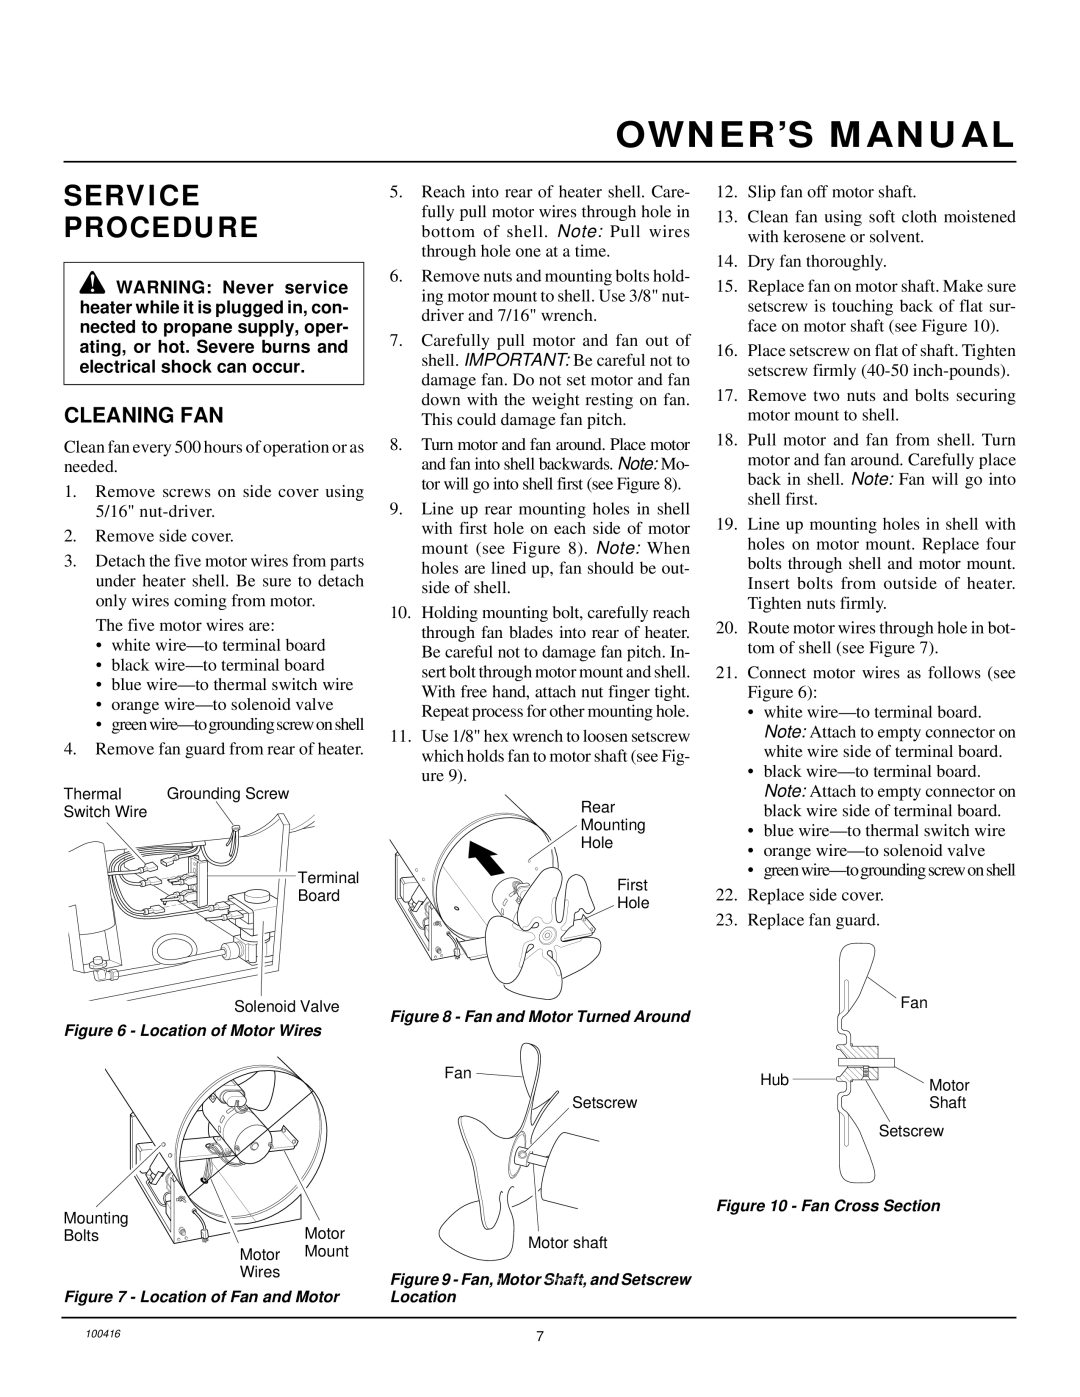
3.Detach the five motor wires from parts under heater shell. Be sure to detach only wires coming from motor.

The five motor wires are:

white wire—to terminal board

black wire—to terminal board

blue wire—to thermal switch wire

orange wire—to solenoid valve

green wire—to grounding screw on shell

4.Remove fan guard from rear of heater.

Thermal

Grounding Screw

Switch Wire


Terminal

Board

5.Reach into rear of heater shell. Care- fully pull motor wires through hole in bottom of shell. Note: Pull wires through hole one at a time.

6.Remove nuts and mounting bolts hold- ing motor mount to shell. Use 3/8" nut- driver and 7/16" wrench.

7.Carefully pull motor and fan out of shell. IMPORTANT: Be careful not to damage fan. Do not set motor and fan down with the weight resting on fan. This could damage fan pitch.

8.Turn motor and fan around. Place motor and fan into shell backwards. Note: Mo- tor will go into shell first (see Figure 8).

9.Line up rear mounting holes in shell with first hole on each side of motor mount (see Figure 8). Note: When holes are lined up, fan should be out- side of shell.

10.Holding mounting bolt, carefully reach through fan blades into rear of heater. Be careful not to damage fan pitch. In- sert bolt through motor mount and shell. With free hand, attach nut finger tight. Repeat process for other mounting hole.

11.Use 1/8" hex wrench to loosen setscrew which holds fan to motor shaft (see Fig- ure 9).

Rear

Mounting

Hole

First

Hole

12.Slip fan off motor shaft.

13.Clean fan using soft cloth moistened with kerosene or solvent.

14.Dry fan thoroughly.

15.Replace fan on motor shaft. Make sure setscrew is touching back of flat sur- face on motor shaft (see Figure 10).

16.Place setscrew on flat of shaft. Tighten setscrew firmly (40-50 inch-pounds).

17.Remove two nuts and bolts securing motor mount to shell.

18.Pull motor and fan from shell. Turn motor and fan around. Carefully place back in shell. Note: Fan will go into shell first.

19.Line up mounting holes in shell with holes on motor mount. Replace four bolts through shell and motor mount. Insert bolts from outside of heater. Tighten nuts firmly.

20.Route motor wires through hole in bot- tom of shell (see Figure 7).

21.Connect motor wires as follows (see Figure 6):

white wire—to terminal board. Note: Attach to empty connector on white wire side of terminal board.

black wire—to terminal board. Note: Attach to empty connector on black wire side of terminal board.

blue wire—to thermal switch wire

orange wire—to solenoid valve

green wire—to grounding screw on shell

22.Replace side cover.

23.Replace fan guard.


026

Solenoid Valve

Fan


Figure 8 - Fan and Motor Turned Around

Figure 6 - Location of Motor Wires

Fan

Hub

Motor


Setscrew


Shaft


Setscrew


ON

LP-P

Figure 10 - Fan Cross Section

Mounting

Motor


Bolts


Motor shaft

Motor

Mount


Wires


Figure 9 - Fan, Motor Shaft, and Setscrew


FAN

LP-PFA/P 023A

Figure 7 - Location of Fan and Motor

Location


100416

7

Page 7
Image 7
Desa RLP375A, BLP375A owner manual Service Procedure, Cleaning FAN

BLP375A, RLP375A specifications

Desa RLP375A and BLP375A represent a significant advancement in the category of portable heating solutions. These models, designed to cater to both residential and commercial needs, merge efficiency with practicality, making them standout options for consumers seeking reliable heating.

Both units feature a sleek, modern design that allows for versatile placement in various settings, whether it be a workshop, garage, or living area. The RLP375A is known for its radiant heating technology, which facilitates consistent warmth by emitting infrared heat. This method is particularly effective in spaces with high ceilings or larger areas, as it directly heats objects and people rather than merely warming the air.

On the other hand, the BLP375A is equipped with a blower fan that circulates warm air throughout a room. This forced-air system enhances the distribution of heat, ensuring that even larger areas are warmed quickly and efficiently. The combination of these technologies allows both models to operate with impressive energy efficiency, significantly reducing heating costs while maintaining comfortable room temperatures.

One of the primary characteristics of the RLP375A and BLP375A is their user-friendly control systems. These models often come with adjustable thermostats, allowing users to set their desired temperature easily. Moreover, they include safety features such as overheat protection and tip-over switches which automatically shut the units down in unsafe situations, providing peace of mind to consumers.

Durability is another hallmark of these heating units. Built with high-quality materials, they are designed to withstand regular use and adverse conditions, making them suitable for both indoor and outdoor environments. The portability of these units is enhanced by their lightweight design and integrated handles, facilitating easy movement from one location to another.

In terms of energy consumption, both the RLP375A and BLP375A are engineered to provide maximum heating output with minimal energy usage, conforming to stringent environmental standards to promote sustainability. Additionally, their quiet operation means they are ideal for use in noise-sensitive environments.

Customers looking for dependable, efficient, and safe heating solutions will find Desa's RLP375A and BLP375A models to be excellent choices, reflecting the brand's commitment to quality and innovation in heating technology.