OWNER’S MANUAL

INSTALLATION

Continued

11.Carefully insert fireplace into cabinet mantel. Be careful not to scratch or damage hearth base, cabinet mantel, or any laminate trim on hearth base. Re- move protective material from top of hearth base and from front of fireplace (if any). Note: You can secure fireplace to hearth or floor. Open lower louver. Locate screw holes in bottom of base. Tighten wood screws through these holes and into hearth or floor.

12.Check all gas connections for leaks. See Checking Gas Connections, page 12.

Nailing

Flanges

Figure 10 - Location of Nailing Flanges

Figure 11 - Inserting Fireplace Into Cabinet Mantel

BUILT-IN FIREPLACE

INSTALLATION

Built-in installation of this fireplace involves installing fireplace into a framed-in enclo- sure. This makes the front of fireplace flush with wall. If installing a mantel above the fireplace, you must follow the clearances shown in Figure 15, page 10. Follow the instructions below to install the fireplace in this manner.


Actual

Framing


Height

32 3/ "

33"


8


Front Width

34 5/16"

35 1/2"

Depth

16 11/16"

17 3/4"

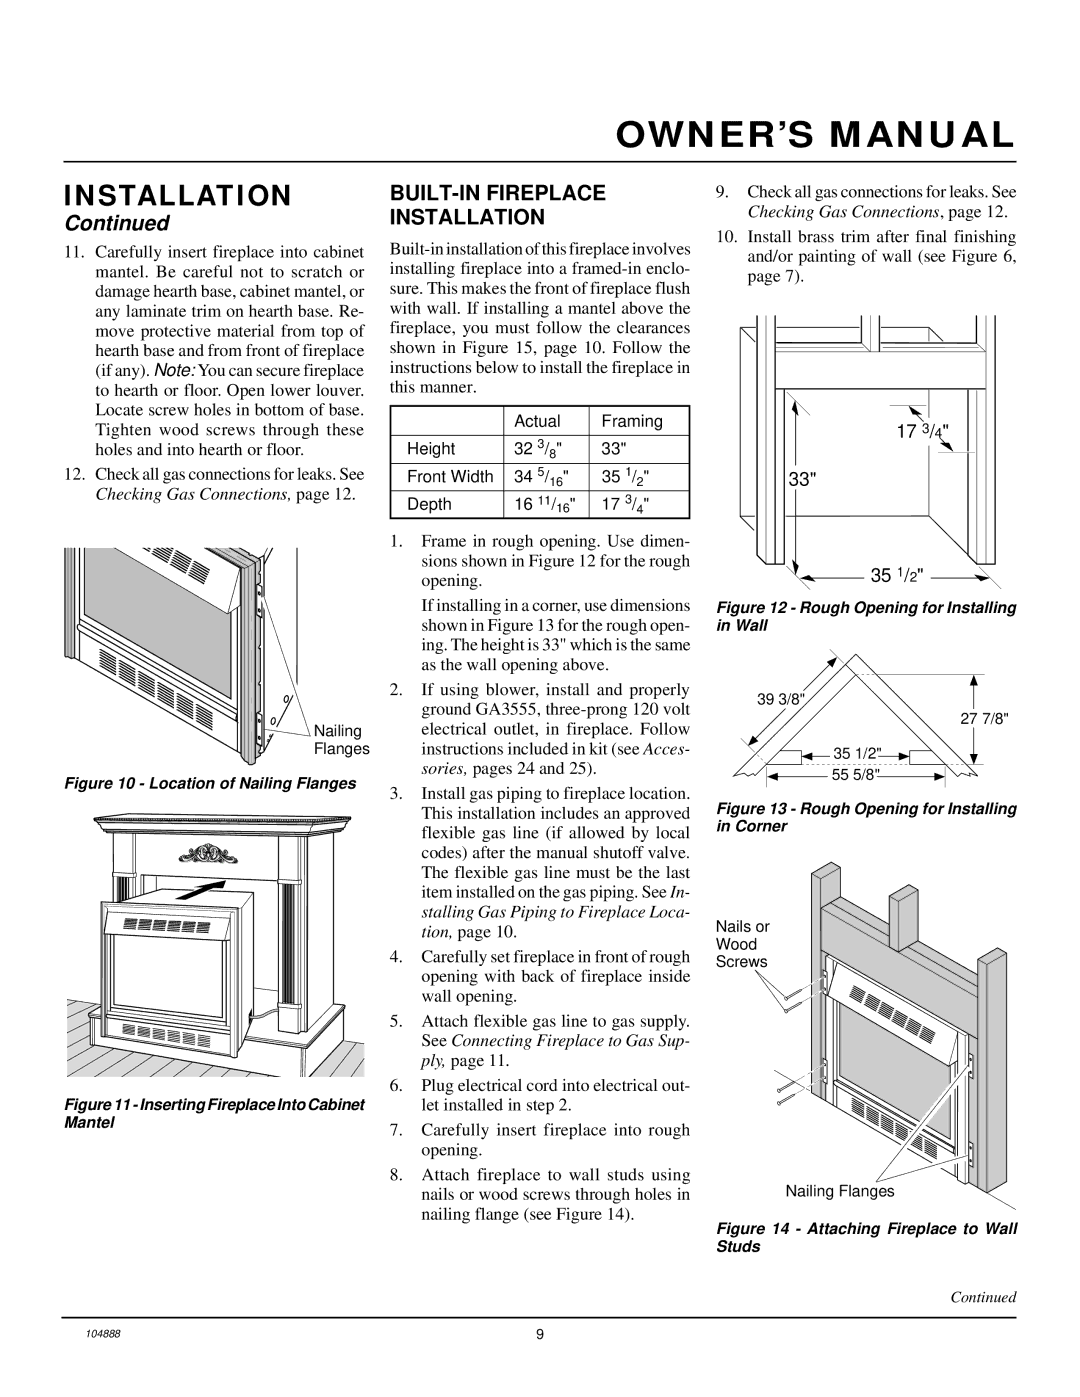
1.Frame in rough opening. Use dimen- sions shown in Figure 12 for the rough opening.

If installing in a corner, use dimensions shown in Figure 13 for the rough open- ing. The height is 33" which is the same as the wall opening above.

2.If using blower, install and properly ground GA3555, three-prong 120 volt electrical outlet, in fireplace. Follow instructions included in kit (see Acces- sories, pages 24 and 25).

3.Install gas piping to fireplace location. This installation includes an approved flexible gas line (if allowed by local codes) after the manual shutoff valve. The flexible gas line must be the last item installed on the gas piping. See In- stalling Gas Piping to Fireplace Loca- tion, page 10.

4.Carefully set fireplace in front of rough opening with back of fireplace inside wall opening.

5.Attach flexible gas line to gas supply. See Connecting Fireplace to Gas Sup- ply, page 11.

6.Plug electrical cord into electrical out- let installed in step 2.

7.Carefully insert fireplace into rough opening.

8.Attach fireplace to wall studs using nails or wood screws through holes in nailing flange (see Figure 14).

9.Check all gas connections for leaks. See Checking Gas Connections, page 12.

10.Install brass trim after final finishing and/or painting of wall (see Figure 6, page 7).

17 3/4"

33"

35 1/2"

Figure 12 - Rough Opening for Installing in Wall

39 3/8"

27 7/8"

35 1/2" 55 5/8"

Figure 13 - Rough Opening for Installing in Corner

Nails or

Wood

Screws

Nailing Flanges

Figure 14 - Attaching Fireplace to Wall Studs

Continued

104888

9

Page 9
Image 9
Desa LFP33PR installation manual BUILT-IN Fireplace Installation, Location of Nailing Flanges

LFP33PR specifications

Desa LFP33PR is a notable model within the LFP series, renowned for its advanced features and superior technology. Designed primarily for both residential and commercial applications, the LFP33PR combines efficiency with user-friendly functionality.

One of the standout features of the Desa LFP33PR is its robust energy performance. It is equipped with an advanced heating element that maximizes energy output while minimizing consumption. This energy-efficient design not only reduces utility costs but also aligns with contemporary sustainability goals, making it an environmentally friendly choice for users.

In terms of safety, the Desa LFP33PR incorporates multiple safety mechanisms. These include an automatic shut-off feature that activates when overheating is detected. Additionally, it comes with a built-in flame sensor and a robust housing design that prevents any risk of accidental burns. This focus on safety ensures peace of mind for users, whether in a family home, office environment, or industrial setting.

The LFP33PR also boasts a compact and portable design, making it easy to move from room to room or to different areas within a facility. This portability does not compromise its durability; the unit is constructed with high-quality materials designed to withstand regular use.

Furthermore, the technology integrated into the Desa LFP33PR elevates user experience significantly. It features an intuitive control panel that allows for easy temperature adjustments and timer settings. Users can also benefit from remote control functionality, enabling them to regulate the heating system from a distance.

The aesthetic design of the LFP33PR is another appealing characteristic. Its sleek exterior is available in various colors and can blend seamlessly with different interior styles. This attention to aesthetic detail not only enhances functionality but also ensures that the device adds an element of style to any space.

Maintenance of the Desa LFP33PR is straightforward, with features that allow easy access for cleaning and servicing. The design also minimizes dust accumulation, ensuring optimal performance over time.

In summary, the Desa LFP33PR is a state-of-the-art heating solution, characterized by its efficiency, safety, portability, user-friendly technology, and appealing aesthetics. Its thoughtful design and advanced features make it an excellent choice for those seeking both comfort and reliability in their heating appliances.