Installation

Continued

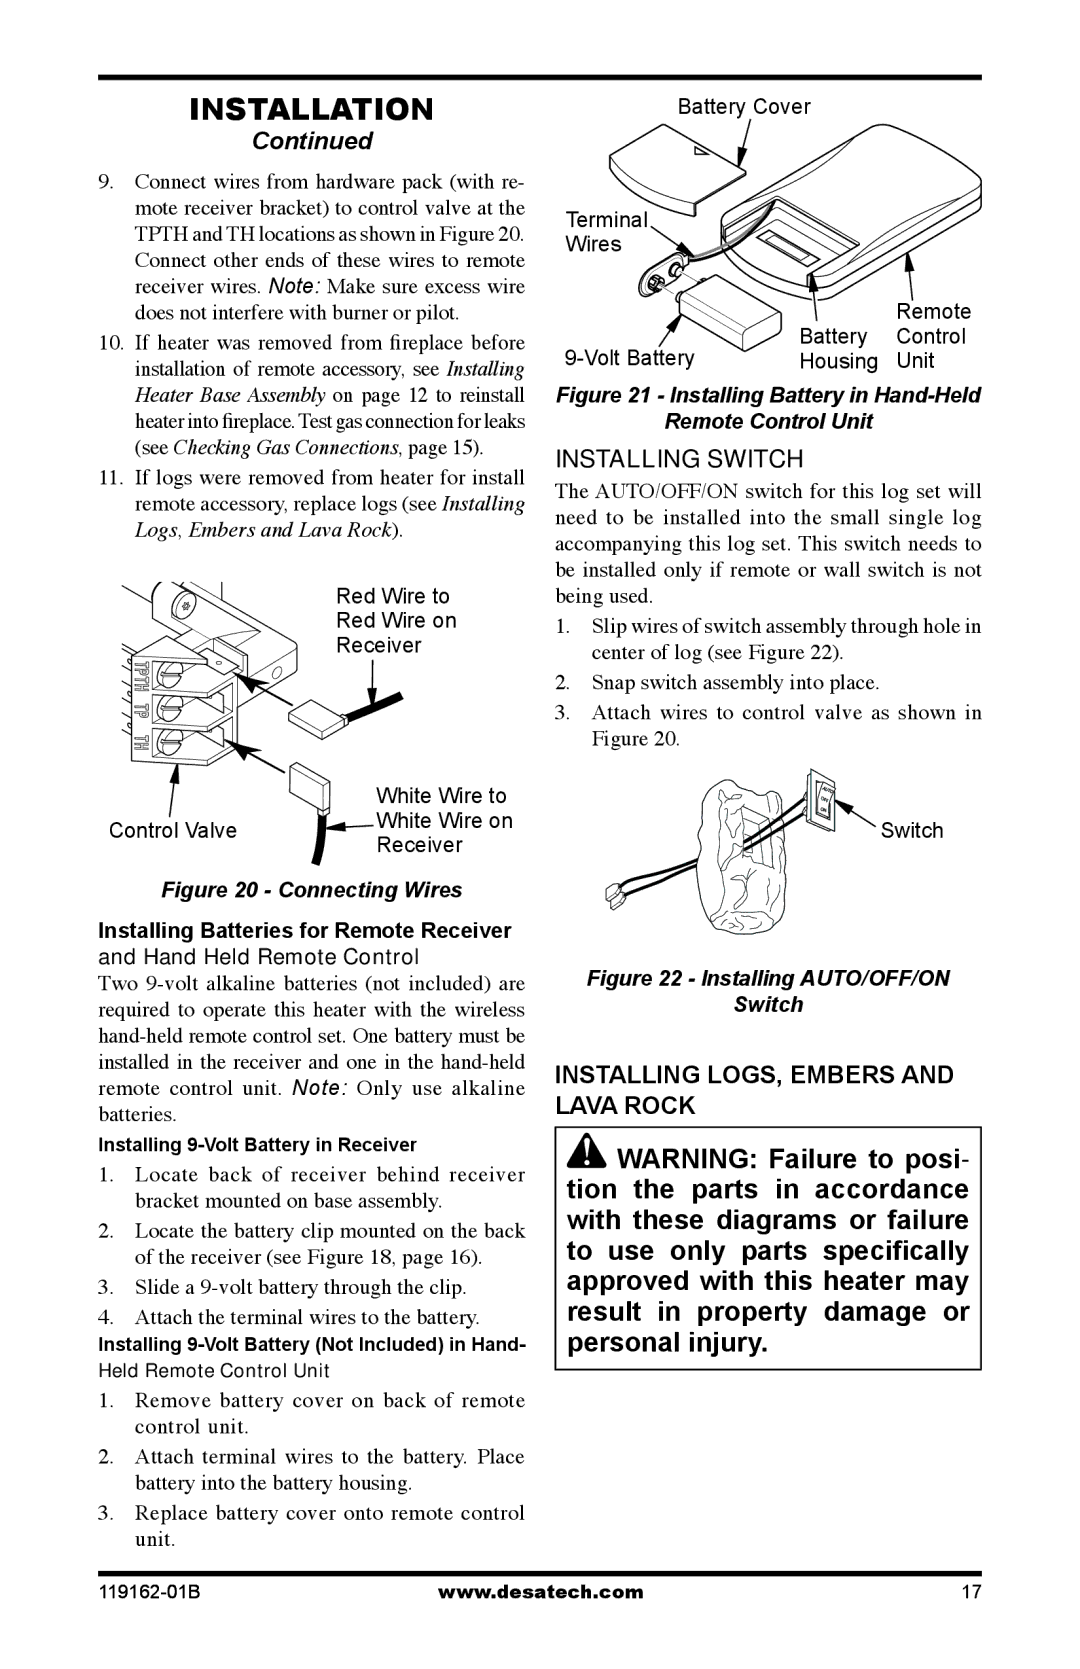
9.Connect wires from hardware pack (with re- mote receiver bracket) to control valve at the TPTH and TH locations as shown in Figure 20. Connect other ends of these wires to remote receiver wires. Note: Make sure excess wire does not interfere with burner or pilot.

10.If heater was removed from fireplace before installation of remote accessory, see Installing Heater Base Assembly on page 12 to reinstall heater into fireplace. Test gas connection for leaks (see Checking Gas Connections, page 15).

11.If logs were removed from heater for install remote accessory, replace logs (see Installing Logs, Embers and Lava Rock).

Red Wire to

Red Wire on

Receiver

White Wire to

Control Valve White Wire on Receiver

Figure 20 - Connecting Wires

Installing Batteries for Remote Receiver

and Hand Held Remote Control

Two 9-volt alkaline batteries (not included) are required to operate this heater with the wireless hand-held remote control set. One battery must be installed in the receiver and one in the hand-held remote control unit. Note: Only use alkaline batteries.

Installing 9-Volt Battery in Receiver

1.Locate back of receiver behind receiver bracket mounted on base assembly.

2.Locate the battery clip mounted on the back of the receiver (see Figure 18, page 16).

3.Slide a 9-volt battery through the clip.

4.Attach the terminal wires to the battery.

Installing 9-Volt Battery (Not Included) in Hand-

Held Remote Control Unit

1.Remove battery cover on back of remote control unit.

2.Attach terminal wires to the battery. Place battery into the battery housing.

3.Replace battery cover onto remote control unit.

Battery Cover

Terminal

Wires


Remote

9-Volt Battery

Battery

Control

Housing

Unit

Figure 21 - Installing Battery in Hand-Held

Remote Control Unit

Installing Switch

The AUTO/OFF/ON switch for this log set will need to be installed into the small single log accompanying this log set. This switch needs to be installed only if remote or wall switch is not being used.

1.Slip wires of switch assembly through hole in center of log (see Figure 22).

2.Snap switch assembly into place.

3.Attach wires to control valve as shown in Figure 20.

Switch

Figure 22 - Installing AUTO/OFF/ON

Switch

INSTALLING LOGS, Embers and Lava Rock

WARNING: Failure to posi- tion the parts in accordance with these diagrams or failure to use only parts specifically approved with this heater may result in property damage or personal injury.

119162-01B

www.desatech.com

17

Page 17
Image 17
Desa VGC30NR/PR, VGC24NR/PR installation manual Installing Switch, Installing LOGS, Embers and Lava Rock

VGC24NR/PR, VGC30NR/PR specifications

Desa VGC24NR/PR and VGC30NR/PR are innovative gas fireplaces designed to offer efficient heating solutions while enhancing the aesthetics of any living space. Both models combine advanced technology with user-friendly features, ensuring a comfortable and visually appealing experience for homeowners.

A standout feature of the VGC series is its remarkable BTU output. The VGC24NR/PR delivers a maximum of 24,000 BTUs, while the VGC30NR/PR can generate up to 30,000 BTUs. This substantial heating capacity makes these fireplaces suitable for various room sizes, providing warmth even in larger spaces. The adjustable heat settings also allow users to customize the warmth according to their preferences, promoting energy efficiency.

Another significant characteristic of the VGC24NR/PR and VGC30NR/PR is their realistic flame presentation. Utilizing advanced burner technology, these units replicate the look of natural wood burning fires. The flames dance against the backdrop of elegant logs or stones, creating a cozy atmosphere that enhances any interior décor. The visual experience is elevated by the optional ember bed lighting, which can provide an ambient glow, making the fireplace a focal point in the room.

Safety is a paramount consideration in the design of these fireplaces. Both models are equipped with built-in safety features, including an automatic shut-off system that activates in the event of a malfunction. Additionally, they meet stringent safety and emissions standards, ensuring that they are environmentally friendly choices.

Installation is straightforward with the VGC series, thanks to their ventless design that allows for flexibility in placement. These units can be installed in a variety of locations without the need for an external venting system, making them an ideal solution for both new constructions and remodels. The minimalist design also aids in space-saving, making it easy to integrate into compact living areas.

Furthermore, the Desa VGC24NR/PR and VGC30NR/PR come with user-friendly controls, including options for remote operation and wall switches, which add convenience to daily use. With their combination of efficiency, aesthetic appeal, and safety features, these gas fireplaces represent an excellent choice for anyone looking to enhance their home’s comfort and charm.