FIREPLACE INSTALLATION

Installing Optional Wireless Hand-Held Remote Control - GHRCB and GHRCTB Series Removing/Replacing Glass Door

21

FIREPLACE INSTALLATION

Continued

INSTALLING OPTIONAL WIRELESS HAND- HELD REMOTE CONTROL - GHRCB AND GHRCTB SERIES

NOTICE: Use only alkaline batteries (not included).

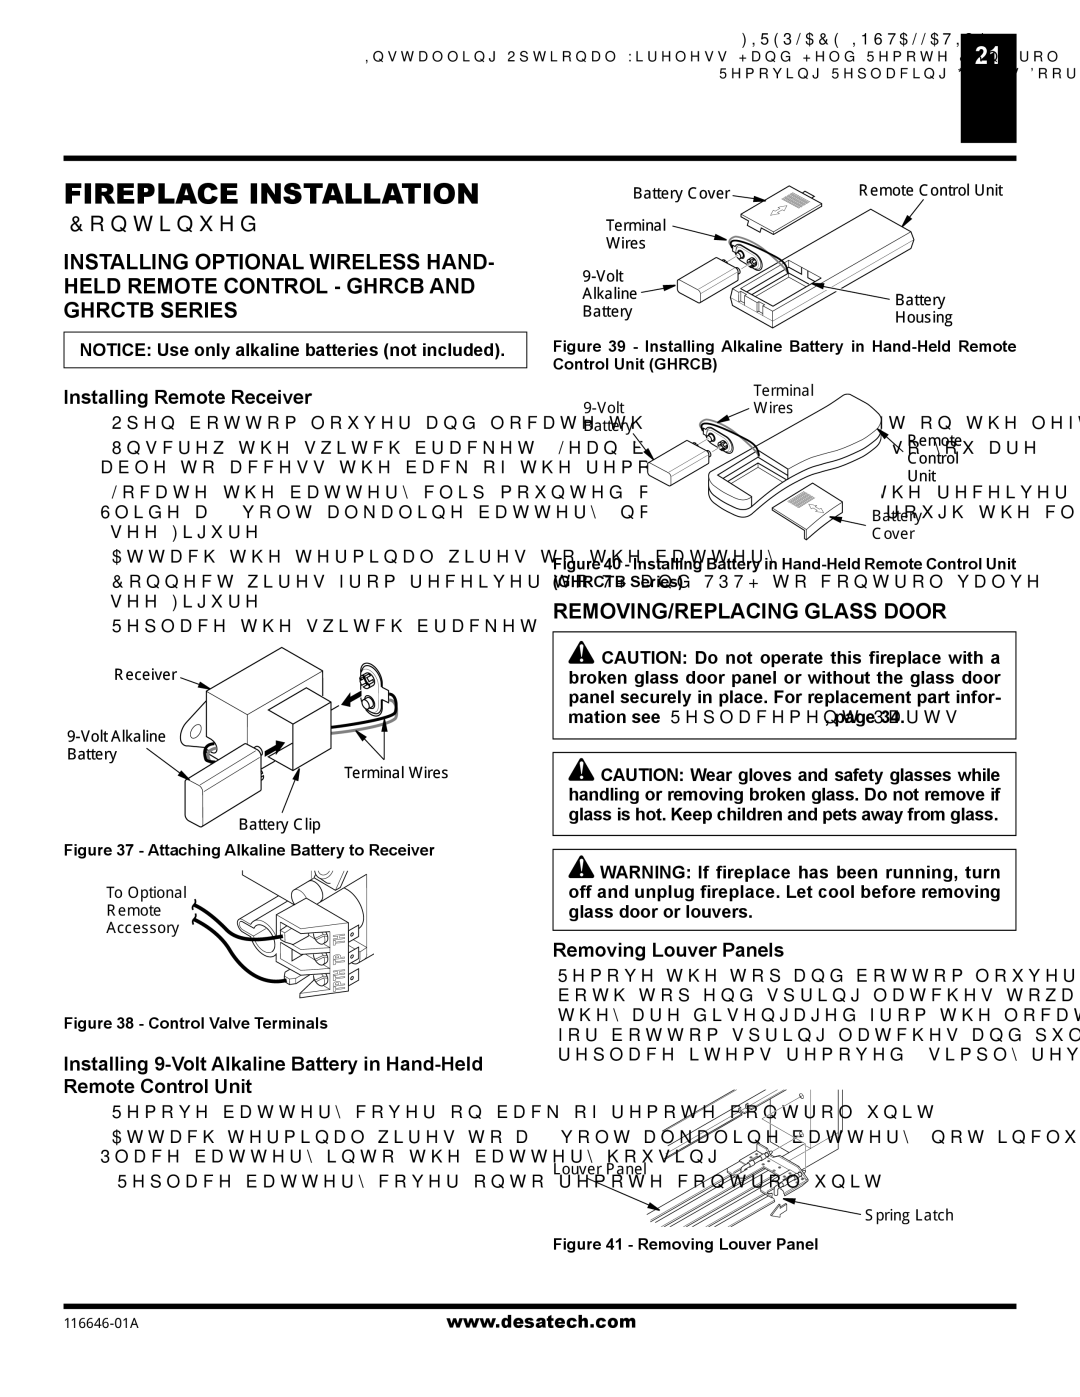
Installing Remote Receiver

1.Open bottom louver and locate the switch bracket on the left.

2.Unscrew the switch bracket. Lean bracket forward so you are able to access the back of the remote receiver.

3.Locate the battery clip mounted on the back of the receiver. Slide a 9-volt alkaline battery (not included) through the clip (see Figure 37).

4.Attach the terminal wires to the battery.

5.Connect wires from receiver to TH and TPTH to control valve (see Figure 38).

6.Replace the switch bracket.

Receiver

9-Volt Alkaline

Battery

Terminal Wires

Battery Clip

Figure 37 - Attaching Alkaline Battery to Receiver

To Optional

Remote

Accessory

Figure 38 - Control Valve Terminals

Installing 9-Volt Alkaline Battery in Hand-Held Remote Control Unit

1.Remove battery cover on back of remote control unit.

2.Attach terminal wires to a 9-volt alkaline battery (not included). Place battery into the battery housing.

3.Replace battery cover onto remote control unit.

Battery Cover

Remote Control Unit

Terminal


Wires


9-Volt


Alkaline

Battery

Battery

Housing


Figure 39 - Installing Alkaline Battery in Hand-Held Remote

Control Unit (GHRCB)


9-Volt

Terminal

Wires

Battery

Remote


Control


Unit


Battery


Cover

Figure 40 - Installing Battery in Hand-Held Remote Control Unit

(GHRCTB Series)


REMOVING/REPLACING GLASS DOOR

CAUTION: Do not operate this fireplace with a

broken glass door panel or without the glass door

panel securely in place. For replacement part infor-

mation see Replacement Parts, page 34.

CAUTION: Wear gloves and safety glasses while

handling or removing broken glass. Do not remove if

glass is hot. Keep children and pets away from glass.

WARNING: If fireplace has been running, turn

off and unplug fireplace. Let cool before removing

glass door or louvers.


Removing Louver Panels

Remove the top and bottom louver panels by simultaneously pulling

both top end spring latches towards the center of the appliance until

they are disengaged from the locating holes (see Figure 41). Repeat

for bottom spring latches and pull the louvers outward. To install or

replace items removed, simply reverse the procedures above.

Louver Panel

Spring Latch

Figure 41 - Removing Louver Panel

116646-01A

www.desatech.com

Page 21
Image 21
Desa (V)T32N-A Series, (V)T32P-A Series REMOVING/REPLACING Glass Door, Installing Remote Receiver, Removing Louver Panels

CGDV32NR, (V)T32N-A Series, (V)T32P-A Series specifications

The Desa (V)T32N-A Series and (V)T32P-A Series, along with the CGDV32NR, represent a significant advancement in modern energy solutions, combining efficiency, durability, and innovative technologies to meet the evolving needs of consumers and businesses alike.

The (V)T32N-A Series is designed specifically for residential applications, featuring a compact and lightweight structure that enables easy installation in various settings. Its primary characteristic is its energy-efficient operation, which minimizes energy consumption while providing optimal heating performance. This series incorporates advanced heating technology, delivering uniform warmth and maximizing comfort in living spaces. The user-friendly digital control panel offers a range of settings, allowing users to customize their heating preferences with ease.

In contrast, the (V)T32P-A Series is tailored for commercial use, boasting a robust design that can withstand the demands of high-traffic environments. This series features enhanced output capacity and quicker heating response times, making it suitable for large venues such as offices, retail spaces, and warehouses. The Duracore technology employed in this series ensures that the heating system is not only powerful but also reliable, reducing downtime and maintenance costs.

The CGDV32NR offers a versatile solution that excels in both residential and commercial applications. Its standout feature is the dual-fuel capability, allowing users to choose between natural gas and propane. This flexibility provides an additional layer of convenience and adaptability, catering to diverse energy needs and preferences. Furthermore, the CGDV32NR is equipped with smart technology that integrates with home automation systems, enabling users to control their heating from a mobile device or smart home interface.

All three series incorporate safety features such as flame failure shut-off and overheat protection, ensuring peace of mind for users. The sleek designs and aesthetic options of the (V)T32N-A and (V)T32P-A Series allow them to blend seamlessly with various interior styles, while the CGDV32NR’s practical functionality and modern design make it an attractive option for any setting.

In summary, the Desa (V)T32N-A Series, (V)T32P-A Series, and CGDV32NR combine cutting-edge technology, energy efficiency, and user-friendly features to deliver ideal solutions for heating needs across residential and commercial landscapes. These series showcase Desa's commitment to innovation, sustainability, and customer satisfaction, marking a significant step forward in heating technology.