HOW TO CHANGE THE DRUM SPEEDS AND REPLACE THE DRIVE BELT

The drum sander has two drum speeds - 2210 SFM or 3300 SFM. To change the sanding drum speeds or to replace the drive belt:

Disconnect machine from power source.

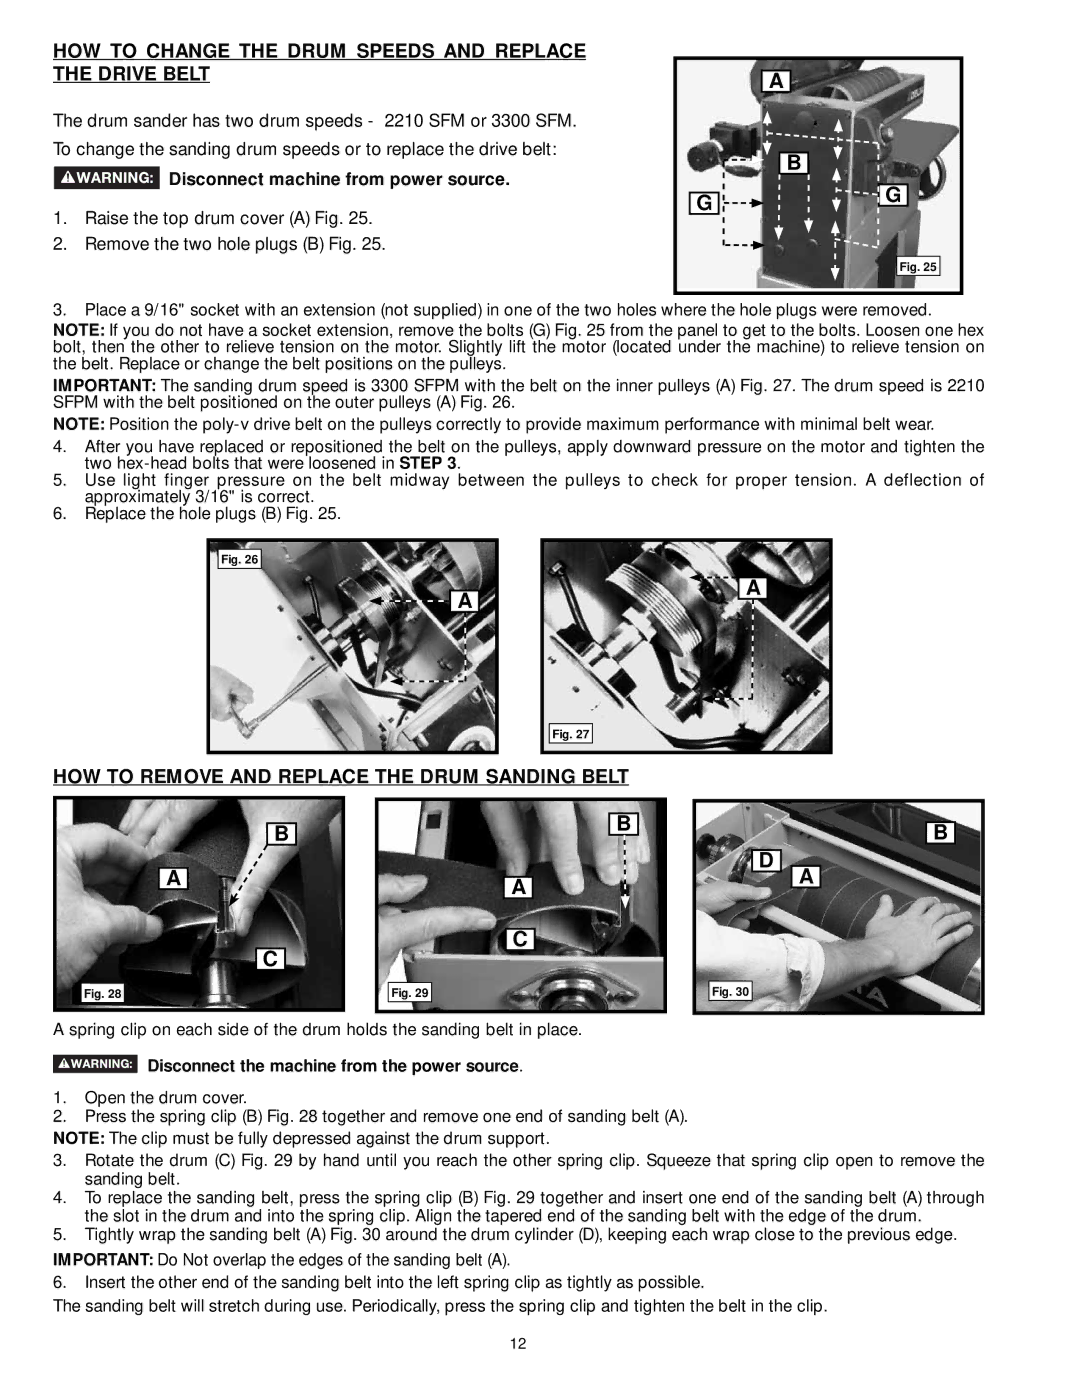
1.Raise the top drum cover (A) Fig. 25.

2.Remove the two hole plugs (B) Fig. 25.


A


B

G

G


Fig. 25

3.Place a 9/16" socket with an extension (not supplied) in one of the two holes where the hole plugs were removed.

NOTE: If you do not have a socket extension, remove the bolts (G) Fig. 25 from the panel to get to the bolts. Loosen one hex bolt, then the other to relieve tension on the motor. Slightly lift the motor (located under the machine) to relieve tension on the belt. Replace or change the belt positions on the pulleys.

IMPORTANT: The sanding drum speed is 3300 SFPM with the belt on the inner pulleys (A) Fig. 27. The drum speed is 2210 SFPM with the belt positioned on the outer pulleys (A) Fig. 26.

NOTE: Position the poly-v drive belt on the pulleys correctly to provide maximum performance with minimal belt wear.

4.After you have replaced or repositioned the belt on the pulleys, apply downward pressure on the motor and tighten the two hex-head bolts that were loosened in STEP 3.

5.Use light finger pressure on the belt midway between the pulleys to check for proper tension. A deflection of approximately 3/16" is correct.

6.Replace the hole plugs (B) Fig. 25.

Fig. 26

A

A

Fig. 27

HOW TO REMOVE AND REPLACE THE DRUM SANDING BELT

B

A

C

Fig. 28

A

C

Fig. 29

B

D

A

Fig. 30

B

A spring clip on each side of the drum holds the sanding belt in place.

Disconnect the machine from the power source.

1.Open the drum cover.

2.Press the spring clip (B) Fig. 28 together and remove one end of sanding belt (A).

NOTE: The clip must be fully depressed against the drum support.

3.Rotate the drum (C) Fig. 29 by hand until you reach the other spring clip. Squeeze that spring clip open to remove the sanding belt.

4.To replace the sanding belt, press the spring clip (B) Fig. 29 together and insert one end of the sanding belt (A) through the slot in the drum and into the spring clip. Align the tapered end of the sanding belt with the edge of the drum.

5.Tightly wrap the sanding belt (A) Fig. 30 around the drum cylinder (D), keeping each wrap close to the previous edge.

IMPORTANT: Do Not overlap the edges of the sanding belt (A).

6.Insert the other end of the sanding belt into the left spring clip as tightly as possible.

The sanding belt will stretch during use. Periodically, press the spring clip and tighten the belt in the clip.

12

Page 12
Image 12
DeWalt 31-260X HOW to Change the Drum Speeds and Replace the Drive Belt, HOW to Remove and Replace the Drum Sanding Belt

31-260X specifications

The DeWalt 31-260X is a powerful and versatile cordless drill that stands out in the competitive world of power tools. With its combination of robust performance, advanced features, and user-friendly design, it has become a favorite among both professionals and DIY enthusiasts alike.

One of the main features of the DeWalt 31-260X is its high-performance motor, which delivers impressive torque and speed to tackle a variety of materials and applications. The drill operates at multiple speed settings, allowing users to adjust the RPM according to their specific project needs. This feature is particularly useful when working with different materials, such as wood, metal, or plastic, ensuring optimal results with minimal effort.

The 31-260X also boasts a compact and lightweight design, making it easy to maneuver in tight spaces and reducing user fatigue during extended use. The ergonomic grip is designed for comfort and control, providing a secure hold that enhances precision during drilling and driving tasks.

In terms of battery technology, the DeWalt 31-260X is equipped with the brand's state-of-the-art lithium-ion batteries, which deliver extended run times and shorter charge times. This ensures that users can work for longer periods without interruptions, and when it is time to recharge, the batteries are ready to go in no time. Additionally, the drill features an integrated battery level indicator, allowing users to monitor the remaining power at a glance.

Another standout characteristic of the DeWalt 31-260X is its durable construction. Built to withstand the rigors of job site conditions, the drill features a rugged housing that protects internal components from dust and debris. This durability enhances its lifespan, making it a smart investment for those who rely on their tools day in and day out.

To further enhance its versatility, the 31-260X is compatible with a wide range of accessories, including drill bits and driving attachments, catering to various tasks with ease. With a quick-release chuck, users can effortlessly switch between different bits, maximizing productivity on the job.

In summary, the DeWalt 31-260X is a standout cordless drill that combines power, efficiency, and durability. Its impressive motor performance, user-friendly design, and advanced battery technology make it an invaluable tool for anyone looking to complete projects with precision and ease. Whether for professional use or home improvement tasks, the DeWalt 31-260X is a reliable choice that won’t disappoint.