DeWalt 31-260X HOW to Attach the Handwheel, HOW to Attach and Level the Feed Table

Models: 31-260X

1 60
Download 60 pages 43.99 Kb
Page 8
Image 8

HOW TO ATTACH THE HANDWHEEL

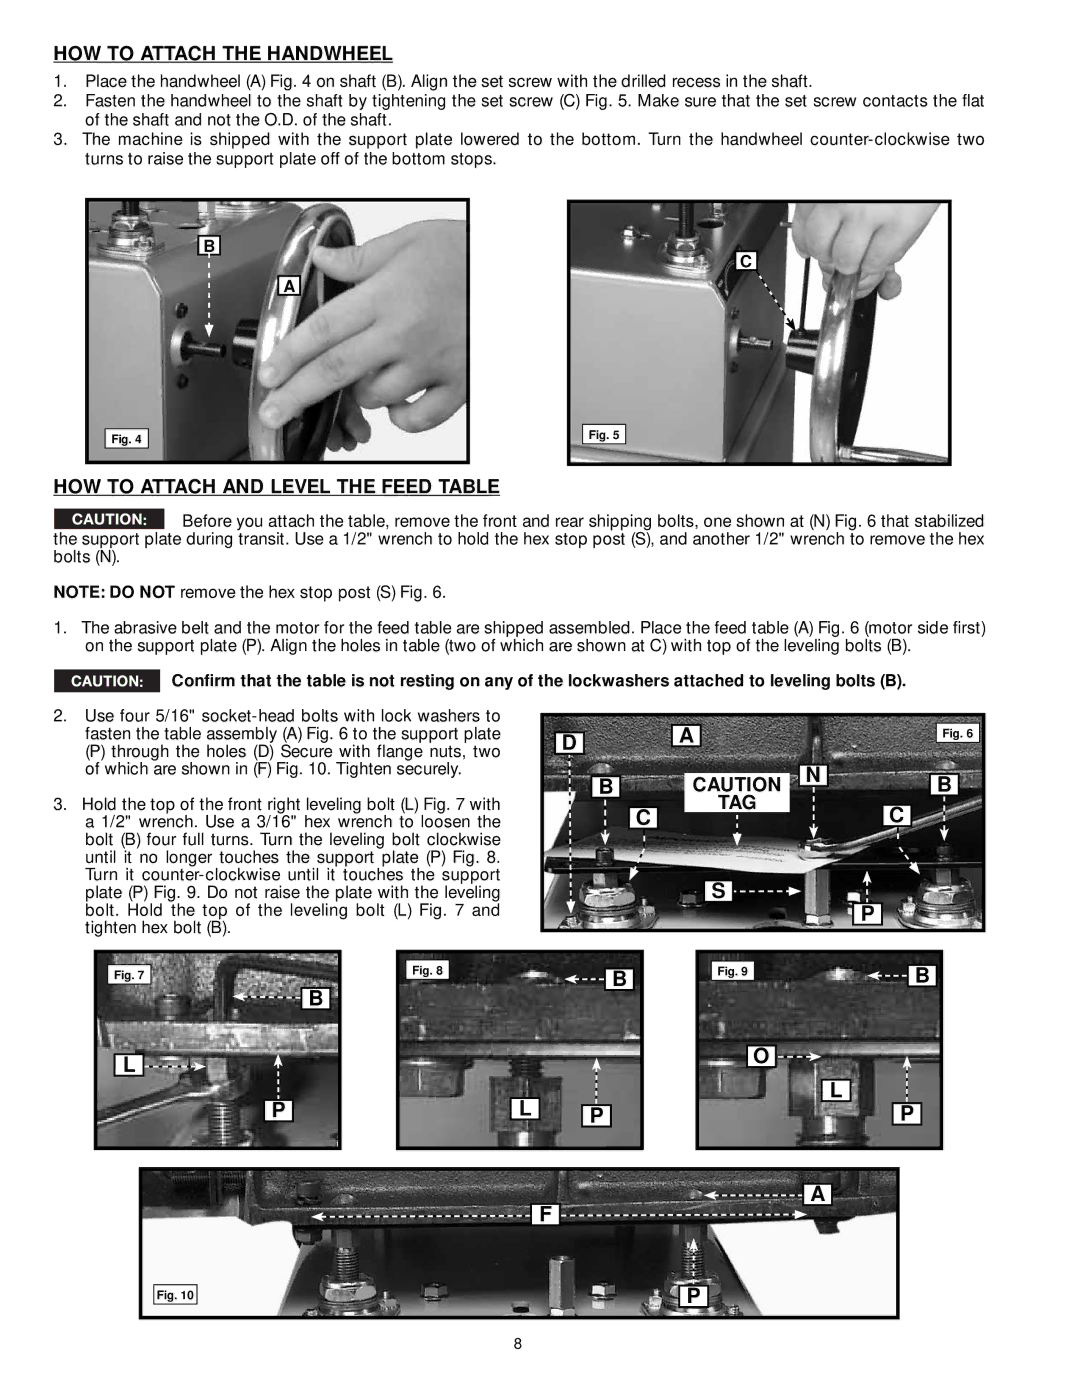
1.Place the handwheel (A) Fig. 4 on shaft (B). Align the set screw with the drilled recess in the shaft.

2.Fasten the handwheel to the shaft by tightening the set screw (C) Fig. 5. Make sure that the set screw contacts the flat of the shaft and not the O.D. of the shaft.

3.The machine is shipped with the support plate lowered to the bottom. Turn the handwheel counter-clockwise two

turns to raise the support plate off of the bottom stops.

B

A

C

Fig. 4

Fig. 5

HOW TO ATTACH AND LEVEL THE FEED TABLE

Before you attach the table, remove the front and rear shipping bolts, one shown at (N) Fig. 6 that stabilized the support plate during transit. Use a 1/2" wrench to hold the hex stop post (S), and another 1/2" wrench to remove the hex bolts (N).

NOTE: DO NOT remove the hex stop post (S) Fig. 6.

1.The abrasive belt and the motor for the feed table are shipped assembled. Place the feed table (A) Fig. 6 (motor side first) on the support plate (P). Align the holes in table (two of which are shown at C) with top of the leveling bolts (B).

Confirm that the table is not resting on any of the lockwashers attached to leveling bolts (B).

2.Use four 5/16" socket-head bolts with lock washers to fasten the table assembly (A) Fig. 6 to the support plate

(P)through the holes (D) Secure with flange nuts, two of which are shown in (F) Fig. 10. Tighten securely.

3.Hold the top of the front right leveling bolt (L) Fig. 7 with a 1/2" wrench. Use a 3/16" hex wrench to loosen the bolt (B) four full turns. Turn the leveling bolt clockwise until it no longer touches the support plate (P) Fig. 8. Turn it counter-clockwise until it touches the support plate (P) Fig. 9. Do not raise the plate with the leveling bolt. Hold the top of the leveling bolt (L) Fig. 7 and tighten hex bolt (B).

D

B

C

A

CAUTION N TAG

S

Fig. 6

B

C

P


B


Fig. 7


Fig. 8


B


Fig. 9


B


O


L


L


L


P


P


P


A


F


Fig. 10

P

8

Page 8
Image 8
DeWalt 31-260X instruction manual HOW to Attach the Handwheel, HOW to Attach and Level the Feed Table

31-260X specifications

The DeWalt 31-260X is a powerful and versatile cordless drill that stands out in the competitive world of power tools. With its combination of robust performance, advanced features, and user-friendly design, it has become a favorite among both professionals and DIY enthusiasts alike.

One of the main features of the DeWalt 31-260X is its high-performance motor, which delivers impressive torque and speed to tackle a variety of materials and applications. The drill operates at multiple speed settings, allowing users to adjust the RPM according to their specific project needs. This feature is particularly useful when working with different materials, such as wood, metal, or plastic, ensuring optimal results with minimal effort.

The 31-260X also boasts a compact and lightweight design, making it easy to maneuver in tight spaces and reducing user fatigue during extended use. The ergonomic grip is designed for comfort and control, providing a secure hold that enhances precision during drilling and driving tasks.

In terms of battery technology, the DeWalt 31-260X is equipped with the brand's state-of-the-art lithium-ion batteries, which deliver extended run times and shorter charge times. This ensures that users can work for longer periods without interruptions, and when it is time to recharge, the batteries are ready to go in no time. Additionally, the drill features an integrated battery level indicator, allowing users to monitor the remaining power at a glance.

Another standout characteristic of the DeWalt 31-260X is its durable construction. Built to withstand the rigors of job site conditions, the drill features a rugged housing that protects internal components from dust and debris. This durability enhances its lifespan, making it a smart investment for those who rely on their tools day in and day out.

To further enhance its versatility, the 31-260X is compatible with a wide range of accessories, including drill bits and driving attachments, catering to various tasks with ease. With a quick-release chuck, users can effortlessly switch between different bits, maximizing productivity on the job.

In summary, the DeWalt 31-260X is a standout cordless drill that combines power, efficiency, and durability. Its impressive motor performance, user-friendly design, and advanced battery technology make it an invaluable tool for anyone looking to complete projects with precision and ease. Whether for professional use or home improvement tasks, the DeWalt 31-260X is a reliable choice that won’t disappoint.