DM 2610935540
Assembly
! WARNING | Always unplug Rotary Tool before |
| changing accessories, changing |
|
collets or servicing your Rotary Tool.
SHAFT LOCK
BUTTON
COLLET
WRENCH
TO TIGHTEN
COLLET
NUT
TO LOOSEN | COLLET |
|
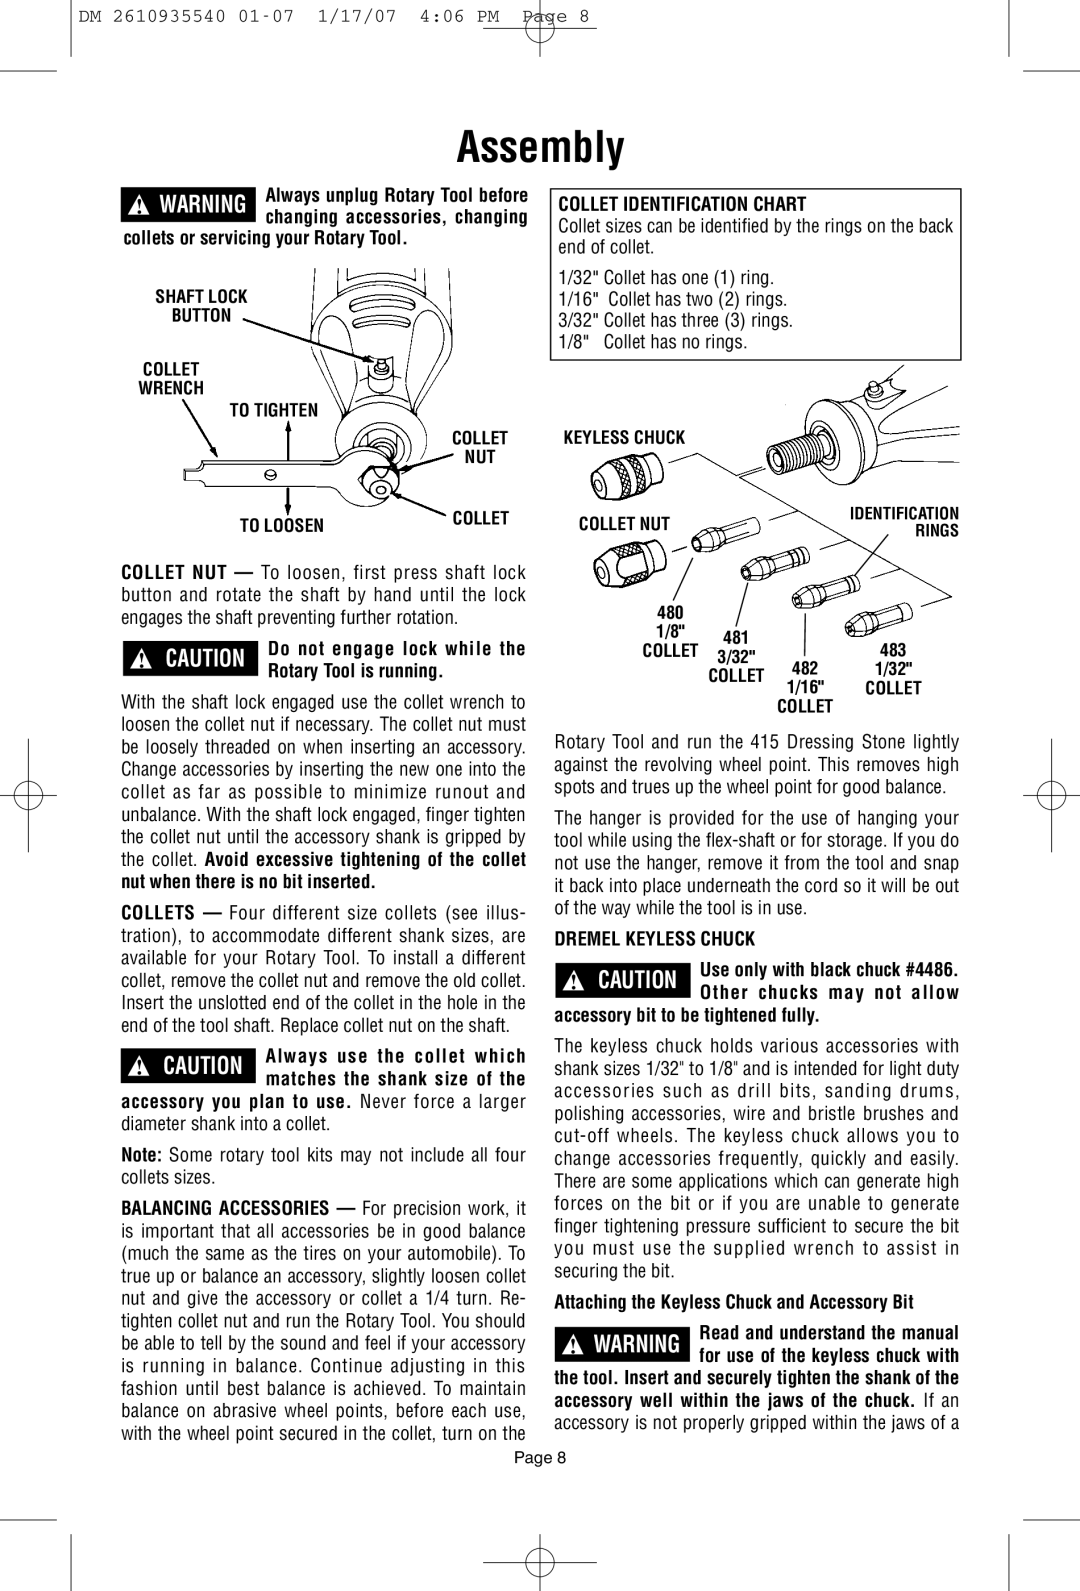
COLLET NUT — To loosen, first press shaft lock button and rotate the shaft by hand until the lock engages the shaft preventing further rotation.
! CAUTION | Do not engage lock while the |
| Rotary Tool is running. |
|
With the shaft lock engaged use the collet wrench to loosen the collet nut if necessary. The collet nut must be loosely threaded on when inserting an accessory. Change accessories by inserting the new one into the collet as far as possible to minimize runout and unbalance. With the shaft lock engaged, finger tighten the collet nut until the accessory shank is gripped by the collet. Avoid excessive tightening of the collet nut when there is no bit inserted.
COLLETS — Four different size collets (see illus- tration), to accommodate different shank sizes, are available for your Rotary Tool. To install a different collet, remove the collet nut and remove the old collet. Insert the unslotted end of the collet in the hole in the end of the tool shaft. Replace collet nut on the shaft.
!CAUTION Always use the collet which matches the shank size of the
accessory you plan to use. Never force a larger diameter shank into a collet.
Note: Some rotary tool kits may not include all four collets sizes.
BALANCING ACCESSORIES — For precision work, it is important that all accessories be in good balance (much the same as the tires on your automobile). To true up or balance an accessory, slightly loosen collet nut and give the accessory or collet a 1/4 turn. Re- tighten collet nut and run the Rotary Tool. You should be able to tell by the sound and feel if your accessory is running in balance. Continue adjusting in this fashion until best balance is achieved. To maintain balance on abrasive wheel points, before each use, with the wheel point secured in the collet, turn on the
COLLET IDENTIFICATION CHART
Collet sizes can be identified by the rings on the back end of collet.
1/32" Collet has one (1) ring. 1/16" Collet has two (2) rings. 3/32" Collet has three (3) rings. 1/8" Collet has no rings.
KEYLESS CHUCK
COLLET NUT |
|
| IDENTIFICATION | |
|
| RINGS | ||
|
|
| ||
480 |
|
|
| |
1/8" |
|
|
| |
481 |
| 483 | ||
COLLET |
| |||
3/32" | 482 | |||
| 1/32" | |||
| COLLET | |||
| 1/16" | COLLET | ||
|
| |||
|
|
COLLET
Rotary Tool and run the 415 Dressing Stone lightly against the revolving wheel point. This removes high spots and trues up the wheel point for good balance.
The hanger is provided for the use of hanging your tool while using the
DREMEL KEYLESS CHUCK
! CAUTION | Use only with black chuck #4486. |
| Other chucks may not allow |
|
accessory bit to be tightened fully.
The keyless chuck holds various accessories with shank sizes 1/32" to 1/8" and is intended for light duty accessories such as drill bits, sanding drums, polishing accessories, wire and bristle brushes and
Attaching the Keyless Chuck and Accessory Bit
! WARNING | Read and understand the manual |
| for use of the keyless chuck with |
|
the tool. Insert and securely tighten the shank of the accessory well within the jaws of the chuck. If an accessory is not properly gripped within the jaws of a
Page 8
