Manuals
/
Dyna-Glo
/
Household Appliance
/
Electric Heater
Dyna-Glo
RMC-KFA65T, RMC-KFA45T Never Leave The Heater Unattended While Burning, Tools Required
Models:
RMC-KFA45T, RMC-KFA65T, RMC-KFA120T, RMC-KFA170T, RMC-KFA210T
RMC-KFA65T
RMC-KFA210T
RMC-KFA45T
1
6
28
28
Download
28 pages
6.3 Kb
3
4
5
6
7
8
9
10
Troubleshooting
Specification
Wiring Diagram
Maintenance
Accessories
Unpacking And Assembly
I. Pump Pressure Adjustment
Safety
Features
Page 6
Image 6
Page 5
Page 7
Page 6
Image 6
Page 5
Page 7
Contents
MODEL RMC-KFA45T, RMC-KFA65T, RMC-KFA120T
PORTABLE FORCED AIR HEATERS
RMC-KFA170T, RMC-KFA210T
CFM RMC INTERNATIONAL 3501 W. HOWARD ST
3.RISK OF ELECTRIC SHOCK
WARNINGS 1.RISK OF INDOOR AIR POLLUTION
2.RISK OF BURNS/FIRE/EXPLOSION
NEVER LEAVE THE HEATER UNATTENDED WHILE BURNING
INTRODUCTION
2. FEATURES
PAGE #
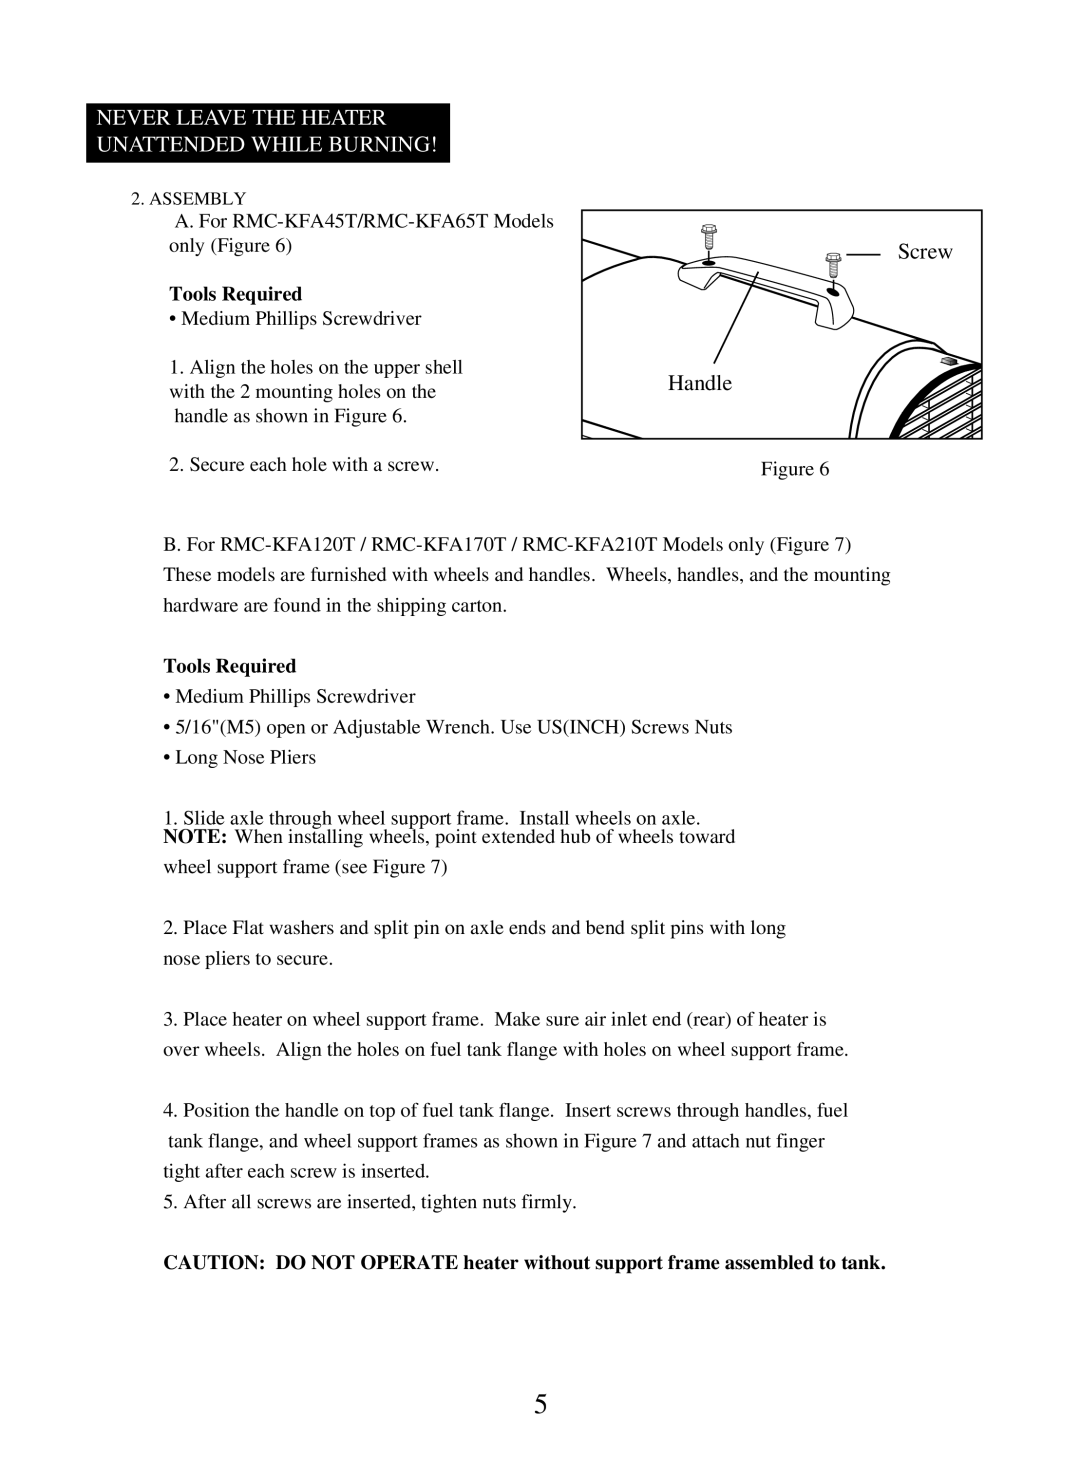
NEVER LEAVE THE HEATER UNATTENDED WHILE BURNING
NEVER LEAVE THE HEATER UNATTENDED WHILE BURNING
Handle
3.UNPACKING AND ASSEMBLY
NEVER LEAVE THE HEATER UNATTENDED WHILE BURNING
Tools Required
Tools Required
Handle Screw Hot Air Outlet Fuel Tank Flange
4. KEROSENE 1-K
NEVER LEAVE THE HEATER UNATTENDED WHILE BURNING
Air Inlet Wheel Support Frame Nut Wheel Axle
NEVER LEAVE THE HEATER UNATTENDED WHILE BURNING
The Safety System
5.OVERVIEW OF HEATERS DESIGN
FUSE TYPE
6. FUELING YOUR HEATER
OPERATION
NEVER LEAVE THE HEATER UNATTENDED WHILE BURNING
A. FUEL TANK
9.MAINTENANCE
8. LONG TERM STORAGE OF YOUR HEATER
B. AIR INTAKE FILTER
E. NOZZLE
C. AIR OUTPUT FILTER, LINT FILTER
D. FAN BLADES
NEVER LEAVE THE HEATER UNATTENDED WHILE BURNING
F. SPARK PLUG
NEVER LEAVE THE HEATER UNATTENDED WHILE BURNING
G. PHOTOCELL
NEVER LEAVE THE HEATER UNATTENDED WHILE BURNING
Fuel Line Side Cover
H. FUEL FILTER
NEVER LEAVE THE HEATER UNATTENDED WHILE BURNING
Fuel Line
NEVER LEAVE THE HEATER UNATTENDED WHILE BURNING
Adaptor Nozzle
I FUEL VALVE
I. PUMP PRESSURE ADJUSTMENT
NEVER LEAVE THE HEATER UNATTENDED WHILE BURNING
POSSIBLE CAUSE
10. TROUBLE SHOOTING GUIDE
TROUBLE
CORRECTIVE ACTION
B WIRING DIAGRAM RMC-KFA120T
11. WIRING DIAGRAM
A WIRING DIAGRAM RMC-KFA45T / RMC-KFA65T
NEVER LEAVE THE HEATER UNATTENDED WHILE BURNING
D WIRING DIAGRAM RMC-KFA210T
11. WIRING DIAGRAM
C WIRING DIAGRAM RMC-KFA170T
NEVER LEAVE THE HEATER UNATTENDED WHILE BURNING
12. SPECIFICATIONS
MODEL
NEVER LEAVE THE HEATER UNATTENDED WHILE BURNING
NEVER LEAVE THE HEATER UNATTENDED WHILE BURNING
13. EXPLODED PARTS DRAWING RMC-KFA210T Model Only
NEVER LEAVE THE HEATER UNATTENDED WHILE BURNING
NEVER LEAVE THE HEATER UNATTENDED WHILE BURNING
FA1010 all models
ACCESSORIES
Air Pressure Gauge
Thermostat
DESCRIPTION
14. PARTS LIST RMC-KFA210T Model Only
NEVER LEAVE THE HEATER UNATTENDED WHILE BURNING
RMC-KFA210T
FA1010 all models
ACCESSORIES
Air Pressure Gauge
Thermostat
2 RMC-KFA120T/170T/210TMODEL
14. PARTS LIST WHEELS AND HANDLE
1 RMC-KFA45T/65TMODELS
NEVER LEAVE THE HEATER UNATTENDED WHILE BURNING
EDITION
07/03 Rev
4221
Top
Page
Image
Contents