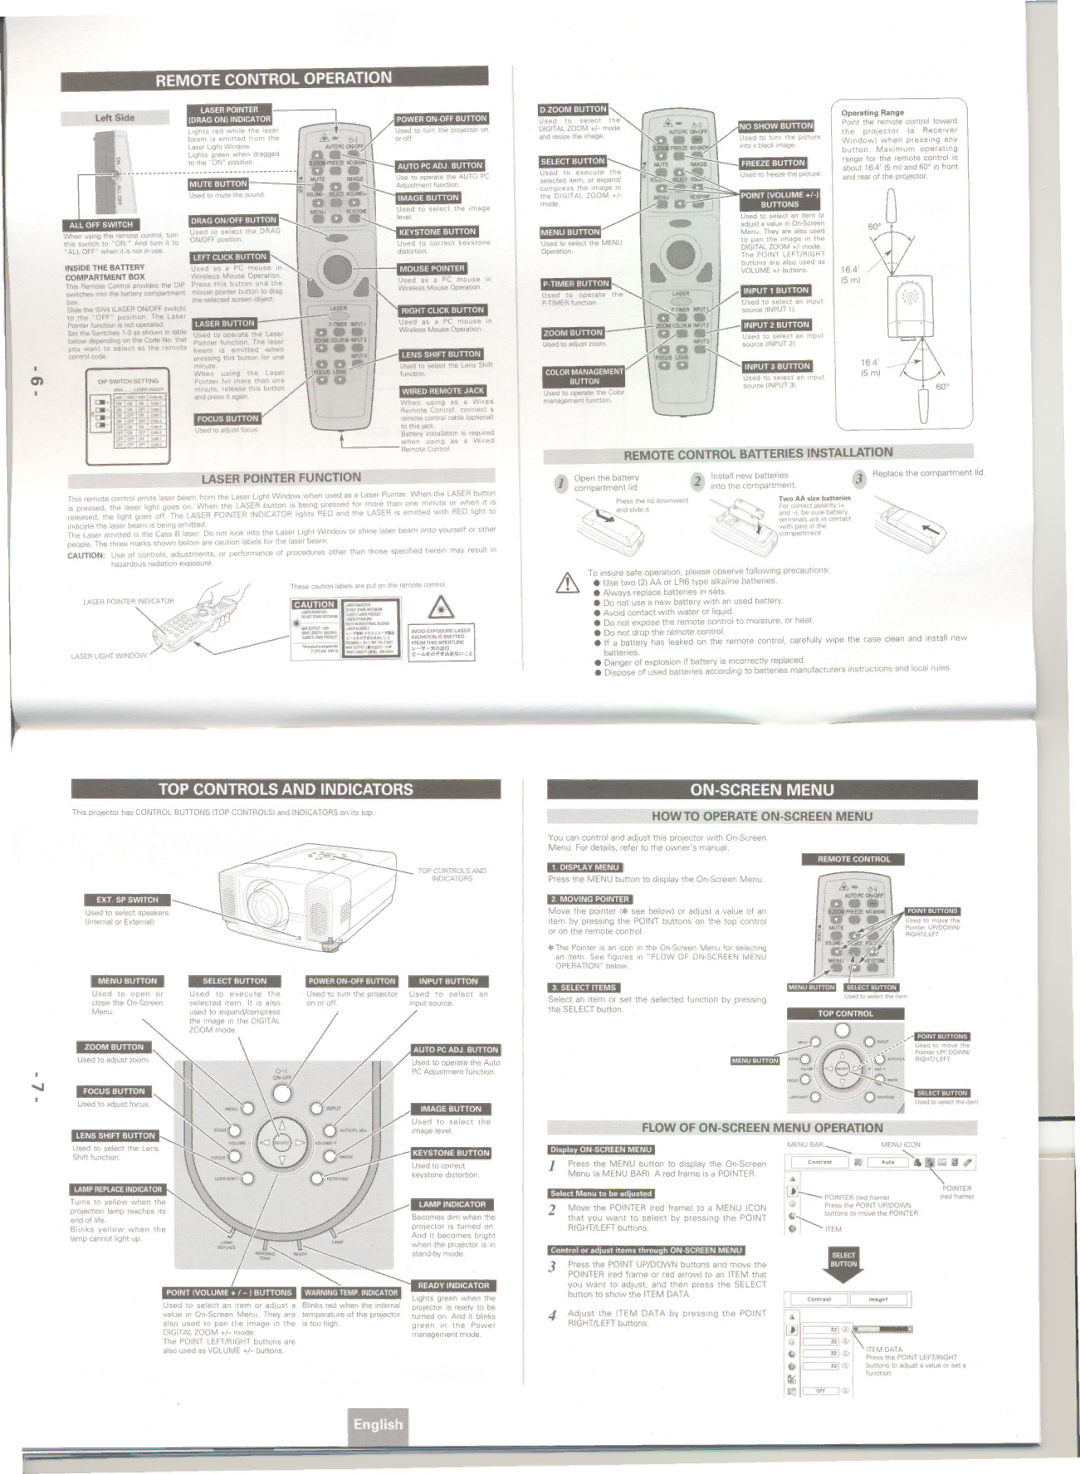
REMOTE CONTROL

OPERATION


LeltSide


~.,


~~

6-'"


1

~':'I"I;OI~"'-"'on


beamISemlnedfromthe


a::.


oroft


!i


LaserligtltW'tfIdoN.


o\IJTOPCCIK'II":'


Lights green

when

dragged


.


!!!8

!

I

.m

"

".


~


to the ~OW

position.


I


FIUZE


~


;-mnnnnnnmmm-mnmmnn...


.""'1.


J!:thIS


: WTfaQilE+~


\

.


~


I.II:8:'

I~1


a


i

~~.,:r~~~~ AUTO PC


11


Used to mute the sound,


D .


111::8:'...


g


~3.


..


.

I


~:,1iD~,j


r


~

~::~toSelectthe.mage


.


~' '-


-':: ,.


~

:t:aJo

h..I:::II:tll...I...

VoIheoUSII'\Qtheremotecontrol,turn~


SWitch to .aN.- And

turn It 10

ONt'OFF posotlOf\.


,~


'AlL .oFF- when ,t is not in use

.1:12...1111.:1

10'.

.


,-


Used to

correct

keystone


.


,

distortIOn.


t.


- ,;


~;:p~~~~~~


~~~.~e::~~; ~::r~~iO~~


1

_,'.IIII...,:IItl.JI~:.

'M

Remol8Co<>"~"""",

the D'P P".. \hI. b,tloo

eod the


.


U"d.. . PCmo,,,'0

SWItchesIOtothe binary c:ompartm'9ntmousepoIOler button to drag


...~

WireJotss Mouse OperatlOf1.

".h'J.:tll...)~1


Oper.tlng


R.ng.


~-".


""-


~~~ALt~~~t~~~


Point the remote control toward


1"- ~~fC~.


I':'


the

projector

la

Receiver

end I8SIl8

lhe

1ITI8Q8.


'


. .

1

Used 10 turn

the

piCture

Window)

when

pressing

any


.


.

button.

Ma)(imum

operating

"'1::1'::I".:I'I.I'h"


.


fII&Zf

11);.0.)

II'Itoa blaCk wnage )~.

range

for

the remote

control is

.!


YUTE


.


~:I'I::I:r"':II~tI


about

16.4'!5 mJ and W

in front

Used to

execute 1~the' CS~!!8' _

I

Used

10freeze the pICture

and rear of the pro;ector.


seleCtedltetn.

Of expand/


.


eu::~~


compress


~


!~

..


the Image '"


. §.

--.Q:

.,


.


the DIGITA.L ZOOM+1-

: MW


- ~. .


mode


'-.a_.

.\


,.


[.

~


.

Uoed10..''''I eo'.m '"


1...!::h.".:'


I... A ' ."


adjust a value 11'IOn-Screen


Menu,

They

are also """


Used 10 seIec1the MENU

;


-.


~~~I~~a~: ~e .


.


OperatIOn.


The POINTLEFTIRIGHT


a..'- .


.


buttonsare also used. as

16.4'


/.


\

."


VOLUME+I-buttons15m)


~sedI~~pera:8-'; the


- ~ --

-


.1~I:.Ih..:t


)~.


box

SlIde the 91'14 tLASERONlOfF swrtchl

tO,the -.oFF"poslt.on. The Laser Pointer IUOCtionis notopfll8led,

=~=~:s=~t~:

=u:an~o . '$1 let as the remote

DIP SWITCH::_SETTflG-==

. 011 011 Q8,

w 011 Q81

N 011 _ 011 Q81

_ 011 _ _ Q8' 01' 011 (10 Q8.

_ 011 _ Q81

,

OJ'001'_ Q81

th,- '," acted v.reAn ob;ect


,~


- ---lASER

... .1..,:I..:I...I.I~.


.

,..--


; INPIITI


D..

~~~~e~o,~~~:~:.~:e~:::~!t~~;

beam

s emitted

when


""""

presSing

th''> button

for Of"


U

0

POinter 10' mOle than one

'0

.

release this

button

(~J

mmUle.

=


.ndpr8S$,tilQlln


Used 10adjust focus

<0.,

t


Used as a PC mouse in WifelessMouseOperalion.

Used 10 seIecI me lens Shift function

.'.'jI'I::I,..t::l.."...=-f"II:18

Whan uSIng as . Wired Remote Control. connect. remote control cable loptlOO8ll

to this jack.

Battery instalLation is required

when using as . Wired

Remote Control

P.TIMERfunction

.

C_ _


r

I

Used 10 se~ct an Input


p.ftIER II'\fI"I


source

(INPUT

1)


..I.I'h.,.:tll."I~. ~z!.c!!w!!~.I~I:.I

_

'


Used

:tI'.'''I~.


a~


I

to select

an

input

Used to adtvst zoom.

\,Jill

a

.1:


sourcenNPUT

21


"""''''''


""J....


G G


J

I~I:.I

:tI..I.]~.


Used to select an input


source (INPUT 31

60'

REMOTE CONTROL BATTERIES INSTALLATION

LASER POINTER FUNCTION

ThIS remote control emits laser beam from the Laser light Window when used as a Laser Pointer. When the lASER button

IS plessed. the laser hght goes on. When the LASER button is being plessed for more than one minute or when It is

released. the light goes off. The lASER POINTER INDICATOR lights RED and the lASER IS emitted with RED light to indicate the laser beam is being emitted

The laser emitted is the Cass II laser. 00 not loOk into the laser light Window or shine laser beam onto yourself or other

peopte. The three marks shown below are caution labels for the laser beam

CAUTION: Use of controls, adlustments, or pertormance of plocedures other than those specified herein may result in hazardous radiation exposure.

These caution Labels are P'Jt on the remote control

3 Replace the companment lid.

1 ~~;~~~~~t~~

"""'-.


Press

the lid downwdfd

"~' "'..

T_AAIiz.batt8ri8s

_ -~

end

"

FOfCOl'rectpolanty(+

and -I. be SUfe bal18fY


t8flT'llnalsIfe

in contact

""

.


.~wllhpinsinthe

.

~


.

~.

""

'. :jCOmpartmenl


~..


~. Use two (2) AA or LR6 type alkaline batteries.

. Always replace batteries in sets

. Do not use a new battery with an used battery

. Avoid contact with water or liquid

. Do not e)(pose the remote control to moisture, Ofheat.

. Do not drop the remote control.

. If a battery has leaked on the remote control. carefully wipe the case clean and install new batteries

. Danger of explosion if battery is incorrect)y replaced.

. Dispose of used batteries according to batteries manufacturers instructions and local rulesTo Insure safe operation. please observe following precautions:

TOP CONTROLS AND INDICATORS

This projector has CONTROL BUTTONS (TOPCONTROLS) and INDICA TORS on its top

_..,.::1.,...:'

1.._

-""'::1.:".:"'.111.'_

.:.!t)'..I::I..'h'!!'I:l:ll:tI~.

_1~I:I...:t"."I.'_

Used

to

open

or


Used

to

e)(ecute the

Used to turn the Pfo,ectOf

Used

to select

an

close the On-Screen


selected

item. It is also

on or off


input

source.


Menu.


used

to expand/compress


the image in the DIGITAL


ZOOM

mode.


___"'''lh',':III.''h'_


~


Usedto adjustzoom." .


0-1

/

U.ed 10ope'ale

the Auto


..


rJI

PC Adjustment function


.'


QN.(W


_::I.III

~t


h'_~,

~ \0/ J


ON-SCREEN MENU

HOWTO OPERATE ON-SCREEN MENU

You can control and adjust this projector with On-Screen

Menu. For details. refer to the owner's manual

__lItoo"':I"".,."::I.'''8

Press the MENU button to display the On-Screen Menu.

"Il.,(I.'ICtI:I.lh.'..::I..

Move the pointer (* see below) or adjust a value of an item by pressing the POINT buttons on the top control or on the remote control.

. The Pointer is an icon in the On-Screen Menu for selecting

an item. See figures in HFlOW OF ON-SCREEN MENU

OPERA TIOW below

-~"'::I'::I"."::I,'......

Select an item or set the selected function by pressing the SELECTbutton.

I

Uoedto adj"stfoc"s."'--


_~'.


~

*.;,

U

-.n

/

J

. ..

..:


1


.fj


. .

..t...

I.~/

Used

to

select

the


'

j


C


"..'~i'


<l ee>,_


LL---".n"'""

~~f~-;':"~

lhe Leos


.

.::0


'.

fJ


. 0:::::


i'.


.

..

~


Uoedto conect


~

1.I.f'fS""'O-


d..'

" OIllrl'lTOlC


keystonedistortion.


Tu~~"

t~ ~e;,o w ~h~n :~e

...


_"'1"'1=--1""1["'.'''1'_


prOf8Cl.IOI"Ilamp reaches

ItS

~. ., "


~


Becomes

dim when

the

end of life.


.


projector

IS turned

on.

Blinks

yellow.

when

the

,"


And it

becomes

bright


r:t


.~-_.


""


-


~


""~,,,,.,.'''"''''''''-


~~


=.:::-"


:i.II~ ,(.I..h...ZW.8!!l.:I...I'I~

a

.'."".I.'II.'[t8I:1,'..:8h'I.II.,..'I'I..

lights

green when

the


Used

to

select an

item

or

adjust

Blinks

red when the internal

Pfo;ectOf is ready to be


value

In On-Screen

Menu.

They are

temperature

of the

projector

turned

on. And

it blinks


also

used

to pan

the image in the

is too high.


green

in

the

Power


DIGITAL ZOOM +/- mode.


management mode.


The POINT lEFT/RIGHT buttons are


also used as VOLUME +/- bunons

FLOW OF ON-SCREEN

1 Press the MENU button to display the On-Screen Menu (a MENU BARL A red frame is a POINTER.

2 Move the POINTER (red frame) to a MENU ICON that you want to select by pressing the POINT

RIGHTILEFTbuttons

3 Press the POINT UP/DOWN buttons and move the POINTER (red frame or red arrow) to an ITEM that

you want to adjust, and then press the SELECT button to show the ITEM DATA.

4Adjust the ITEM DATA by pressing the POINT

RIGHTILEFT buttons.

L-

MENU

OPERATION


MENUBAR~_

~~,


_ ~

_

LJ ~M":'-J

.:.. .~.

J 4

..."\

. ,

~._


__J

..


I~~

POINTERIredtramel


(~I~~I


Pressthe POINTUP,{)OVIJN


I C


buttons to move the POINTER


.~ITEM.

.'


'


l~tE=:EJf:


.

I~'

'\


L~

~:T~INTLEFTJRiGHT

.

~::]!I,

buttons to aellust a v8Iue Of seta

I:~I

.I

t,O<1~


Page 4
Image 4
Eiki LC-X7L owner manual Expand, Buttonsare also used. as, LItooI.,.I.8, Keystonedistortion, RIGHTILEFTbuttons

LC-X7L specifications

The Eiki LC-X7L is a high-performance LCD projector designed to meet the demands of various professional settings, including classrooms, conference rooms, and auditoriums. With its advanced features and technologies, the LC-X7L provides outstanding image quality, reliability, and versatility, making it an ideal choice for educators, presenters, and business professionals alike.

One of the standout characteristics of the Eiki LC-X7L is its exceptional brightness. With a brightness rating of up to 6000 ANSI lumens, this projector ensures that presentations remain visible even in well-lit environments. This capability is essential for engaging audiences without the need to dim the lights excessively.

The LC-X7L boasts a native XGA resolution of 1024 x 768 pixels, allowing it to deliver sharp and clear images. Its advanced LCD technology contributes to vibrant colors, rich contrast, and improved image definition. The 3LCD design offers a broad color palette and enhanced brightness uniformity, ensuring that images remain impactful and lifelike.

Connectivity is a significant advantage of the Eiki LC-X7L, as it is equipped with multiple input options, including HDMI, VGA, and S-Video ports. This flexibility allows users to connect various devices such as laptops, DVD players, and document cameras seamlessly. Additionally, the projector supports wireless connectivity options, enabling easy integration with smart devices for added convenience in presentation scenarios.

Another notable feature is the projector's long lamp life, lasting up to 4000 hours in standard mode and even longer in eco mode. This durability reduces the frequency of lamp replacements, lowering overall maintenance costs. Moreover, the Eiki LC-X7L is equipped with an efficient cooling system that minimizes noise output, allowing for quieter operation during presentations.

Ease of use is a priority for the LC-X7L, and it incorporates features like zoom and focus controls, as well as an intuitive on-screen menu. Remote control functionality allows users to manage presentations from a distance, enhancing overall interactivity.

In conclusion, the Eiki LC-X7L combines high brightness, impressive image quality, multiple connectivity options, and user-friendly features, making it a versatile choice for professionals seeking a reliable projector for various applications. With its robust performance and advanced technologies, the LC-X7L stands out as a leading solution for effective visual presentations.