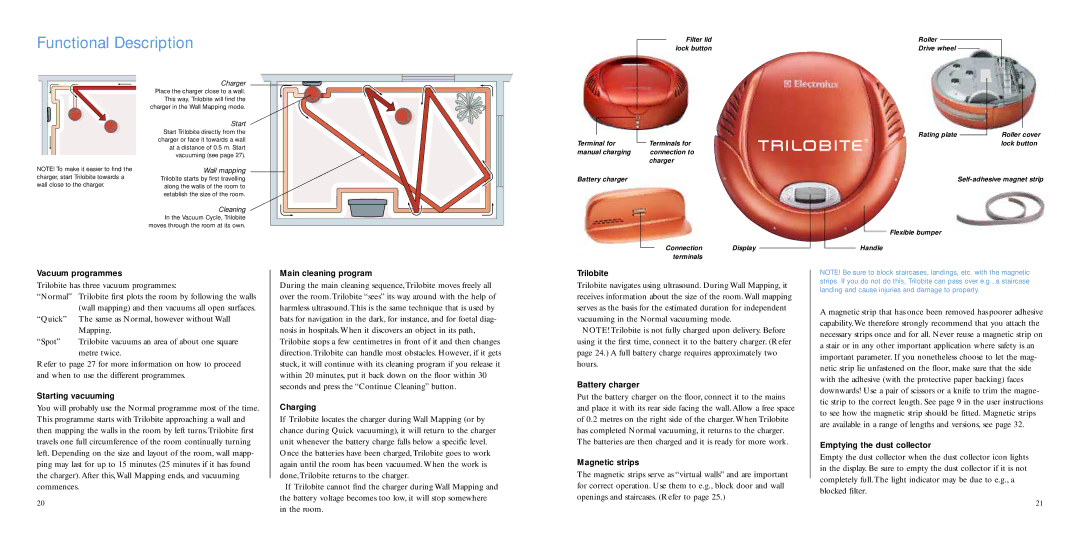
Electrolux 8228226-02 Functional Description, Vacuum programmes, Starting vacuuming, Charging

Models: 8228226-02

1 10
Download 10 pages 4.94 Kb
Page 4
Image 4
Functional Description

Functional Description

Filter lid

Roller


lock button

Drive wheel


NOTE! To make it easier to find the charger, start Trilobite towards a wall close to the charger.

Charger

Place the charger close to a wall. This way, Trilobite will find the charger in the Wall Mapping mode.

Start

Start Trilobite directly from the charger or face it towards a wall at a distance of 0.5 m. Start vacuuming (see page 27).

Wall mapping

Trilobite starts by first travelling along the walls of the room to establish the size of the room.

Terminal for manual charging

Battery charger

Terminals for connection to charger


Rating plate


Roller cover


®


lock button


Self-adhesive magnet strip

Cleaning

In the Vacuum Cycle, Trilobite moves through the room at its own.

Connection Display terminals

Flexible bumper

Handle

Vacuum programmes

Trilobite has three vacuum programmes:

“Normal”

Trilobite first plots the room by following the walls


(wall mapping) and then vacuums all open surfaces.

“Quick”

The same as Normal, however without Wall


Mapping.

“Spot”

Trilobite vacuums an area of about one square


metre twice.

Refer to page 27 for more information on how to proceed and when to use the different programmes.

Starting vacuuming

You will probably use the Normal programme most of the time. This programme starts with Trilobite approaching a wall and then mapping the walls in the room by left turns.Trilobite first travels one full circumference of the room continually turning left. Depending on the size and layout of the room, wall mapp- ping may last for up to 15 minutes (25 minutes if it has found the charger). After this,Wall Mapping ends, and vacuuming commences.

20

Main cleaning program

During the main cleaning sequence,Trilobite moves freely all over the room.Trilobite “sees” its way around with the help of harmless ultrasound.This is the same technique that is used by bats for navigation in the dark, for instance, and for foetal diag- nosis in hospitals.When it discovers an object in its path, Trilobite stops a few centimetres in front of it and then changes direction.Trilobite can handle most obstacles. However, if it gets stuck, it will continue with its cleaning program if you release it within 20 minutes, put it back down on the floor within 30 seconds and press the “Continue Cleaning” button.

Charging

If Trilobite locates the charger during Wall Mapping (or by chance during Quick vacuuming), it will return to the charger unit whenever the battery charge falls below a specific level. Once the batteries have been charged,Trilobite goes to work again until the room has been vacuumed.When the work is done,Trilobite returns to the charger.

If Trilobite cannot find the charger during Wall Mapping and the battery voltage becomes too low, it will stop somewhere in the room.

Trilobite

Trilobite navigates using ultrasound. During Wall Mapping, it receives information about the size of the room.Wall mapping serves as the basis for the estimated duration for independent vacuuming in the Normal vacuuming mode.

NOTE! Trilobite is not fully charged upon delivery. Before using it the first time, connect it to the battery charger. (Refer page 24.) A full battery charge requires approximately two hours.

Battery charger

Put the battery charger on the floor, connect it to the mains and place it with its rear side facing the wall. Allow a free space of 0.2 metres on the right side of the charger.When Trilobite has completed Normal vacuuming, it returns to the charger. The batteries are then charged and it is ready for more work.

Magnetic strips

The magnetic strips serve as “virtual walls” and are important for correct operation. Use them to e.g., block door and wall openings and staircases. (Refer to page 25.)

NOTE! Be sure to block staircases, landings, etc. with the magnetic strips. If you do not do this, Trilobite can pass over e.g., a staircase landing and cause injuries and damage to property.

A magnetic strip that has once been removed has poorer adhesive capability.We therefore strongly recommend that you attach the necessary strips once and for all. Never reuse a magnetic strip on a stair or in any other important application where safety is an important parameter. If you nonetheless choose to let the mag- netic strip lie unfastened on the floor, make sure that the side with the adhesive (with the protective paper backing) faces downwards! Use a pair of scissors or a knife to trim the magne- tic strip to the correct length. See page 9 in the user instructions to see how the magnetic strip should be fitted. Magnetic strips are available in a range of lengths and versions, see page 32.

Emptying the dust collector

Empty the dust collector when the dust collector icon lights in the display. Be sure to empty the dust collector if it is not completely full.The light indicator may be due to e.g., a blocked filter.

21

Page 4
Image 4
Electrolux 8228226-02 manual Functional Description, Vacuum programmes, Starting vacuuming, Main cleaning program, Charging