OPERATING INSTRUCTIONS
III . OPERATING INSTRUCTIONS
1.GENERAL
The appliance is used for grilling and frying various types of meat, sausages, fish and vegetables.
An electrically heated steel plate with a metallic special coating is built into a chrome nickel steel cover plate. Optionally the appliance is equipped with a grooved grill plate, a smooth griddle plate or a combined grill/griddle plate.
Floor temperature control is stepless and separate for the left and right halves of the trough. The trough is seamlessly inte- grated into the appliance cover and the sharply rounded cor- ners and edges facilitate easy cleaning. There is a standing surface in the front part of the cover for resting crockery and dishes.
A GN container in the open storage space in the base unit ser- ves as a drip pan for liquids when the pressure tube is pulled out.
All the parts of the appliance that remain in contact with the water and the food, plus the whole superstructure, are made of
Additional equipment:
-GN container 1/1, 2/1,
-Scraper grill/griddle.
-Stopper
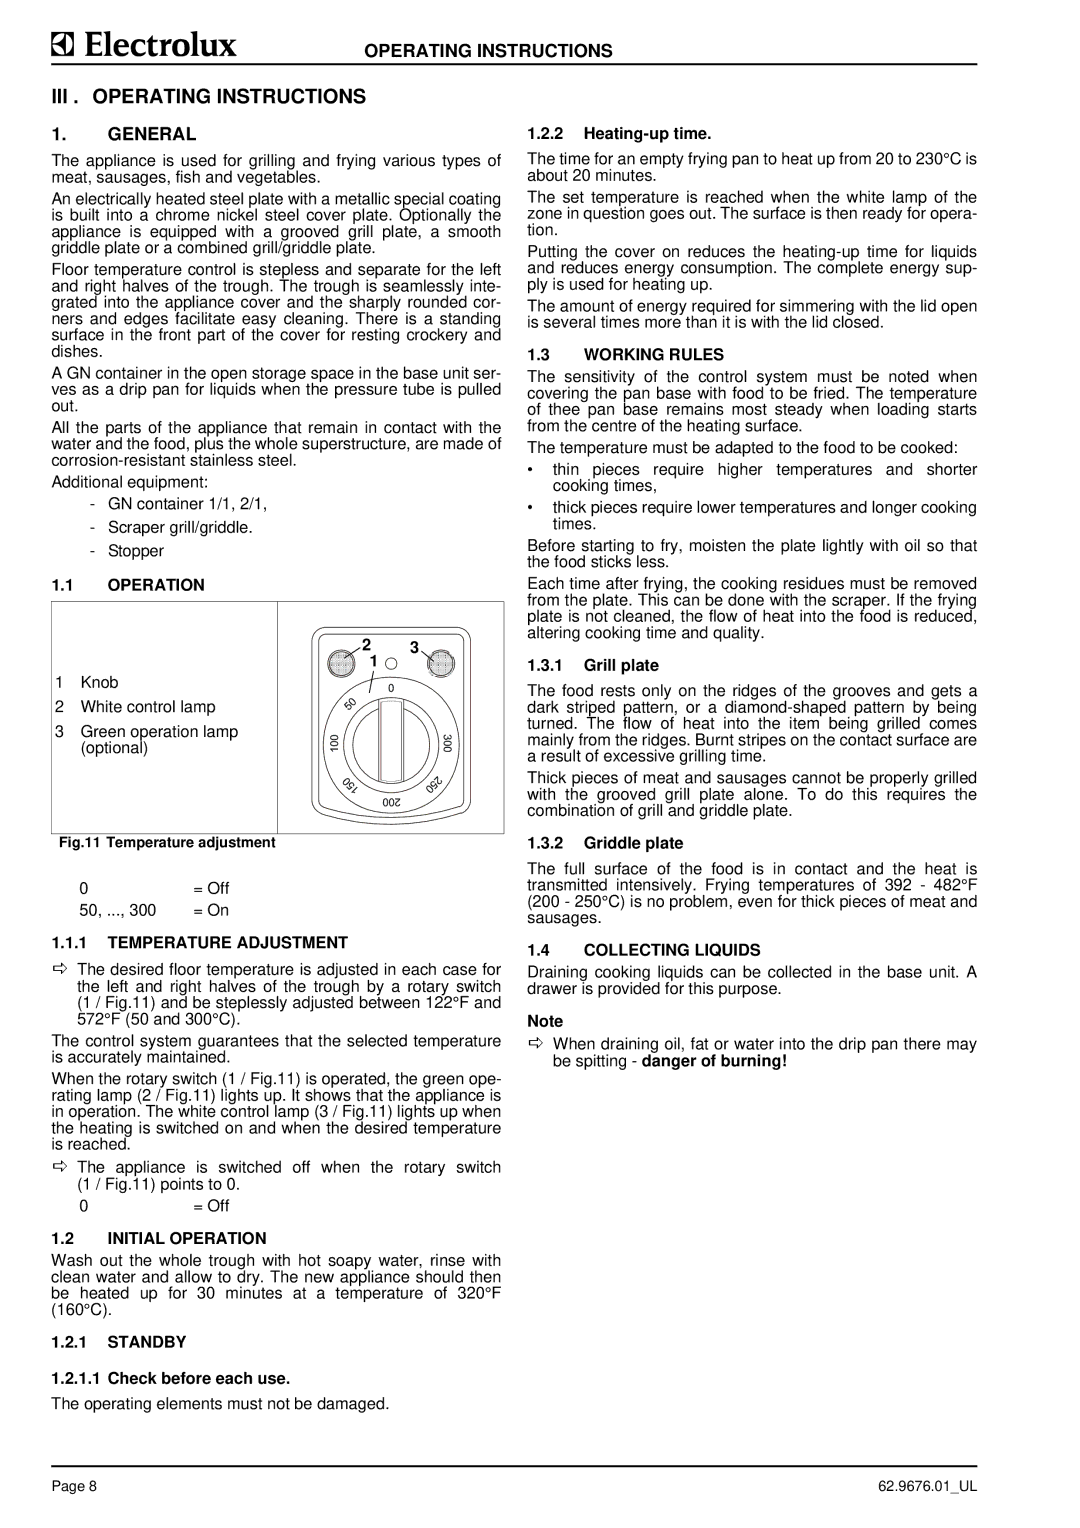
1.1OPERATION
| 2 | 3 |
| 1 |
|
1 | Knob |
|
2 | White control lamp |
|
3 | Green operation lamp |
|
| (optional) |
|
Fig.11 Temperature adjustment
0 | = Off |
50, ..., 300 | = On |
1.1.1TEMPERATURE ADJUSTMENT
DThe desired floor temperature is adjusted in each case for the left and right halves of the trough by a rotary switch (1 / Fig.11) and be steplessly adjusted between 122°F and 572°F (50 and 300°C).
The control system guarantees that the selected temperature is accurately maintained.
When the rotary switch (1 / Fig.11) is operated, the green ope- rating lamp (2 / Fig.11) lights up. It shows that the appliance is in operation. The white control lamp (3 / Fig.11) lights up when the heating is switched on and when the desired temperature is reached.
DThe appliance is switched off when the rotary switch (1 / Fig.11) points to 0.
0= Off
1.2INITIAL OPERATION
Wash out the whole trough with hot soapy water, rinse with clean water and allow to dry. The new appliance should then be heated up for 30 minutes at a temperature of 320°F (160°C).
1.2.1STANDBY
1.2.1.1 Check before each use.
The operating elements must not be damaged.
1.2.2Heating-up time.
The time for an empty frying pan to heat up from 20 to 230°C is about 20 minutes.
The set temperature is reached when the white lamp of the zone in question goes out. The surface is then ready for opera- tion.
Putting the cover on reduces the
The amount of energy required for simmering with the lid open is several times more than it is with the lid closed.
1.3WORKING RULES
The sensitivity of the control system must be noted when covering the pan base with food to be fried. The temperature of thee pan base remains most steady when loading starts from the centre of the heating surface.
The temperature must be adapted to the food to be cooked:
•thin pieces require higher temperatures and shorter cooking times,
•thick pieces require lower temperatures and longer cooking times.
Before starting to fry, moisten the plate lightly with oil so that the food sticks less.
Each time after frying, the cooking residues must be removed from the plate. This can be done with the scraper. If the frying plate is not cleaned, the flow of heat into the food is reduced, altering cooking time and quality.
1.3.1Grill plate
The food rests only on the ridges of the grooves and gets a dark striped pattern, or a
Thick pieces of meat and sausages cannot be properly grilled with the grooved grill plate alone. To do this requires the combination of grill and griddle plate.
1.3.2Griddle plate
The full surface of the food is in contact and the heat is transmitted intensively. Frying temperatures of 392 - 482°F (200 - 250°C) is no problem, even for thick pieces of meat and sausages.
1.4COLLECTING LIQUIDS
Draining cooking liquids can be collected in the base unit. A drawer is provided for this purpose.
Note
DWhen draining oil, fat or water into the drip pan there may be spitting - danger of burning!
Page 8 | 62.9676.01_UL |
