OPERATING INSTRUCTIONS

6.GAS-OPERATED ROASTING AND BAKING OVEN

The roasting and baking oven is integrated in the base unit of the range. The oven equipment includes:

-removable grid guides

-grid and trays

The base of the oven is made of a thick steel plate which dis- tributes and stores the heat evenly. All other parts of the appli- ance are made of chrome nickel steel. The power rating is 7 kW.

Note

It should be noted that hot air or steam flows out when the door is opened - Danger of burns!

Particular care must be taken when the oven door is open - otherwise the operator may injure or burn his legs.

WARNING

Use always the straight part of the oven door handle. Do not touch the curves of the oven door handle, it can be hot. - Danger of burns!

6.1OPERATION

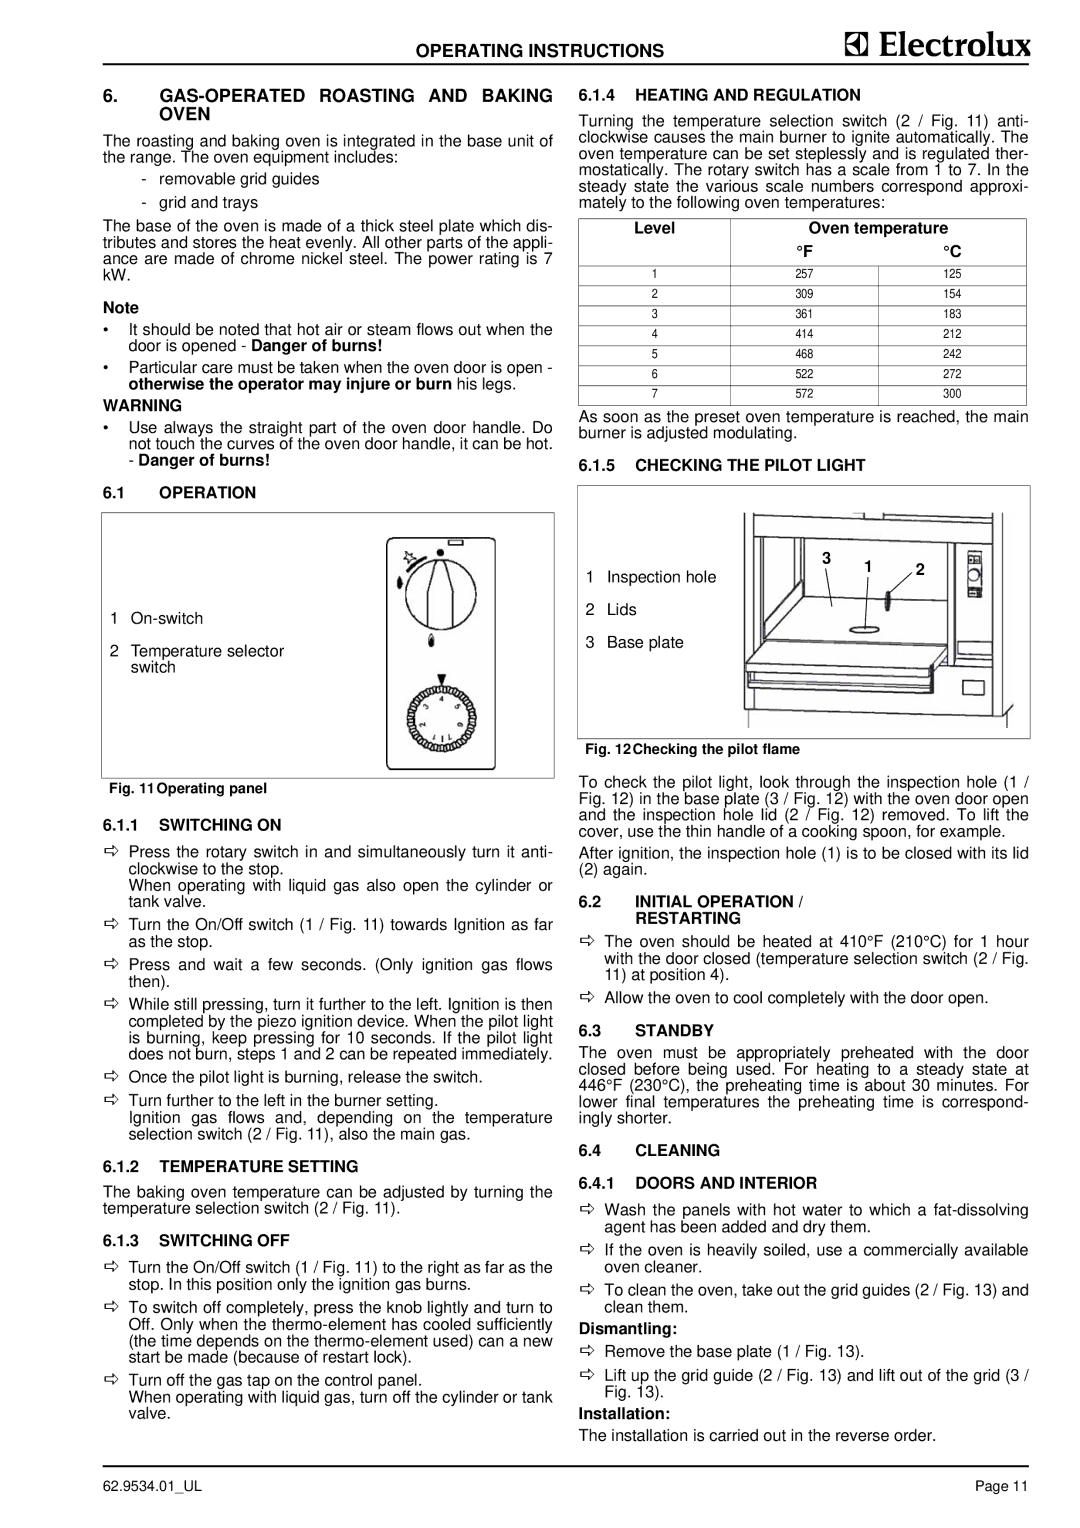
1On-switch

2Temperature selector switch

Fig. 11Operating panel

6.1.1SWITCHING ON

DPress the rotary switch in and simultaneously turn it anti- clockwise to the stop.

When operating with liquid gas also open the cylinder or tank valve.

DTurn the On/Off switch (1 / Fig. 11) towards Ignition as far as the stop.

DPress and wait a few seconds. (Only ignition gas flows then).

DWhile still pressing, turn it further to the left. Ignition is then completed by the piezo ignition device. When the pilot light is burning, keep pressing for 10 seconds. If the pilot light does not burn, steps 1 and 2 can be repeated immediately.

DOnce the pilot light is burning, release the switch.

DTurn further to the left in the burner setting.

Ignition gas flows and, depending on the temperature selection switch (2 / Fig. 11), also the main gas.

6.1.2TEMPERATURE SETTING

The baking oven temperature can be adjusted by turning the temperature selection switch (2 / Fig. 11).

6.1.3SWITCHING OFF

DTurn the On/Off switch (1 / Fig. 11) to the right as far as the stop. In this position only the ignition gas burns.

DTo switch off completely, press the knob lightly and turn to Off. Only when the thermo-element has cooled sufficiently (the time depends on the thermo-element used) can a new start be made (because of restart lock).

DTurn off the gas tap on the control panel.

When operating with liquid gas, turn off the cylinder or tank valve.

6.1.4HEATING AND REGULATION

Turning the temperature selection switch (2 / Fig. 11) anti- clockwise causes the main burner to ignite automatically. The oven temperature can be set steplessly and is regulated ther- mostatically. The rotary switch has a scale from 1 to 7. In the steady state the various scale numbers correspond approxi- mately to the following oven temperatures:

Level

Oven temperature


°F

°C


1

257

125


2

309

154


3

361

183


4

414

212


5

468

242


6

522

272


7

572

300


As soon as the preset oven temperature is reached, the main burner is adjusted modulating.

6.1.5CHECKING THE PILOT LIGHT

1 Inspection hole

3

1

2


2Lids

3Base plate

Fig. 12Checking the pilot flame

To check the pilot light, look through the inspection hole (1 / Fig. 12) in the base plate (3 / Fig. 12) with the oven door open and the inspection hole lid (2 / Fig. 12) removed. To lift the cover, use the thin handle of a cooking spoon, for example.

After ignition, the inspection hole (1) is to be closed with its lid

(2) again.

6.2INITIAL OPERATION / RESTARTING

DThe oven should be heated at 410°F (210°C) for 1 hour with the door closed (temperature selection switch (2 / Fig. 11) at position 4).

DAllow the oven to cool completely with the door open.

6.3STANDBY

The oven must be appropriately preheated with the door closed before being used. For heating to a steady state at 446°F (230°C), the preheating time is about 30 minutes. For lower final temperatures the preheating time is correspond- ingly shorter.

6.4CLEANING

6.4.1DOORS AND INTERIOR

DWash the panels with hot water to which a fat-dissolving agent has been added and dry them.

DIf the oven is heavily soiled, use a commercially available oven cleaner.

DTo clean the oven, take out the grid guides (2 / Fig. 13) and clean them.

Dismantling:

DRemove the base plate (1 / Fig. 13).

DLift up the grid guide (2 / Fig. 13) and lift out of the grid (3 / Fig. 13).

Installation:

The installation is carried out in the reverse order.

62.9534.01_UL

Page 11

Page 15
Image 15
Electrolux WLGWDCOOOO Switching on, Temperature Setting, Switching OFF, Heating and Regulation, Checking the Pilot Light

9CHG584160, 9CHG584163, 584166, 9CHG584161, 9CHG584159 specifications

Electrolux, a leading global appliance manufacturer, has long been synonymous with innovation and quality in the home appliance industry. Among its impressive roster of appliances, models like the WLGWAFOOOO, WLGWACOOOO, 9CHG584160, 9CHG584161, and 9CHG584163 stand out for their advanced features, technologies, and user-friendly characteristics.

The WLGWAFOOOO washing machine is designed for efficiency and ease of use. It boasts a high energy efficiency rating, helping users save on electricity bills while minimizing environmental impact. Featuring multiple wash programs, it accommodates a variety of fabrics, ensuring optimal washing cycles for everything from delicate garments to heavily soiled items. The Direct Drive motor technology offers a quieter operation while reducing vibrations, enhancing the overall user experience.

The WLGWACOOOO model is a testament to Electrolux's commitment to smart home technology. This model features built-in Wi-Fi connectivity, enabling users to control and monitor their laundry remotely via smartphone apps. Additionally, it comes equipped with a steam function that helps remove wrinkles and sanitize clothes effectively, allowing for fresher results without excessive ironing.

Electrolux also provides compact yet powerful options with models like the 9CHG584160, 9CHG584161, and 9CHG584163. These appliances are designed for smaller spaces without compromising performance. They offer flexible installation options, making them ideal for apartments or homes with limited laundry areas. The dual-purpose functionalities of these models allow users to wash and dry clothes efficiently, saving time and space.

All these models feature intuitive touch control panels that simplify operation, along with child lock features for safety. Their sleek designs fit seamlessly into modern homes, while their robust build quality ensures long-lasting performance.

With a strong focus on reducing water use, many of these Electrolux models include sensor-driven load detection, which adjusts water levels and energy consumption based on the size and type of the load. Additionally, they are designed with eco-friendly materials, reinforcing Electrolux's commitment to sustainability.

In summary, Electrolux's WLGWAFOOOO, WLGWACOOOO, 9CHG584160, 9CHG584161, and 9CHG584163 models reflect a perfect blend of cutting-edge technology, user-centric designs, and environmental responsibility, making them an excellent choice for modern households.