INSTALLATION INSTRUCTIONS

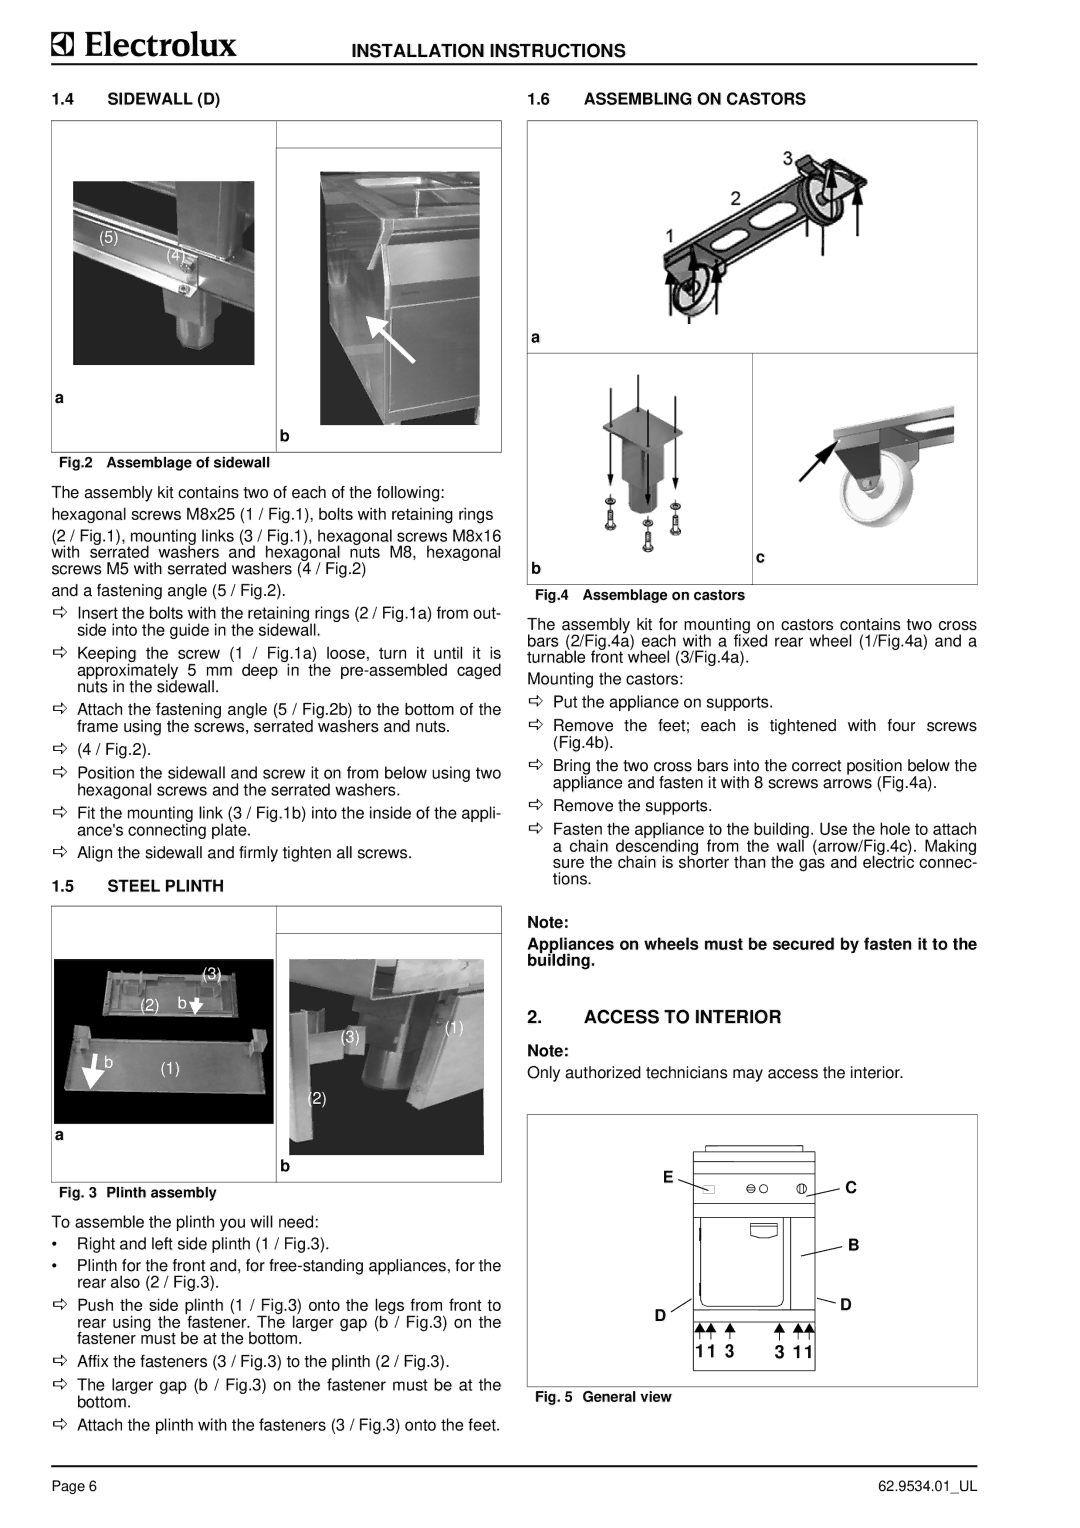
1.4 SIDEWALL (D)

1.6 ASSEMBLING ON CASTORS

(5)

(4)

a

b

Fig.2 Assemblage of sidewall

The assembly kit contains two of each of the following: hexagonal screws M8x25 (1 / Fig.1), bolts with retaining rings

(2 / Fig.1), mounting links (3 / Fig.1), hexagonal screws M8x16 with serrated washers and hexagonal nuts M8, hexagonal screws M5 with serrated washers (4 / Fig.2)

and a fastening angle (5 / Fig.2).

DInsert the bolts with the retaining rings (2 / Fig.1a) from out- side into the guide in the sidewall.

DKeeping the screw (1 / Fig.1a) loose, turn it until it is approximately 5 mm deep in the pre-assembled caged nuts in the sidewall.

DAttach the fastening angle (5 / Fig.2b) to the bottom of the frame using the screws, serrated washers and nuts.

D(4 / Fig.2).

DPosition the sidewall and screw it on from below using two hexagonal screws and the serrated washers.

DFit the mounting link (3 / Fig.1b) into the inside of the appli- ance's connecting plate.

DAlign the sidewall and firmly tighten all screws.

1.5STEEL PLINTH

a

b

c


Fig.4 Assemblage on castors

The assembly kit for mounting on castors contains two cross bars (2/Fig.4a) each with a fixed rear wheel (1/Fig.4a) and a turnable front wheel (3/Fig.4a).

Mounting the castors:

DPut the appliance on supports.

DRemove the feet; each is tightened with four screws (Fig.4b).

DBring the two cross bars into the correct position below the appliance and fasten it with 8 screws arrows (Fig.4a).

DRemove the supports.

DFasten the appliance to the building. Use the hole to attach a chain descending from the wall (arrow/Fig.4c). Making sure the chain is shorter than the gas and electric connec- tions.

Note:

(3)


(2) b

b

(1)


a

(3)(1)

(2)

b

Appliances on wheels must be secured by fasten it to the building.

2.ACCESS TO INTERIOR

Note:

Only authorized technicians may access the interior.

E

Fig. 3 Plinth assembly

To assemble the plinth you will need:

Right and left side plinth (1 / Fig.3).

Plinth for the front and, for free-standing appliances, for the rear also (2 / Fig.3).

DPush the side plinth (1 / Fig.3) onto the legs from front to rear using the fastener. The larger gap (b / Fig.3) on the fastener must be at the bottom.

DAffix the fasteners (3 / Fig.3) to the plinth (2 / Fig.3).

DThe larger gap (b / Fig.3) on the fastener must be at the bottom.

DAttach the plinth with the fasteners (3 / Fig.3) onto the feet.


C


B

D

D


11 3

3 11

Fig. 5 General view

Page 6

62.9534.01_UL

Page 10
Image 10
Electrolux 584166, WLGWAAOOOO, WLGWDAOOOO, WLGWDCOOOO Access to Interior, Sidewall D Assembling on Castors, Steel Plinth

9CHG584160, 9CHG584163, 584166, 9CHG584161, 9CHG584159 specifications

Electrolux, a leading global appliance manufacturer, has long been synonymous with innovation and quality in the home appliance industry. Among its impressive roster of appliances, models like the WLGWAFOOOO, WLGWACOOOO, 9CHG584160, 9CHG584161, and 9CHG584163 stand out for their advanced features, technologies, and user-friendly characteristics.

The WLGWAFOOOO washing machine is designed for efficiency and ease of use. It boasts a high energy efficiency rating, helping users save on electricity bills while minimizing environmental impact. Featuring multiple wash programs, it accommodates a variety of fabrics, ensuring optimal washing cycles for everything from delicate garments to heavily soiled items. The Direct Drive motor technology offers a quieter operation while reducing vibrations, enhancing the overall user experience.

The WLGWACOOOO model is a testament to Electrolux's commitment to smart home technology. This model features built-in Wi-Fi connectivity, enabling users to control and monitor their laundry remotely via smartphone apps. Additionally, it comes equipped with a steam function that helps remove wrinkles and sanitize clothes effectively, allowing for fresher results without excessive ironing.

Electrolux also provides compact yet powerful options with models like the 9CHG584160, 9CHG584161, and 9CHG584163. These appliances are designed for smaller spaces without compromising performance. They offer flexible installation options, making them ideal for apartments or homes with limited laundry areas. The dual-purpose functionalities of these models allow users to wash and dry clothes efficiently, saving time and space.

All these models feature intuitive touch control panels that simplify operation, along with child lock features for safety. Their sleek designs fit seamlessly into modern homes, while their robust build quality ensures long-lasting performance.

With a strong focus on reducing water use, many of these Electrolux models include sensor-driven load detection, which adjusts water levels and energy consumption based on the size and type of the load. Additionally, they are designed with eco-friendly materials, reinforcing Electrolux's commitment to sustainability.

In summary, Electrolux's WLGWAFOOOO, WLGWACOOOO, 9CHG584160, 9CHG584161, and 9CHG584163 models reflect a perfect blend of cutting-edge technology, user-centric designs, and environmental responsibility, making them an excellent choice for modern households.