Hanging The Ceiling Fan

(Standard Method Using

Hanger Ball/Downrod)

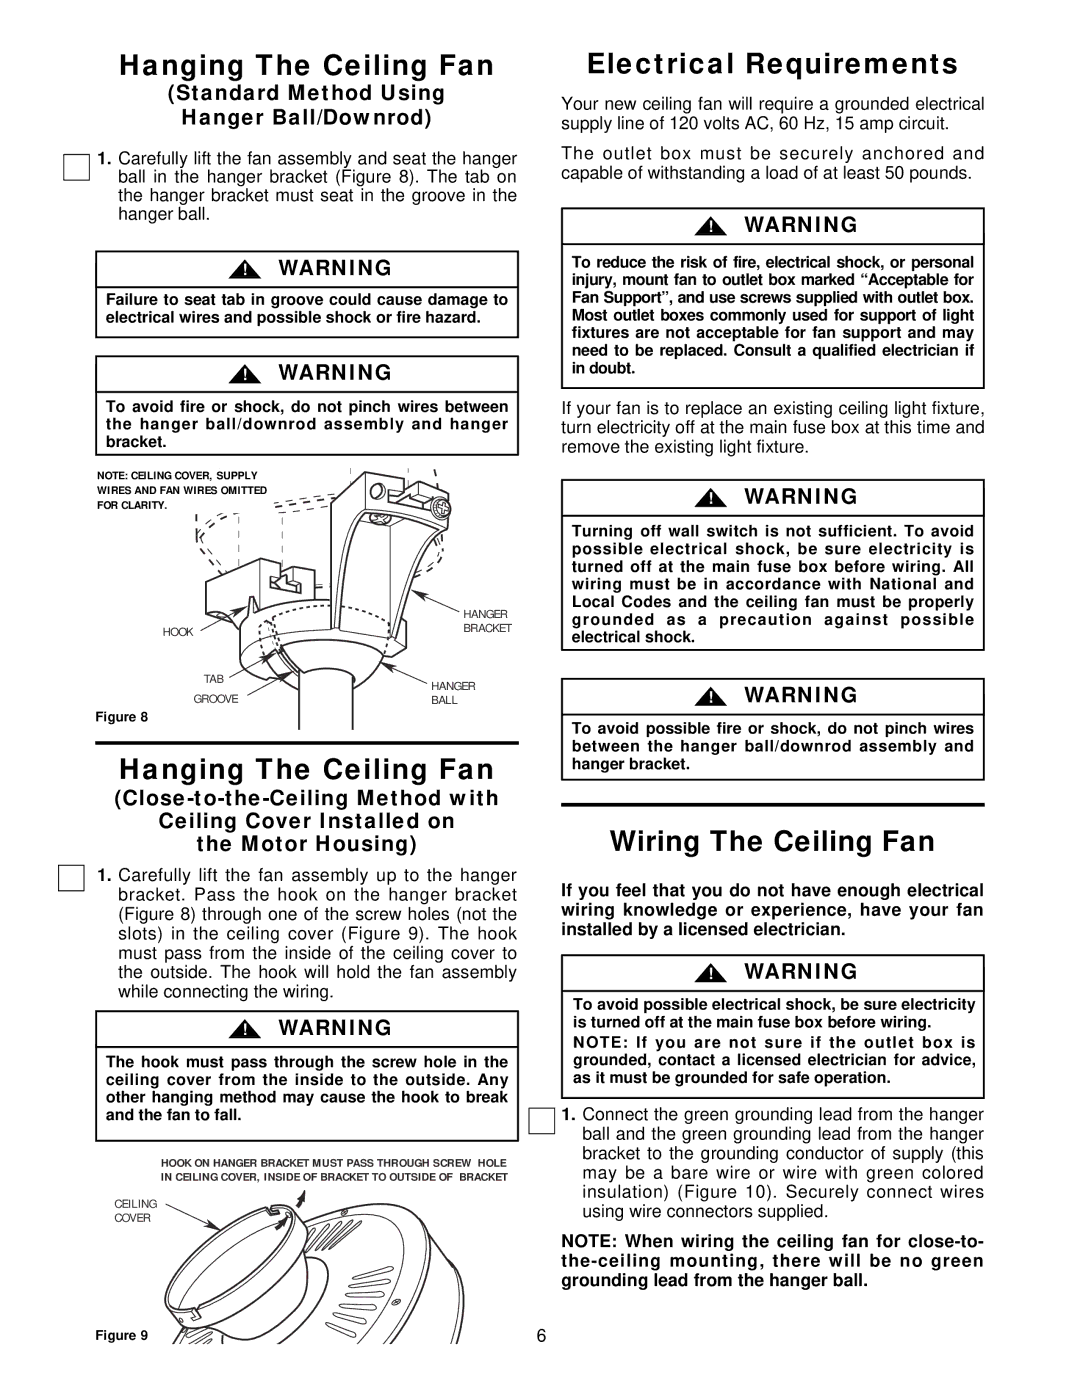
1.Carefully lift the fan assembly and seat the hanger ball in the hanger bracket (Figure 8). The tab on the hanger bracket must seat in the groove in the hanger ball.

!WARNING

Failure to seat tab in groove could cause damage to electrical wires and possible shock or fire hazard.

!WARNING

To avoid fire or shock, do not pinch wires between the hanger ball/downrod assembly and hanger bracket.

Electrical Requirements

Your new ceiling fan will require a grounded electrical supply line of 120 volts AC, 60 Hz, 15 amp circuit.

The outlet box must be securely anchored and capable of withstanding a load of at least 50 pounds.

!WARNING

To reduce the risk of fire, electrical shock, or personal injury, mount fan to outlet box marked “Acceptable for Fan Support”, and use screws supplied with outlet box. Most outlet boxes commonly used for support of light fixtures are not acceptable for fan support and may need to be replaced. Consult a qualified electrician if in doubt.

If your fan is to replace an existing ceiling light fixture, turn electricity off at the main fuse box at this time and remove the existing light fixture.

NOTE: CEILING COVER, SUPPLY WIRES AND FAN WIRES OMITTED FOR CLARITY.

HOOK

TAB

GROOVE

Figure 8

HANGER

BRACKET

HANGER

BALL

!WARNING

Turning off wall switch is not sufficient. To avoid possible electrical shock, be sure electricity is turned off at the main fuse box before wiring. All wiring must be in accordance with National and Local Codes and the ceiling fan must be properly grounded as a precaution against possible electrical shock.

!WARNING

Hanging The Ceiling Fan

(Close-to-the-Ceiling Method with

Ceiling Cover Installed on

the Motor Housing)

1.Carefully lift the fan assembly up to the hanger bracket. Pass the hook on the hanger bracket (Figure 8) through one of the screw holes (not the slots) in the ceiling cover (Figure 9). The hook must pass from the inside of the ceiling cover to the outside. The hook will hold the fan assembly while connecting the wiring.

!WARNING

The hook must pass through the screw hole in the ceiling cover from the inside to the outside. Any other hanging method may cause the hook to break and the fan to fall.

HOOK ON HANGER BRACKET MUST PASS THROUGH SCREW HOLE IN CEILING COVER, INSIDE OF BRACKET TO OUTSIDE OF BRACKET

CEILING

COVER

Figure 9

To avoid possible fire or shock, do not pinch wires between the hanger ball/downrod assembly and hanger bracket.

Wiring The Ceiling Fan

If you feel that you do not have enough electrical wiring knowledge or experience, have your fan installed by a licensed electrician.

!WARNING

To avoid possible electrical shock, be sure electricity is turned off at the main fuse box before wiring. NOTE: If you are not sure if the outlet box is grounded, contact a licensed electrician for advice, as it must be grounded for safe operation.

1.Connect the green grounding lead from the hanger ball and the green grounding lead from the hanger bracket to the grounding conductor of supply (this may be a bare wire or wire with green colored insulation) (Figure 10). Securely connect wires using wire connectors supplied.

NOTE: When wiring the ceiling fan for close-to- the-ceiling mounting, there will be no green grounding lead from the hanger ball.

6

Page 6
Image 6
Emerson CF712AW01, CF712WW01, CF712BS01, CF712TZ01 Hanging The Ceiling Fan, Electrical Requirements, Wiring The Ceiling Fan

CF712TZ01, CF712OB01, CF712WW01, CF712ORB01, CF712AW01 specifications

The Emerson CF712AB01, CF712WB01, CF712BS01, CF712AW01, and CF712ORB01 are a series of stylish ceiling fans designed to enhance the aesthetic and comfort of any living space. Each model is equipped with key features and modern technologies that set them apart in the market.

One of the standout features of the Emerson CF712 series is its sleek design that effortlessly blends into various interior styles. Whether it's the Antique Brass finish of the CF712AB01, the White finish of the CF712WB01, the Brushed Steel of the CF712BS01, the Aged Walnut of the CF712AW01, or the Oil-Rubbed Bronze of the CF712ORB01, each fan adds a touch of elegance to any room. The color options cater to different design preferences, allowing homeowners to find the perfect match for their decor.

In addition to their aesthetic appeal, the fans in this series are designed for optimal functionality and energy efficiency. The blade pitch and motor design work together to produce a powerful airflow, ensuring that any room feels comfortable regardless of the season. The fans are fitted with reversible motors, enabling users to switch the direction of the blades with ease. This feature allows for a cooling breeze in the summer and a gentle updraft in the winter, aiding in the circulation of warm air.

Installation and maintenance of the CF712 ceiling fans are simplified through innovative engineering. Many models come with a Quick Connect system for more effortless assembly. The blades are crafted from high-quality materials that are not only durable but also easy to clean, ensuring longevity and reduced maintenance effort.

Moreover, these fans are often compatible with various control options, including pull chains and remote controls, giving users the flexibility to operate them from anywhere in the room. Some models also support smart home technology, allowing integration with platforms like Alexa and Google Assistant for voice-activated control.

The Emerson CF712 series caters to sustainability-conscious consumers as well. By consuming less electricity than traditional fans while still delivering high performance, these fans help reduce energy costs and environmental impact.

Overall, the Emerson CF712AB01, CF712WB01, CF712BS01, CF712AW01, and CF712ORB01 ceiling fans combine elegant design, advanced technology, and energy-efficient operation, making them an excellent choice for enhancing both style and comfort in any home.