LOG PLACEMENT
Before you begin: This fireplace insert is supplied with a set of seven ce- ramic fiber logs. Do not handle these logs with your bare hands. Always wear gloves to prevent skin irritation from ceramic fibers. After handling logs, wash your hands gently with soap and water to remove any traces of fiber.
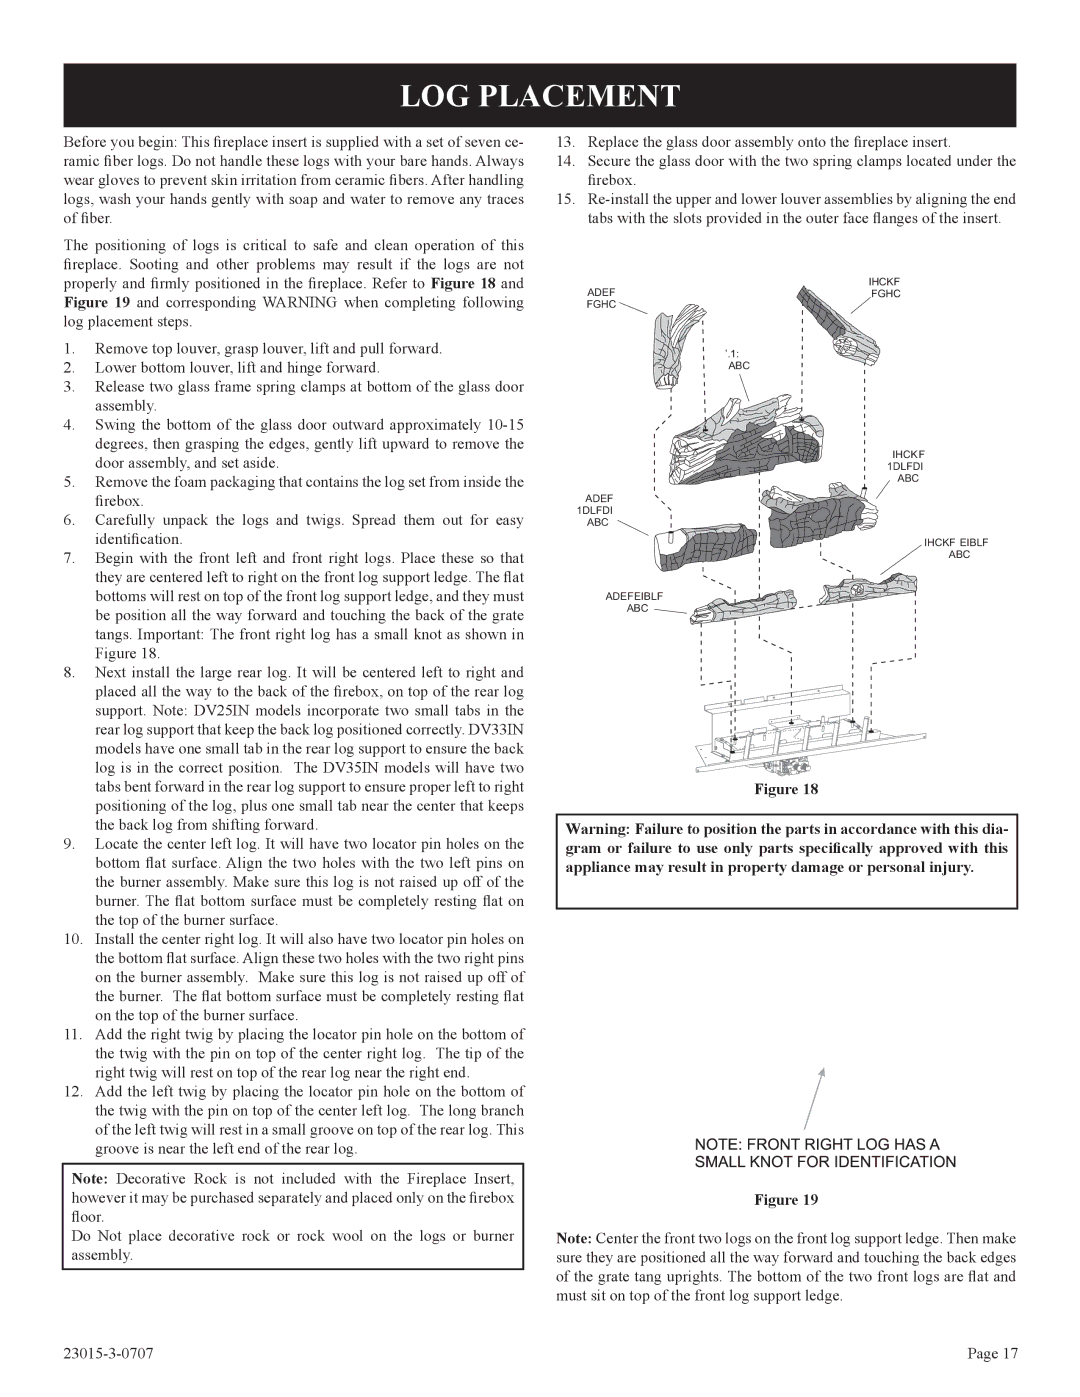
The positioning of logs is critical to safe and clean operation of this fireplace. Sooting and other problems may result if the logs are not properly and firmly positioned in the fireplace. Refer to Figure 18 and Figure 19 and corresponding WARNING when completing following log placement steps.
1.Remove top louver, grasp louver, lift and pull forward.
2.Lower bottom louver, lift and hinge forward.
3.Release two glass frame spring clamps at bottom of the glass door assembly.
4.Swing the bottom of the glass door outward approximately
5.Remove the foam packaging that contains the log set from inside the firebox.
6.Carefully unpack the logs and twigs. Spread them out for easy identification.
7.Begin with the front left and front right logs. Place these so that they are centered left to right on the front log support ledge. The flat bottoms will rest on top of the front log support ledge, and they must be position all the way forward and touching the back of the grate tangs. Important: The front right log has a small knot as shown in Figure 18.
8.Next install the large rear log. It will be centered left to right and placed all the way to the back of the firebox, on top of the rear log support. Note: DV25IN models incorporate two small tabs in the rear log support that keep the back log positioned correctly. DV33IN models have one small tab in the rear log support to ensure the back log is in the correct position. The DV35IN models will have two tabs bent forward in the rear log support to ensure proper left to right positioning of the log, plus one small tab near the center that keeps the back log from shifting forward.
9.Locate the center left log. It will have two locator pin holes on the bottom flat surface. Align the two holes with the two left pins on the burner assembly. Make sure this log is not raised up off of the burner. The flat bottom surface must be completely resting flat on the top of the burner surface.
10.Install the center right log. It will also have two locator pin holes on the bottom flat surface. Align these two holes with the two right pins on the burner assembly. Make sure this log is not raised up off of the burner. The flat bottom surface must be completely resting flat on the top of the burner surface.
11.Add the right twig by placing the locator pin hole on the bottom of the twig with the pin on top of the center right log. The tip of the right twig will rest on top of the rear log near the right end.
12.Add the left twig by placing the locator pin hole on the bottom of the twig with the pin on top of the center left log. The long branch of the left twig will rest in a small groove on top of the rear log. This groove is near the left end of the rear log.
Note: Decorative Rock is not included with the Fireplace Insert, however it may be purchased separately and placed only on the firebox floor.
Do Not place decorative rock or rock wool on the logs or burner assembly.
13.Replace the glass door assembly onto the fireplace insert.
14.Secure the glass door with the two spring clamps located under the firebox.
15.
RIGHT
LEFTTWIG
TWIG
BACK
LOG
RIGHT
CENTER
LOG
LEFT CENTER
LOG
RIGHT FRONT LOG
LEFT FRONT
LOG
Figure 18
Warning: Failure to position the parts in accordance with this dia- gram or failure to use only parts specifically approved with this appliance may result in property damage or personal injury.
Figure 19
Note: Center the front two logs on the front log support ledge. Then make sure they are positioned all the way forward and touching the back edges of the grate tang uprights. The bottom of the two front logs are flat and must sit on top of the front log support ledge.
Page 17 |