7.When sawing a long piece of material or a panel, always use a work support. A sawhorse, rollers or out feed assembly provides adequate support for this purpose. The work sup- port must be at the same height as the saw table.

Bevel Ripping

This operation is the same as ripping except the bevel angle is set to an angle other than zero degrees.

WARNING: Before connecting the table saw to the power source or operating the saw, always inspect the guard and splitter for proper alignment and clearance with saw blade. Check alignment after each change of bevel angle.

Ripping Small Pieces

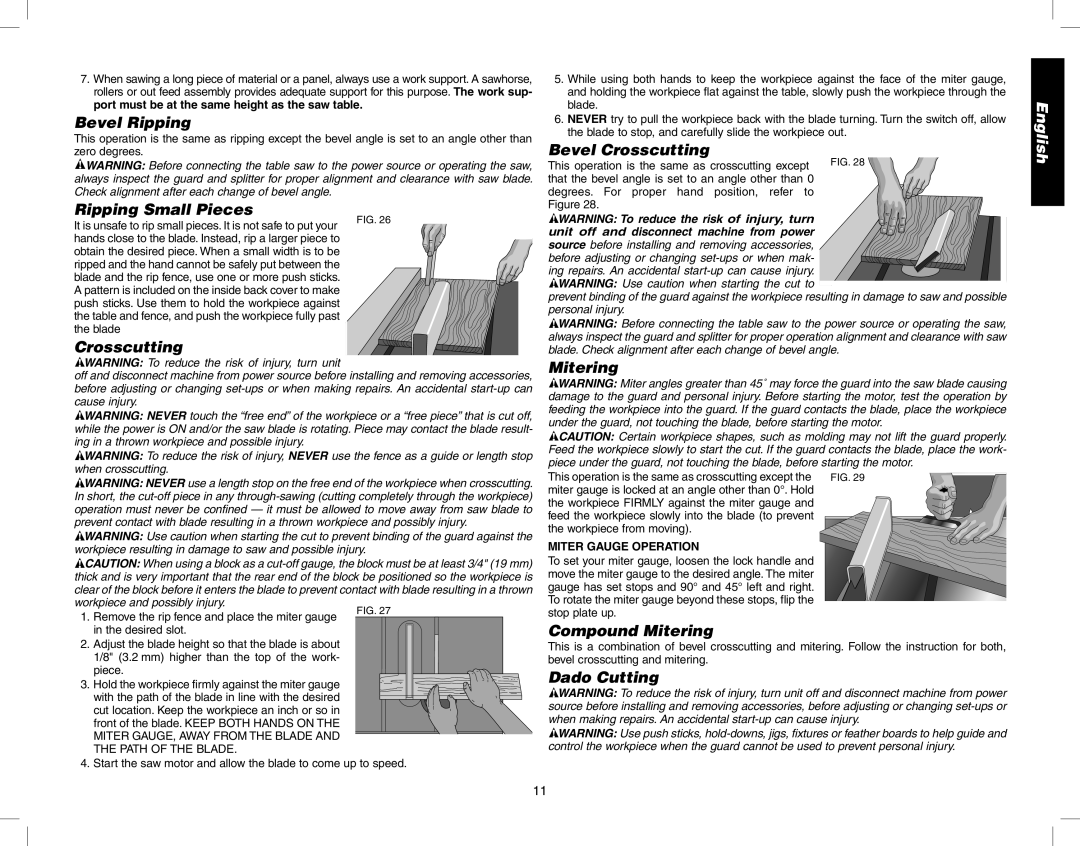
It is unsafe to rip small pieces. It is not safe to put your

FIG. 26


hands close to the blade. Instead, rip a larger piece to


obtain the desired piece. When a small width is to be


ripped and the hand cannot be safely put between the


blade and the rip fence, use one or more push sticks.


A pattern is included on the inside back cover to make


push sticks. Use them to hold the workpiece against


the table and fence, and push the workpiece fully past


the blade


Crosscutting

WARNING: To reduce the risk of injury, turn unit

off and disconnect machine from power source before installing and removing accessories, before adjusting or changing set-ups or when making repairs. An accidental start-up can cause injury.

WARNING: NEVER touch the “free end” of the workpiece or a “free piece” that is cut off, while the power is ON and/or the saw blade is rotating. Piece may contact the blade result- ing in a thrown workpiece and possible injury.

WARNING: To reduce the risk of injury, NEVER use the fence as a guide or length stop when crosscutting.

WARNING: NEVER use a length stop on the free end of the workpiece when crosscutting. In short, the cut-off piece in any through-sawing (cutting completely through the workpiece) operation must never be confined — it must be allowed to move away from saw blade to prevent contact with blade resulting in a thrown workpiece and possibly injury.

WARNING: Use caution when starting the cut to prevent binding of the guard against the workpiece resulting in damage to saw and possible injury.

CAUTION: When using a block as a cut-off gauge, the block must be at least 3/4" (19 mm) thick and is very important that the rear end of the block be positioned so the workpiece is clear of the block before it enters the blade to prevent contact with blade resulting in a thrown workpiece and possibly injury.

5.While using both hands to keep the workpiece against the face of the miter gauge, and holding the workpiece flat against the table, slowly push the workpiece through the blade.

6.NEVER try to pull the workpiece back with the blade turning. Turn the switch off, allow the blade to stop, and carefully slide the workpiece out.

Bevel Crosscutting

This operation is the same as crosscutting except

FIG. 28


that the bevel angle is set to an angle other than 0


degrees. For proper hand position, refer to


Figure 28.


WARNING: To reduce the risk of injury, turn


unit off and disconnect machine from power


source before installing and removing accessories,


before adjusting or changing set-ups or when mak-


ing repairs. An accidental start-up can cause injury.


WARNING: Use caution when starting the cut to


prevent binding of the guard against the workpiece resulting in damage to saw and possible personal injury.

WARNING: Before connecting the table saw to the power source or operating the saw, always inspect the guard and splitter for proper operation alignment and clearance with saw blade. Check alignment after each change of bevel angle.

Mitering

WARNING: Miter angles greater than 45˚ may force the guard into the saw blade causing damage to the guard and personal injury. Before starting the motor, test the operation by feeding the workpiece into the guard. If the guard contacts the blade, place the workpiece under the guard, not touching the blade, before starting the motor.

CAUTION: Certain workpiece shapes, such as molding may not lift the guard properly. Feed the workpiece slowly to start the cut. If the guard contacts the blade, place the work- piece under the guard, not touching the blade, before starting the motor.

This operation is the same as crosscutting except the FIG. 29 miter gauge is locked at an angle other than 0°. Hold

the workpiece FIRMLY against the miter gauge and feed the workpiece slowly into the blade (to prevent the workpiece from moving).

MITER GAUGE OPERATION

To set your miter gauge, loosen the lock handle and move the miter gauge to the desired angle. The miter gauge has set stops and 90° and 45° left and right. To rotate the miter gauge beyond these stops, flip the

English

1. Remove the rip fence and place the miter gauge in the desired slot.

FIG. 27

stop plate up.

Compound Mitering

2. Adjust the blade height so that the blade is about 1/8" (3.2 mm) higher than the top of the work- piece.

3. Hold the workpiece firmly against the miter gauge with the path of the blade in line with the desired

cut location. Keep the workpiece an inch or so in front of the blade. KEEP BOTH HANDS ON THE MITER GAUGE, AWAY FROM THE BLADE AND THE PATH OF THE BLADE.

4. Start the saw motor and allow the blade to come up to speed.

This is a combination of bevel crosscutting and mitering. Follow the instruction for both, bevel crosscutting and mitering.

Dado Cutting

WARNING: To reduce the risk of injury, turn unit off and disconnect machine from power source before installing and removing accessories, before adjusting or changing set-ups or when making repairs. An accidental start-up can cause injury.

WARNING: Use push sticks, hold-downs, jigs, fixtures or feather boards to help guide and control the workpiece when the guard cannot be used to prevent personal injury.

11

Page 13
Image 13
Epson DW746 Bevel Ripping, Ripping Small Pieces, Bevel Crosscutting, Compound Mitering, Dado Cutting

DW746 specifications

The Epson DW746 is a powerful and versatile all-in-one printer designed for business and professional use. Known for its reliability and high-quality output, the DW746 caters to a wide range of printing needs, making it an ideal choice for offices and small workgroups.

One of the main features of the DW746 is its fast printing speed. It can produce up to 25 pages per minute for monochrome documents and approximately 12 pages per minute for color prints. This efficiency ensures that users can handle large workloads without experiencing frustrating delays.

In addition to speed, the Epson DW746 offers exceptional print quality. With a maximum print resolution of 4800 x 1200 dpi, it delivers sharp text and vibrant colors. This makes it suitable for a variety of printing tasks, from professional documents to marketing materials and high-quality photos.

The DW746 utilizes PrecisionCore technology, which is a key aspect of Epson's printing process. This technology employs an array of micro-fine nozzles to create extremely precise dots of ink, resulting in superior print quality and consistency. PrecisionCore also enhances the printer's durability and longevity, ensuring that it remains a reliable workhorse for years to come.

Another notable feature is the DW746's connectivity options. It supports a variety of connectivity methods, including USB, Ethernet, and Wi-Fi, allowing users to print directly from their computers, mobile devices, or even cloud services. This flexibility makes it easy to integrate the printer into any office setup, promoting seamless workflow and collaboration.

The printer is equipped with an automatic duplex printing feature, which allows for double-sided printing. This not only saves paper but also helps businesses to reduce their overall printing costs and environmental impact.

Additionally, the Epson DW746 has a robust paper handling capacity. It comes with a standard paper tray that can hold up to 250 sheets, along with a rear manual feed slot for specialty media. For larger print jobs, users can also equip the printer with optional paper trays to increase storage capacity.

In conclusion, the Epson DW746 stands out as a powerful all-in-one solution for businesses seeking speed, quality, and versatility. With advanced printing technologies, robust connectivity options, and efficient paper handling capabilities, it meets the demands of modern office environments while delivering impressive results.