English

Unpacking

WARNING: To reduce the risk of injury, do not connect the machine to the power source until the machine is completely assembled and you read and understand the entire instruction manual.

1.Remove parts box, motor cover, fence beam, side tables and fence rails (DW746X).

2.Turn the saw to the upright position.

CAUTION: Use a minimum of two people to prevent personal injury when turning the saw and stand upright. The combined weight of the table top and motor assembly is approxi- mately 200 lbs (91 kg).

3.Cut and remove plastic strap holding the motor.

4.Using front hand crank, lower the motor some and remove the foam packing material between the motor and the mechanism.

Assembly

WARNING: To reduce the risk of injury, do not connect the machine to the power source until the machine is completely assembled and you read and understand the entire instruction manual.

PLEASE READ ENTIRE ASSEMBLY SECTION BEFORE PROCEEDING.

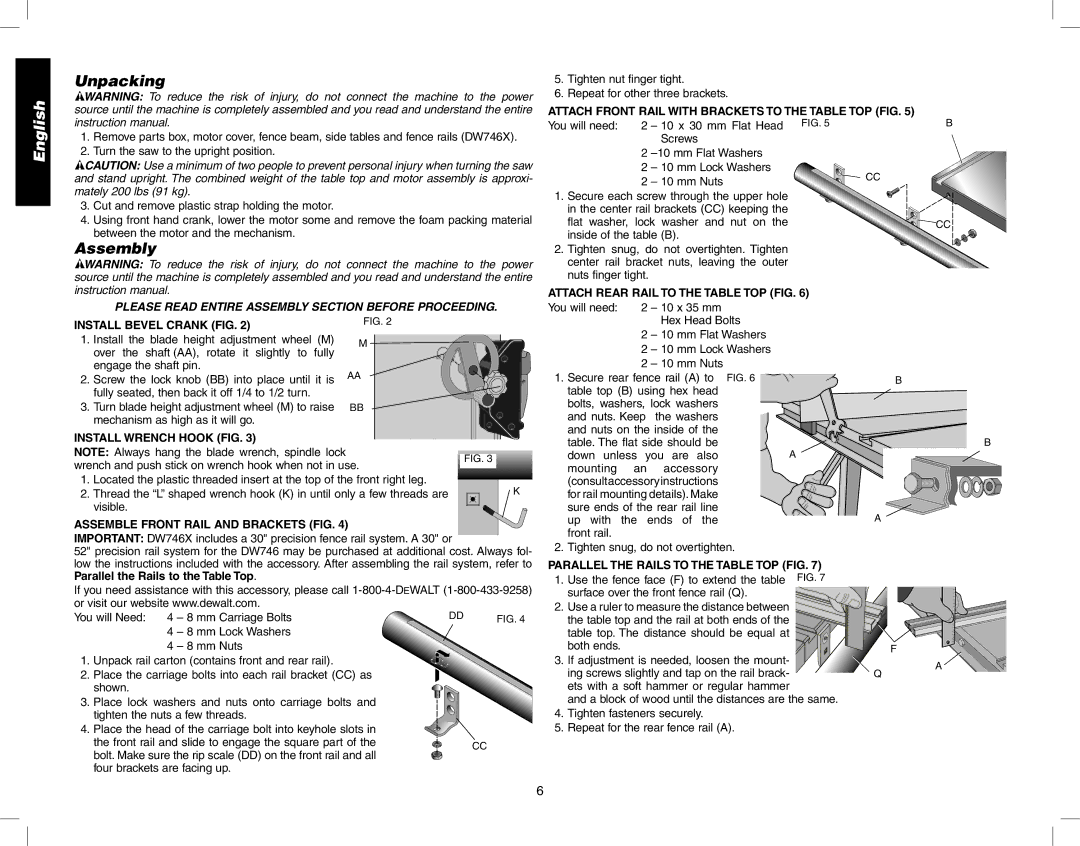
INSTALL BEVEL CRANK (FIG. 2)


FIG. 2

1. Install the blade height adjustment wheel (M)

M

over the shaft (AA), rotate it

slightly

to

fully


5.Tighten nut finger tight.

6.Repeat for other three brackets.

ATTACH FRONT RAIL WITH BRACKETS TO THE TABLE TOP (FIG. 5)

You will need:

2

– 10 x 30 mm Flat Head FIG. 5

B


Screws


2

–10 mm Flat Washers


2

– 10 mm Lock Washers

CC


2

– 10 mm Nuts


1. Secure each screw through the upper hole


in the center rail brackets (CC) keeping the


flat washer, lock washer and nut on the

CC

inside of the table (B).


2.Tighten snug, do not overtighten. Tighten center rail bracket nuts, leaving the outer nuts finger tight.

ATTACH REAR RAIL TO THE TABLE TOP (FIG. 6)

You will need:

2

– 10 x 35 mm


Hex Head Bolts


2

– 10 mm Flat Washers


2

– 10 mm Lock Washers


engage the shaft pin.

AA


2.

Screw the lock knob (BB) into place until it is


fully seated, then back it off 1/4 to 1/2 turn.


3.

Turn blade height adjustment wheel (M) to raise BB


mechanism as high as it will go.


INSTALL WRENCH HOOK (FIG. 3)


NOTE: Always hang the blade wrench, spindle lock


FIG. 3

wrench and push stick on wrench hook when not in use.


1.

Located the plastic threaded insert at the top of the front right leg.

K

2.

Thread the “L” shaped wrench hook (K) in until only a few threads are


visible.


ASSEMBLE FRONT RAIL AND BRACKETS (FIG. 4)

IMPORTANT: DW746X includes a 30" precision fence rail system. A 30" or

2 – 10 mm Nuts

1. Secure rear fence rail (A) to FIG. 6 table top (B) using hex head bolts, washers, lock washers

and nuts. Keep the washers and nuts on the inside of the table. The flat side should be down unless you are also mounting an accessory (consultaccessoryinstructions for rail mounting details). Make sure ends of the rear rail line up with the ends of the front rail.

B

B

A

A

52" precision rail system for the DW746 may be purchased at additional cost. Always fol- low the instructions included with the accessory. After assembling the rail system, refer to

Parallel the Rails to the Table Top.

If you need assistance with this accessory, please call 1-800-4-DEWALT (1-800-433-9258) or visit our website www.dewalt.com.

You will Need: 4 – 8 mm Carriage Bolts

DD

FIG. 4

4 – 8 mm Lock Washers

4 – 8 mm Nuts

1. Unpack rail carton (contains front and rear rail).

2. Place the carriage bolts into each rail bracket (CC) as shown.

3. Place lock washers and nuts onto carriage bolts and tighten the nuts a few threads.

4. Place the head of the carriage bolt into keyhole slots in


the front rail and slide to engage the square part of the

CC

bolt. Make sure the rip scale (DD) on the front rail and all


four brackets are facing up.


2. Tighten snug, do not overtighten.

PARALLEL THE RAILS TO THE TABLE TOP (FIG. 7)

1. Use the fence face (F) to extend the table FIG. 7 surface over the front fence rail (Q).

2. Use a ruler to measure the distance between the table top and the rail at both ends of the table top. The distance should be equal at both ends.

3.If adjustment is needed, loosen the mount- ing screws slightly and tap on the rail brack- ets with a soft hammer or regular hammer

and a block of wood until the distances are the same.

4.Tighten fasteners securely.

5.Repeat for the rear fence rail (A).

F

A

Q

6

Page 8
Image 8
Epson DW746 instruction manual Unpacking, Assembly

DW746 specifications

The Epson DW746 is a powerful and versatile all-in-one printer designed for business and professional use. Known for its reliability and high-quality output, the DW746 caters to a wide range of printing needs, making it an ideal choice for offices and small workgroups.

One of the main features of the DW746 is its fast printing speed. It can produce up to 25 pages per minute for monochrome documents and approximately 12 pages per minute for color prints. This efficiency ensures that users can handle large workloads without experiencing frustrating delays.

In addition to speed, the Epson DW746 offers exceptional print quality. With a maximum print resolution of 4800 x 1200 dpi, it delivers sharp text and vibrant colors. This makes it suitable for a variety of printing tasks, from professional documents to marketing materials and high-quality photos.

The DW746 utilizes PrecisionCore technology, which is a key aspect of Epson's printing process. This technology employs an array of micro-fine nozzles to create extremely precise dots of ink, resulting in superior print quality and consistency. PrecisionCore also enhances the printer's durability and longevity, ensuring that it remains a reliable workhorse for years to come.

Another notable feature is the DW746's connectivity options. It supports a variety of connectivity methods, including USB, Ethernet, and Wi-Fi, allowing users to print directly from their computers, mobile devices, or even cloud services. This flexibility makes it easy to integrate the printer into any office setup, promoting seamless workflow and collaboration.

The printer is equipped with an automatic duplex printing feature, which allows for double-sided printing. This not only saves paper but also helps businesses to reduce their overall printing costs and environmental impact.

Additionally, the Epson DW746 has a robust paper handling capacity. It comes with a standard paper tray that can hold up to 250 sheets, along with a rear manual feed slot for specialty media. For larger print jobs, users can also equip the printer with optional paper trays to increase storage capacity.

In conclusion, the Epson DW746 stands out as a powerful all-in-one solution for businesses seeking speed, quality, and versatility. With advanced printing technologies, robust connectivity options, and efficient paper handling capabilities, it meets the demands of modern office environments while delivering impressive results.