Installing Cabinet in
Minimum Width Window
1.Remove filler panels on air conditioner cabinet.
2.Refer to steps 1 through 3 of Window Installation instructions.
3.Close window until it touches behind air conditioner top bar.
4.Fasten top bar to window frame using 5/8” washer head screw.
5.If filler is required on sides of air conditioner, cut plastic foam seal to size and fill both sides.
6.Use silicone or latex sealant (not supplied) to fill any minor openings.
7.Install chassis into cabinet.
Consult your authorized dealer or importer for alternative installation instructions.
Through-the-wall Installation
This air conditioner is designed as a
• IMPORTANT: This appliance must be installed according to all applicable electrical and building codes and ordinances.
•It is recommended that you have help to install your unit and that you use proper lifting technique to avoid personal injury.
•It is important that you inspect the condition of the wall where the air conditioner will be installed.
•Be sure the wall can support the weight of the unit.
•All cabinet louvers MUST BE on the outdoor side of the wall. DO NOT BLOCK SIDE LOUVERS.
•The cabinet must be installed level from
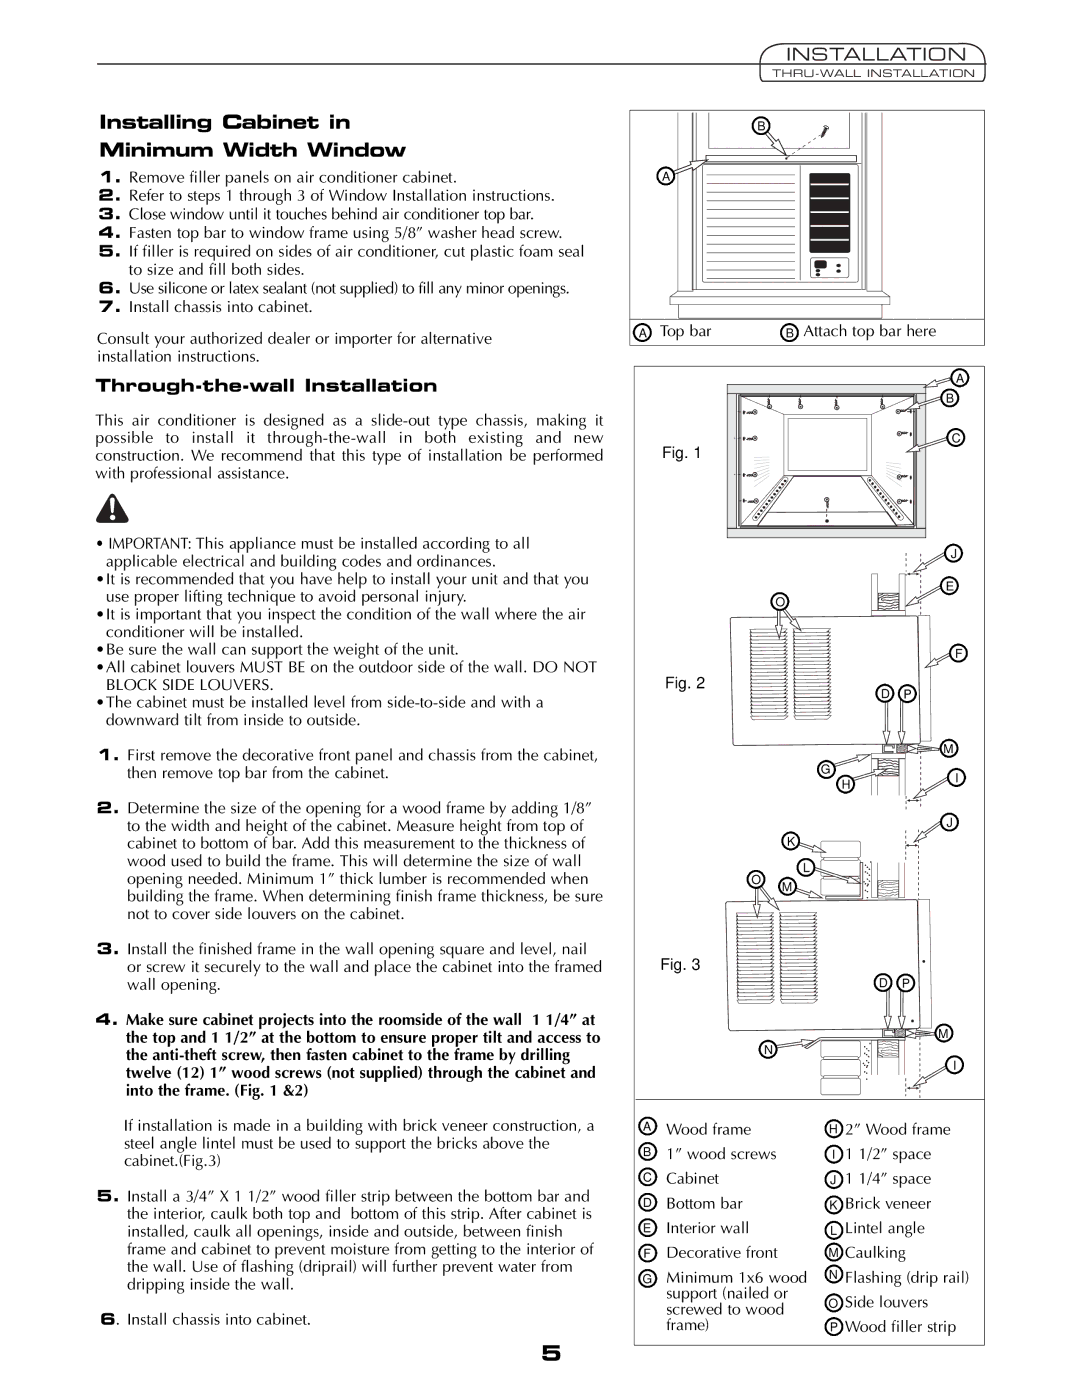
1.First remove the decorative front panel and chassis from the cabinet, then remove top bar from the cabinet.
2.Determine the size of the opening for a wood frame by adding 1/8” to the width and height of the cabinet. Measure height from top of cabinet to bottom of bar. Add this measurement to the thickness of wood used to build the frame. This will determine the size of wall opening needed. Minimum 1” thick lumber is recommended when building the frame. When determining finish frame thickness, be sure not to cover side louvers on the cabinet.
3.Install the finished frame in the wall opening square and level, nail or screw it securely to the wall and place the cabinet into the framed wall opening.
4.Make sure cabinet projects into the roomside of the wall 1 1/4” at the top and 1 1/2” at the bottom to ensure proper tilt and access to the
INSTALLATION
B
A![]()
A Top bar | B Attach top bar here |
|
| A |
|
| B |
Fig. 1 |
| C |
|
| |
|
| J |
|
| E |
| O |
|
|
| F |
Fig. 2 | D | P |
| ||
|
| M |
| G | I |
| H | |
|
| |
|
| J |
| K |
|
O | L |
|
M |
| |
|
| |
Fig. 3 |
|
|
| D | P |
|
| M |
| N |
|
|
| I |
If installation is made in a building with brick veneer construction, a steel angle lintel must be used to support the bricks above the cabinet.(Fig.3)
5.Install a 3/4” X 1 1/2” wood filler strip between the bottom bar and the interior, caulk both top and bottom of this strip. After cabinet is installed, caulk all openings, inside and outside, between finish frame and cabinet to prevent moisture from getting to the interior of the wall. Use of flashing (driprail) will further prevent water from dripping inside the wall.
6. Install chassis into cabinet.
5
AWood frame
B1” wood screws
CCabinet
DBottom bar
EInterior wall
FDecorative front
GMinimum 1x6 wood support (nailed or screwed to wood frame)
H2” Wood frame
I1 1/2” space
J1 1/4” space
KBrick veneer
LLintel angle
MCaulking
NFlashing (drip rail)
OSide louvers
PWood filler strip