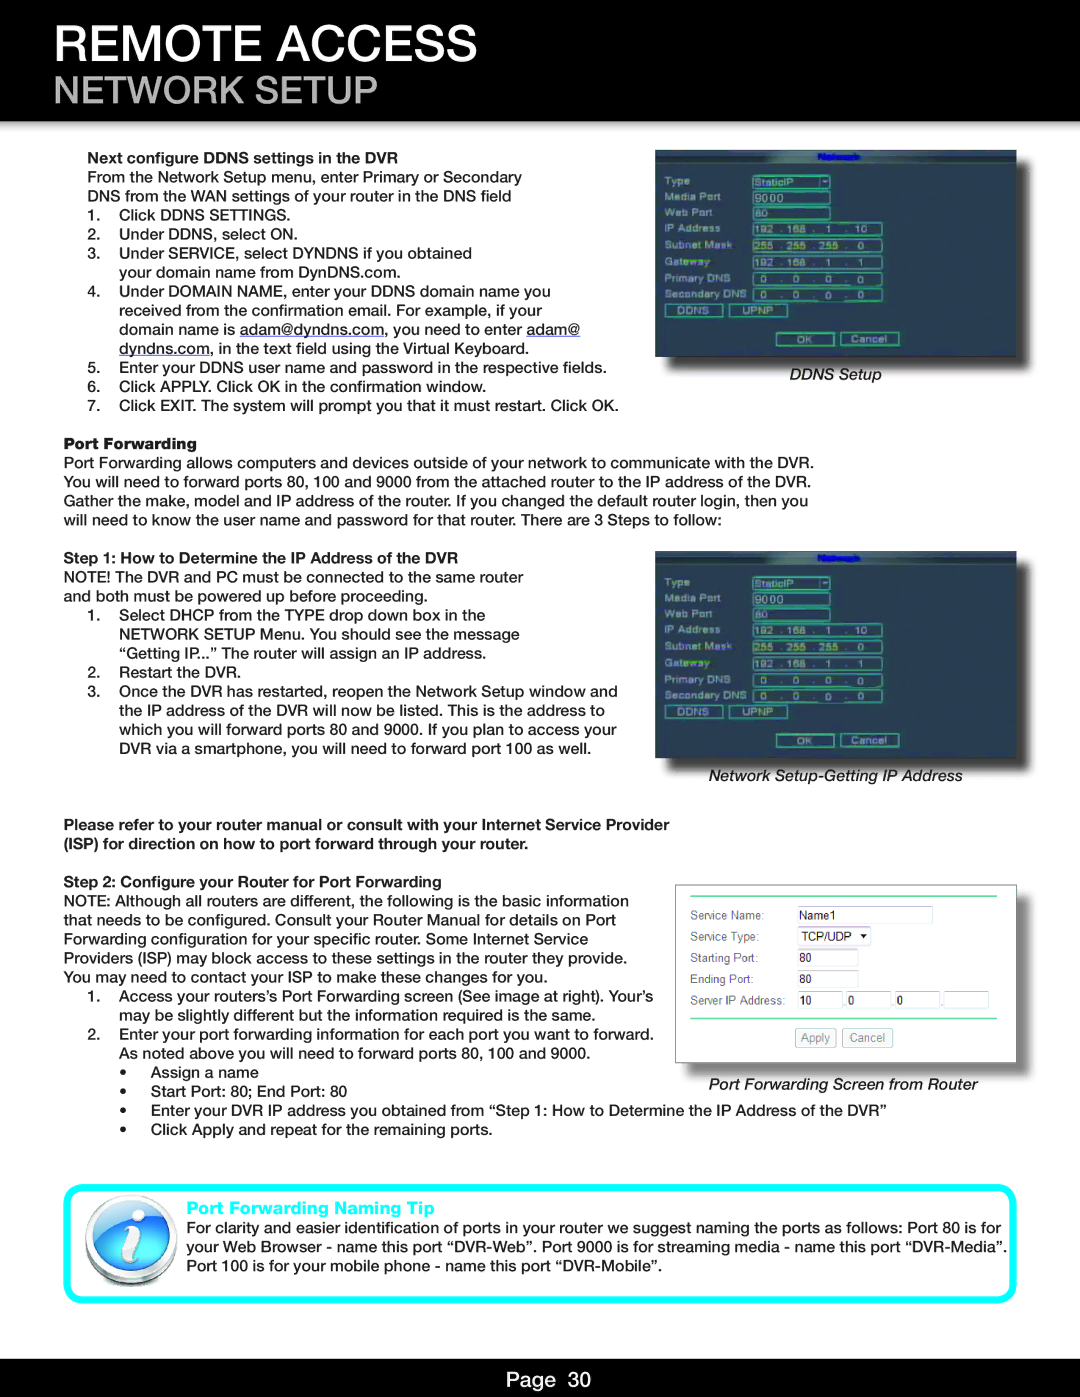
Network Setup-Getting IP Address

REMOTE ACCESS

NETWORK SETUP

Next configure DDNS settings in the DVR

From the Network Setup menu, enter Primary or Secondary

DNS from the WAN settings of your router in the DNS field

1.Click DDNS SETTINGS.

2.Under DDNS, select ON.

3.Under SERVICE, select DYNDNS if you obtained your domain name from DynDNS.com.

4.Under DOMAIN NAME, enter your DDNS domain name you received from the confirmation email. For example, if your domain name is adam@dyndns.com, you need to enter adam@ dyndns.com, in the text field using the Virtual Keyboard.

5.

Enter your DDNS user name and password in the respective fields.

DDNS Setup

6.

Click APPLY. Click OK in the confirmation window.


7.

Click EXIT. The system will prompt you that it must restart. Click OK.


Port Forwarding

Port Forwarding allows computers and devices outside of your network to communicate with the DVR. You will need to forward ports 80, 100 and 9000 from the attached router to the IP address of the DVR. Gather the make, model and IP address of the router. If you changed the default router login, then you will need to know the user name and password for that router. There are 3 Steps to follow:

Step 1: How to Determine the IP Address of the DVR

NOTE! The DVR and PC must be connected to the same router and both must be powered up before proceeding.

1.Select DHCP from the TYPE drop down box in the NETWORK SETUP Menu. You should see the message “Getting IP...” The router will assign an IP address.

2.Restart the DVR.

3.Once the DVR has restarted, reopen the Network Setup window and the IP address of the DVR will now be listed. This is the address to which you will forward ports 80 and 9000. If you plan to access your DVR via a smartphone, you will need to forward port 100 as well.

Please refer to your router manual or consult with your Internet Service Provider (ISP) for direction on how to port forward through your router.

Step 2: Configure your Router for Port Forwarding

NOTE: Although all routers are different, the following is the basic information that needs to be configured. Consult your Router Manual for details on Port Forwarding configuration for your specific router. Some Internet Service Providers (ISP) may block access to these settings in the router they provide. You may need to contact your ISP to make these changes for you.

1.Access your routers’s Port Forwarding screen (See image at right). Your’s may be slightly different but the information required is the same.

2.Enter your port forwarding information for each port you want to forward. As noted above you will need to forward ports 80, 100 and 9000.

Assign a name

Port Forwarding Screen from Router

Start Port: 80; End Port: 80


Enter your DVR IP address you obtained from “Step 1: How to Determine the IP Address of the DVR”

Click Apply and repeat for the remaining ports.

Port Forwarding Naming Tip

For clarity and easier identification of ports in your router we suggest naming the ports as follows: Port 80 is for your Web Browser - name this port “DVR-Web”. Port 9000 is for streaming media - name this port “DVR-Media”. Port 100 is for your mobile phone - name this port “DVR-Mobile”.

Page 30

Page 30
Image 30
First Alert DVR0805, DVR0810 user manual Port Forwarding Naming Tip, Next configure Ddns settings in the DVR

DVR0810, DVR0805 specifications

The First Alert DVR0810 and DVR0805 are sophisticated digital video recorders designed for home security and surveillance. Both models provide a comprehensive solution for monitoring premises, providing peace of mind and enhanced security features.

One of the standout features of the DVR0810 and DVR0805 is their ability to support up to 8 cameras simultaneously. This scalability allows homeowners and businesses to cover multiple areas, ensuring a robust security system. Each channel can record continuously or be programmed for motion-activated recording. This flexibility is essential for conserving storage space and focusing on key events.

The devices come equipped with a user-friendly interface that simplifies the setup and operation of the DVR system. Users can configure settings easily, allowing for quick adjustments based on particular surveillance needs. The built-in Wi-Fi capability in the DVR0810 enables remote access from various devices. Users can monitor live feeds, playback recorded footage, and receive alerts directly on their smartphones or tablets through the accompanying mobile app.

Both models utilize H.264 video compression technology. This ensures high-quality video recordings without consuming excessive storage space, allowing for longer retention periods of footage. The DVR0810 and DVR0805 support hard drives with substantial storage capacities, making them ideal for users who require continuous monitoring.

In terms of video resolution, the DVRs deliver crisp and clear images, with options often up to 1080p. This high-definition capability facilitates better image recognition, ensuring that details such as faces and license plates can be captured effectively.

The systems also feature motion detection alerts, which notify users when motion is detected within the camera's field of view. This proactive feature enhances security by allowing prompt responses to potential threats.

Moreover, the DVR0810 and DVR0805 are designed with robust security protocols to protect recorded footage from unauthorized access. Password protection and encryption provide an additional layer of assurance, safeguarding sensitive information.

In conclusion, the First Alert DVR0810 and DVR0805 are powerful and versatile digital video recorders that cater to various surveillance needs. With features like multi-camera support, high-definition recording, and remote access capabilities, these models stand out as reliable solutions for enhancing security in homes and businesses.