INSTALLATION

Connecting the Water Supply

WARNING

To reduce risk of injury or death, follow basic precautions, including the following:

Read all instructions before installing ice maker.

Do not attempt installation if instructions are not

Notes:

Use copper tubing only for installation. Plastic is less durable and can cause damage.

Add 8’ to tubing length needed to reach water supply for creation of service loop.


understood or if they are beyond personal skill


level.

• Observe all local codes and ordinances.

Do not service ice maker unless specifically


recommended in Use & Care Guide or published


user-repair instructions.

Disconnect power to refrigerator before installing


ice maker.

• Water damage due to an improper water


connection may cause mold/mildew growth.


Clean up spills or leakage immediately.

CAUTION

To avoid property damage or possible injury, follow basic precautions, including the following:

Consult a plumber to connect 14” O.D. copper tubing to household plumbing to assure compliance with local codes and ordinances.

Confirm water pressure to water valve is between 35 and 100 pounds per square inch, 20 pounds per square inch without filter.

Do not use a self-piercing, or 316” saddle valve. Both reduce water flow can become clogged over time, and may cause leaks if repair is attempted.

Wait two to three hours before placing refrigerator into final position to check and correct any water leaks. Recheck for leaks after 24 hours.

Verify the copper tubing under the sleeve is smooth and free from defects. Do not reuse an old sleeve.

Materials Needed

14” outer diameter flexible copper tubing

Shut-off valve (requires a 1” hole to be drilled into

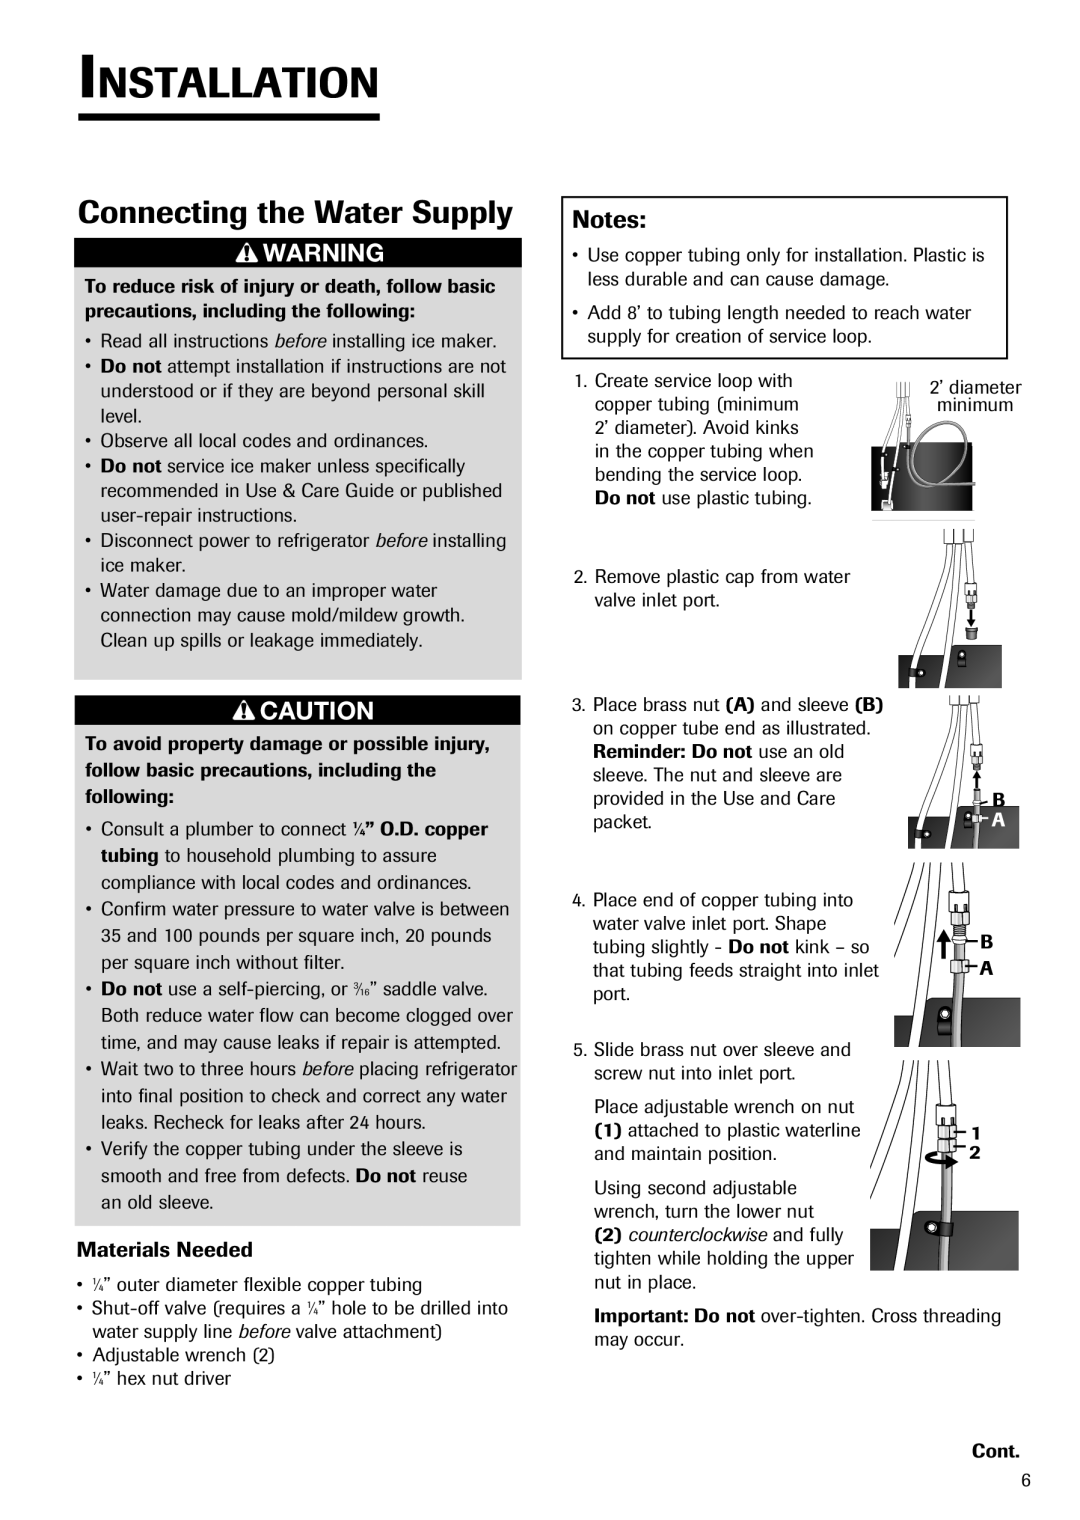
1. Create service loop with copper tubing (minimum 2’ diameter). Avoid kinks in the copper tubing when bending the service loop. Do not use plastic tubing.

2.Remove plastic cap from water valve inlet port.

3.Place brass nut (A) and sleeve (B) on copper tube end as illustrated. Reminder: Do not use an old sleeve. The nut and sleeve are provided in the Use and Care packet.

4.Place end of copper tubing into water valve inlet port. Shape tubing slightly - Do not kink – so that tubing feeds straight into inlet port.

5.Slide brass nut over sleeve and screw nut into inlet port.

Place adjustable wrench on nut

(1) attached to plastic waterline and maintain position.

Using second adjustable wrench, turn the lower nut

(2)counterclockwise and fully tighten while holding the upper nut in place.

2’ diameter

minimum

B

A

B

A

1 2


4


water supply line before valve attachment)

Adjustable wrench (2)

14” hex nut driver

Important: Do not over-tighten. Cross threading may occur.

Cont.

6

Page 9
Image 9
Fisher & Paykel RX256DT7X1 installation instructions Connecting the Water Supply

RX256DT7X1 specifications

The Fisher & Paykel RX256DT7X1 is a premium refrigerator designed to take food preservation to the next level while offering a modern aesthetic for your kitchen. With a capacity of 256 liters, this refrigerator is ideal for families or anyone who enjoys cooking and entertaining.

One of the standout features of the RX256DT7X1 is its ActiveSmart technology. This innovative system adapts the temperature and humidity levels based on the food stored inside, ensuring that your perishables stay fresh for longer. By using smart sensors, it continuously monitors your fridge's internal conditions and adjusts accordingly, providing an optimal storage environment.

The refrigerator also employs a robust Dual Cooling system. This feature utilizes two separate cooling systems for the fridge and freezer compartments, which prevents the transfer of odors between them and helps maintain the ideal humidity levels. The coolant in the fridge compartment is designed to keep your fruits and vegetables fresher, allowing you to enjoy them for an extended period.

Additionally, the Fisher & Paykel RX256DT7X1 boasts a sleek integrated design, allowing it to blend seamlessly into your kitchen cabinetry. The stainless steel finish not only enhances its aesthetic appeal but also ensures durability and easy cleaning. The recessed handles further contribute to its minimalist look, emphasizing both practicality and style.

Convenience is another noteworthy characteristic of the RX256DT7X1. It features adjustable shelving to accommodate various types of food containers and has door bins that can store taller items with ease. The energy-efficient LED lighting illuminates the interior, providing clear visibility of all your stored items, reducing the chance of food waste.

The freezer section also includes a fast freeze function, which quickly lowers the temperature when new food is added, preserving its quality. With multiple storage options, including ice trays and compartments, organizing frozen goods is a straightforward task.

In summary, the Fisher & Paykel RX256DT7X1 combines advanced technology with user-friendly features. From its ActiveSmart system and Dual Cooling technology to its flexible storage and elegant design, this refrigerator sets a new standard in food preservation, making it a valuable addition to any modern kitchen.