Model D2424LV Quick Operation Guide
5. Select the desired sampling frequency using the Jog dial and press the [EXECUTE/YES] key.
By pressing the [EXECUTE/YES] key after selecting the sampling frequency, the screen for the multiple undo On/Off setting will appear.
| Flashing |
| |
SETUP |
| OL |
|
|
| ||
OL |
| BIT | |
0 | 0 | ||
3 | 3 | FS | |
6 | 6 | ||
9 | 9 | kHz | |
12 | 12 | CLOCK | |
18 | 18 | ||
24 | 24 |
| |
30 | 30 |
| |
42 | 42 |
| |
∞ |
| ∞ |
|
1 2 3 4 5 6 7 8 9 10 11 12 13 14 15 16 17 18 19 20 21 22 23 24
In the initial setting, "On" will flash and if the Jog dial is rotated in this state, either "On" or "Off" can be selected. Normally, format is executed with multiple undo set to "On" but if the current drive capacity is small and you wish to limit consumption of the hard disk, it must be set to "Off."
Multiple Undo function
On (default) | Off |
|
|
When set to On, the undo func- | When set to Off, the undo func- |
tion is applied to all takes (re- | tion is only applied to the cur- |
cording, editing, etc.) executed | rent take (recording, editing, |
after the disk has been format- | etc.). |
ted. However, consumption of | If the disk capacity is not large |
the hard disk increases, so if the | enough, we recommend set- |
disk capacity is not large | ting this function to Off. |
enough, we recommend setting |
|
this function to Off. |
|
|
|
For details on multiple undo function, refer to the Refer- ence Manual.
6. Select “On” or “Off” via the Jog dial, and press the [EXECUTE/YES] key.
The screen for selecting the format appears (the default shows “Standard Format?”).
You can select the format type between “Standard Format” and “Quick Format” using the Jog dial.
To newly format the hard disk, select the initial setting of "Standard format?" and proceed to the next step.
|
|
|
|
| Flashing |
|
|
|
|
|
|
|
|
|
|
|
|
|
|
|
| |||
SETUP |
|
|
|
|
|
|
|
|
|
|
|
|
|
|
|
|
|
|
|
|
|
|
|
|
|
|
|
|
|
|
|
|
|
|
|
|
|
|
|
|
|
|
|
|
|
|
|
| |
OL |
|
|
|
|
|
|
|
|
|
|
|
|
|
|
|
|
|
|
|
|
|
| OL | BIT |
0 |
|
|
|
|
|
|
|
|
|
|
|
|
|
|
|
|
|
|
|
|
|
| 0 | |
3 |
|
|
|
|
|
|
|
|
|
|
|
|
|
|
|
|
|
|
|
|
|
| 3 | FS |
6 |
|
|
|
|
|
|
|
|
|
|
|
|
|
|
|
|
|
|
|
|
|
| 6 | |
9 |
|
|
|
|
|
|
|
|
|
|
|
|
|
|
|
|
|
|
|
|
|
| 9 | kHz |
12 |
|
|
|
|
|
|
|
|
|
|
|
|
|
|
|
|
|
|
|
|
|
| 12 | CLOCK |
18 |
|
|
|
|
|
|
|
|
|
|
|
|
|
|
|
|
|
|
|
|
|
| 18 | |
24 |
|
|
|
|
|
|
|
|
|
|
|
|
|
|
|
|
|
|
|
|
|
| 24 |
|
30 |
|
|
|
|
|
|
|
|
|
|
|
|
|
|
|
|
|
|
|
|
|
| 30 |
|
42 |
|
|
|
|
|
|
|
|
|
|
|
|
|
|
|
|
|
|
|
|
|
| 42 |
|
∞ |
|
|
|
|
|
|
|
|
|
|
|
|
|
|
|
|
|
|
|
|
|
| ∞ |
|
1 | 2 | 3 | 4 | 5 | 6 | 7 | 8 | 9 | 10 | 11 | 12 | 13 | 14 | 15 | 16 | 17 | 18 | 19 | 20 | 21 | 22 | 23 | 24 |
|
Format type
Standard Format (default) | Quick Format | |
|
| |
During formatting, the recorder | Formatting this way, the recorder | |
checks the hard disk perfor- | assumes that all sectors in the | |
mance including the access | hard disk are good and simply | |
time of each block. | formats the disk. | |
The time required to format is very | ||
The time required for the for- | ||
mat is longer but the reliability | short, however, bad sectors on | |
is enhanced. | the disk will not be found. | |
Select this format type only when | ||
In general, it is best to select | ||
this default format type. | using a new hard disk that is | |
checked by FOSTEX. | ||
| ||
|
|
7. Press the [EXECUTE/YES] key while holding down the [RECORD] button.
The size of unformatted area on the hard disk appears on the display, and counts down as the formatting progresses.
It will take a while to complete formatting, especially if you are formatting a
Upon completion of formatting, "COMPLETED!" will be lit and the effective hard disk capacity as a result of formatting will be indicated.
The display below is an example at formatting in "48kHz/ 24 bit," and the number of effective tracks after format- ting will be indicated as 24.
| It is indicated as formatted in 48kHz/ |
|
|
Lit | 24 bit. |
|
|
|
|
| |
SETUP COMPLETED! |
|
|
|
OL | OL | BIT | 24 |
0 | 0 |
|
|
3 | 3 |
| FS |
6 | 6 |
| |
9 | 9 |
| kHz |
12 | 12 |
| CLOCK |
18 | 18 |
| |
24 | 24 |
| INT |
30 | 30 |
|
|
42 | 42 |
|
|
∞ | ∞ |
|
|
1 | 2 | 3 | 4 | 5 | 6 | 7 | 8 | 9 | 10 | 11 | 12 | 13 | 14 | 15 | 16 | 17 | 18 | 19 | 20 | 21 | 22 | 23 | 24 |
The operating clock after formatting is set to "Int."
Display below is the example at completion of format- ting in "96kHz/24 bit”.
Number of effective tracks after formatting is 8 (It will also be 8 tracks when formatted in "88.2kHz/24 bit.").
| It is indicated as formatted in 96kHz/ |
|
|
Lit | 24 bit. |
|
|
|
|
| |
SETUP COMPLETED! |
|
|
|
OL | OL | BIT | 24 |
0 | 0 |
|
|
3 | 3 |
| FS |
6 | 6 |
| |
9 | 9 |
| kHz |
12 | 12 |
| CLOCK |
18 | 18 |
| |
24 | 24 |
| INT |
30 | 30 |
|
|
42 | 42 |
|
|
∞ | ∞ |
|
|
1 2 3 4 5 6 7 8
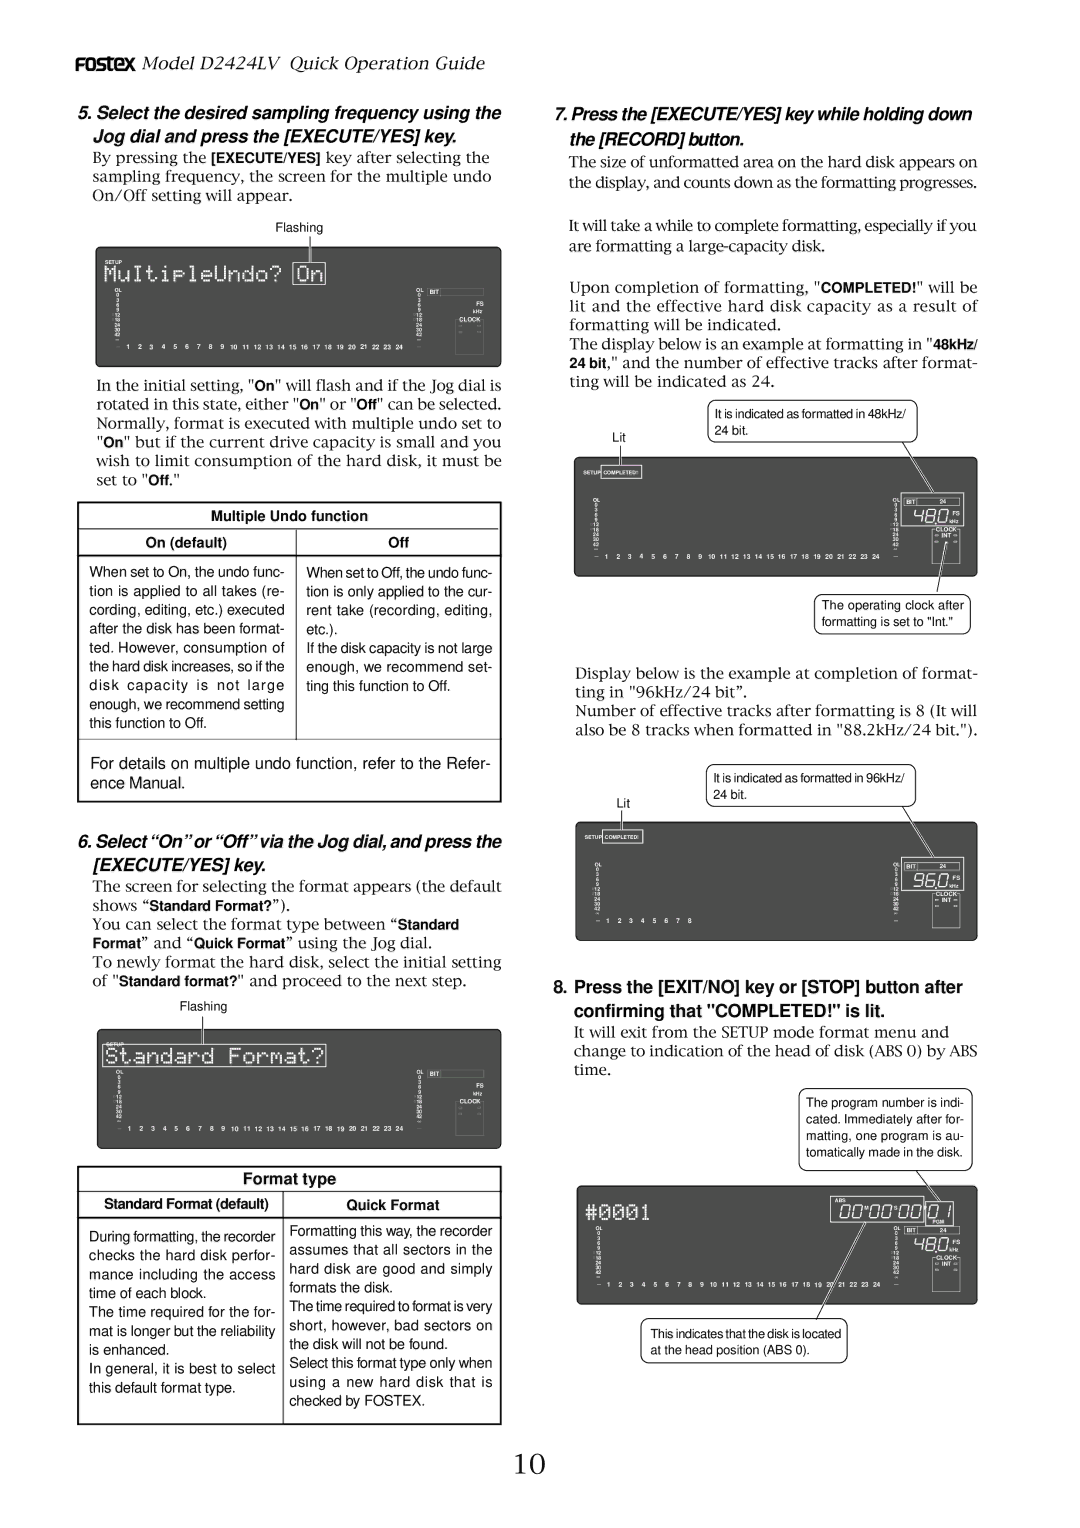
8. Press the [EXIT/NO] key or [STOP] button after confirming that "COMPLETED!" is lit.
It will exit from the SETUP mode format menu and change to indication of the head of disk (ABS 0) by ABS time.
The program number is indi- cated. Immediately after for- matting, one program is au- tomatically made in the disk.
ABS |
|
|
|
M | S |
| F |
|
|
| PGM |
OL | OL | BIT | 24 |
0 | 0 |
|
|
3 | 3 |
| FS |
6 | 6 |
| |
9 | 9 |
| kHz |
12 | 12 |
| CLOCK |
18 | 18 |
| |
24 | 24 |
| INT |
30 | 30 |
|
|
42 | 42 |
|
|
∞ | ∞ |
|
|
1 2 3 4 5 6 7 8 9 10 11 12 13 14 15 16 17 18 19 20 21 22 23 24
This indicates that the disk is located at the head position (ABS 0).
10