Model D2424LV Quick Operation Guide
Setup of the Internal Clock
This recorder contains an internal clock function.
Upon finishing format of the current drive, set internal clock to the present time by procedure explained below. Procedures below is explained on the assumption that current drive has been formatted, the program head (ABS 0) is displayed and this recorder is on standby.
<Note>
Be sure the internal clock is setup to the correct year, month, day and present time.
The year, month, day and time are important data necessary for executing the "Multiple Undo Function" ex- plained in the Reference Manual. For details on multiple undo function, refer to the Reference Manual.
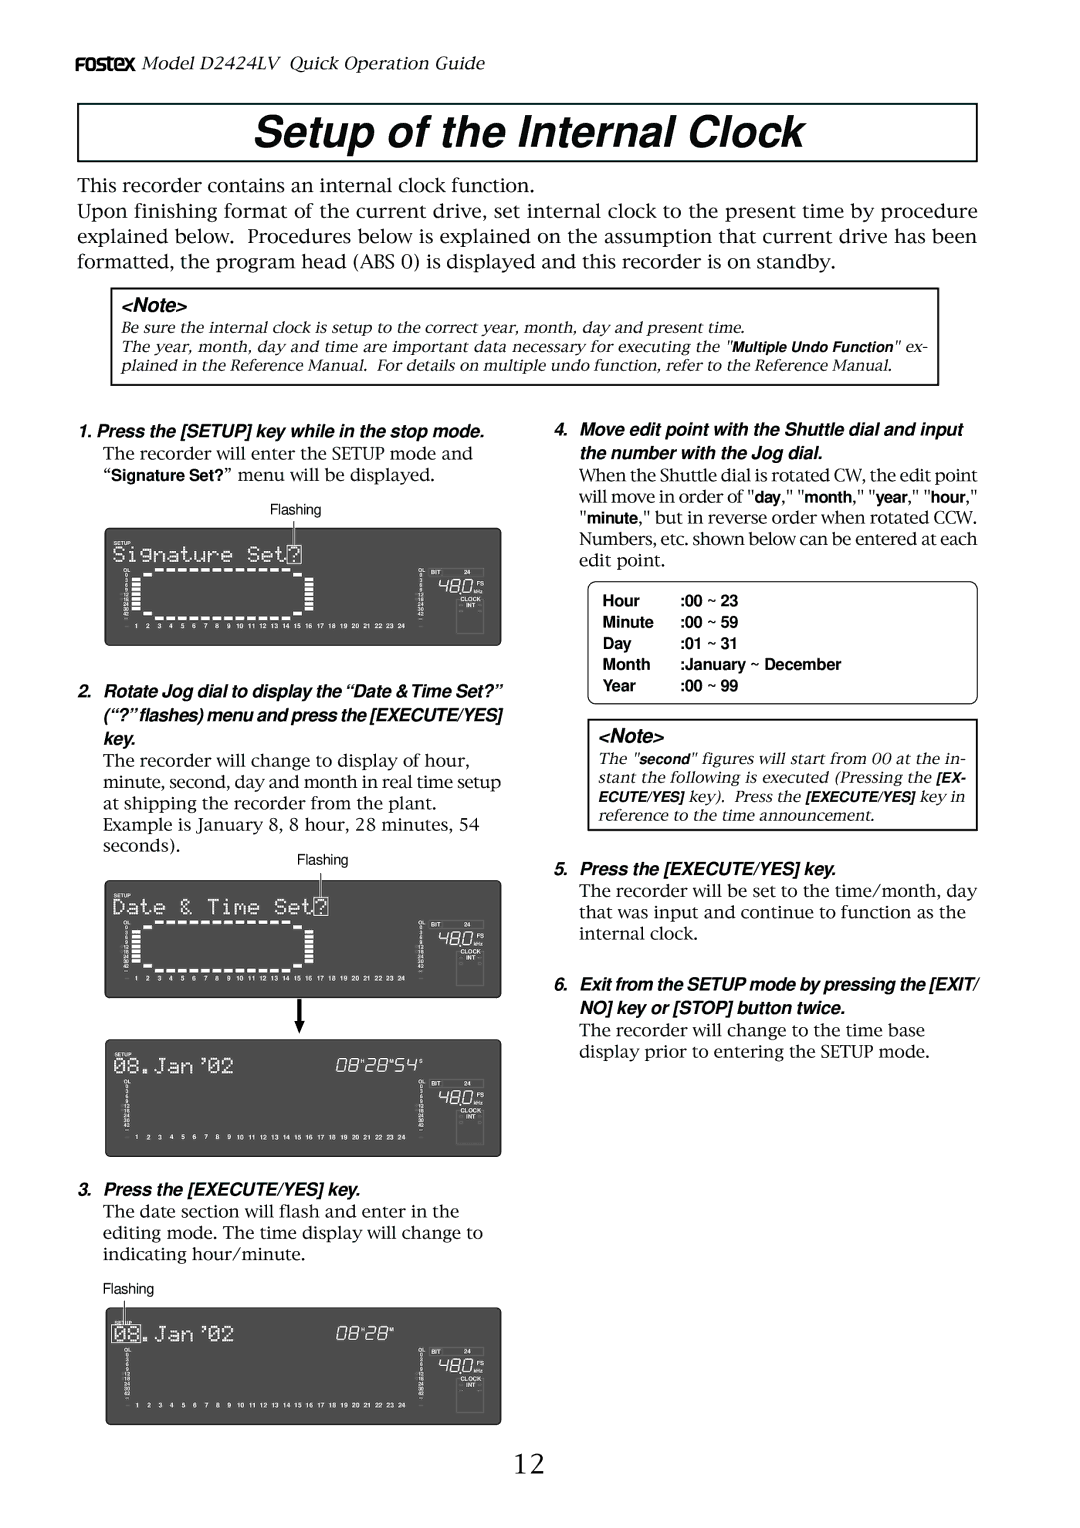
1.Press the [SETUP] key while in the stop mode.
The recorder will enter the SETUP mode and “Signature Set?” menu will be displayed.
Flashing
SETUP
OL |
|
|
|
|
|
|
|
|
|
|
|
|
|
|
|
|
|
|
|
|
|
|
|
|
|
|
|
|
|
|
|
|
| OL | BIT | 24 |
|
|
|
|
|
|
|
|
|
|
|
|
|
| |||||||||||||||||||||||
0 |
|
|
|
| 0 |
|
| |||||||||||||||||||||||||||||
|
|
|
|
| ||||||||||||||||||||||||||||||||
3 |
|
|
| 3 |
| FS | ||||||||||||||||||||||||||||||
|
|
| ||||||||||||||||||||||||||||||||||
6 |
|
|
|
| 6 |
| ||||||||||||||||||||||||||||||
|
|
|
| |||||||||||||||||||||||||||||||||
9 |
|
|
| 9 |
| kHz | ||||||||||||||||||||||||||||||
|
|
| ||||||||||||||||||||||||||||||||||
12 |
|
|
| 12 |
| CLOCK | ||||||||||||||||||||||||||||||
|
|
| ||||||||||||||||||||||||||||||||||
18 |
|
|
| 18 |
| |||||||||||||||||||||||||||||||
|
|
| ||||||||||||||||||||||||||||||||||
24 |
|
|
| 24 |
| INT | ||||||||||||||||||||||||||||||
|
|
| ||||||||||||||||||||||||||||||||||
30 |
|
|
| 30 |
|
| ||||||||||||||||||||||||||||||
|
|
|
| |||||||||||||||||||||||||||||||||
42 |
|
|
|
| 42 |
|
| |||||||||||||||||||||||||||||
∞ |
|
|
|
|
|
|
|
|
|
|
|
|
|
|
|
|
|
|
|
|
|
|
|
|
|
|
|
|
|
|
|
|
| ∞ |
|
|
1 2 3 4 5 6 7 8 9 10 11 12 13 14 15 16 17 18 19 20 21 22 23 24
2.Rotate Jog dial to display the “Date & Time Set?” (“?” flashes) menu and press the [EXECUTE/YES] key.
The recorder will change to display of hour, minute, second, day and month in real time setup at shipping the recorder from the plant. Example is January 8, 8 hour, 28 minutes, 54 seconds).
Flashing
SETUP
OL |
|
|
|
|
|
|
|
|
|
|
|
|
|
|
|
|
|
|
|
|
|
|
|
|
|
|
|
|
|
|
|
|
| OL | BIT | 24 |
|
|
|
|
|
|
|
|
|
|
|
|
|
| |||||||||||||||||||||||
0 |
|
|
|
| 0 |
|
| |||||||||||||||||||||||||||||
|
|
|
|
| ||||||||||||||||||||||||||||||||
3 |
|
|
| 3 |
| FS | ||||||||||||||||||||||||||||||
|
|
| ||||||||||||||||||||||||||||||||||
6 |
|
|
|
| 6 |
| ||||||||||||||||||||||||||||||
|
|
|
| |||||||||||||||||||||||||||||||||
9 |
|
|
| 9 |
| kHz | ||||||||||||||||||||||||||||||
|
|
| ||||||||||||||||||||||||||||||||||
12 |
|
|
| 12 |
| CLOCK | ||||||||||||||||||||||||||||||
|
|
| ||||||||||||||||||||||||||||||||||
18 |
|
|
| 18 |
| |||||||||||||||||||||||||||||||
|
|
| ||||||||||||||||||||||||||||||||||
24 |
|
|
| 24 |
| INT | ||||||||||||||||||||||||||||||
|
|
| ||||||||||||||||||||||||||||||||||
30 |
|
|
| 30 |
|
| ||||||||||||||||||||||||||||||
|
|
|
| |||||||||||||||||||||||||||||||||
42 |
|
|
|
| 42 |
|
| |||||||||||||||||||||||||||||
∞ |
|
|
|
|
|
|
|
|
|
|
|
|
|
|
|
|
|
|
|
|
|
|
|
|
|
|
|
|
|
|
|
|
| ∞ |
|
|
4.Move edit point with the Shuttle dial and input the number with the Jog dial.
When the Shuttle dial is rotated CW, the edit point will move in order of "day," "month," "year," "hour," "minute," but in reverse order when rotated CCW. Numbers, etc. shown below can be entered at each edit point.
Hour | :00 ~ 23 |
Minute | :00 ~ 59 |
Day | :01 ~ 31 |
Month | :January ~ December |
Year | :00 ~ 99 |
<Note>
The "second" figures will start from 00 at the in- stant the following is executed (Pressing the [EX- ECUTE/YES] key). Press the [EXECUTE/YES] key in reference to the time announcement.
5.Press the [EXECUTE/YES] key.
The recorder will be set to the time/month, day that was input and continue to function as the internal clock.
1 | 2 | 3 | 4 | 5 | 6 | 7 | 8 | 9 | 10 | 11 | 12 | 13 | 14 | 15 | 16 | 17 | 18 | 19 | 20 | 21 | 22 | 23 | 24 |
|
|
SETUP |
|
|
|
|
|
|
|
|
|
|
|
|
|
|
|
|
|
|
|
|
|
|
|
|
|
|
|
|
|
|
|
|
|
|
|
|
|
|
|
|
|
|
|
|
| H |
| M | S |
|
|
OL |
|
|
|
|
|
|
|
|
|
|
|
|
|
|
|
|
|
|
|
|
|
| OL | BIT | 24 |
0 |
|
|
|
|
|
|
|
|
|
|
|
|
|
|
|
|
|
|
|
|
|
| 0 |
|
|
3 |
|
|
|
|
|
|
|
|
|
|
|
|
|
|
|
|
|
|
|
|
|
| 3 |
| FS |
6 |
|
|
|
|
|
|
|
|
|
|
|
|
|
|
|
|
|
|
|
|
|
| 6 |
| |
9 |
|
|
|
|
|
|
|
|
|
|
|
|
|
|
|
|
|
|
|
|
|
| 9 |
| kHz |
12 |
|
|
|
|
|
|
|
|
|
|
|
|
|
|
|
|
|
|
|
|
|
| 12 |
| CLOCK |
18 |
|
|
|
|
|
|
|
|
|
|
|
|
|
|
|
|
|
|
|
|
|
| 18 |
| |
24 |
|
|
|
|
|
|
|
|
|
|
|
|
|
|
|
|
|
|
|
|
|
| 24 |
| INT |
30 |
|
|
|
|
|
|
|
|
|
|
|
|
|
|
|
|
|
|
|
|
|
| 30 |
|
|
42 |
|
|
|
|
|
|
|
|
|
|
|
|
|
|
|
|
|
|
|
|
|
| 42 |
|
|
∞ |
|
|
|
|
|
|
|
|
|
|
|
|
|
|
|
|
|
|
|
|
|
| ∞ |
|
|
1 | 2 | 3 | 4 | 5 | 6 | 7 | 8 | 9 | 10 | 11 | 12 | 13 | 14 | 15 | 16 | 17 | 18 | 19 | 20 | 21 | 22 | 23 | 24 |
|
|
3.Press the [EXECUTE/YES] key.
The date section will flash and enter in the editing mode. The time display will change to indicating hour/minute.
Flashing
SETUP |
|
H | M |
OL |
|
|
|
|
|
|
|
|
|
|
|
|
|
|
|
|
|
|
|
|
|
| OL | BIT | 24 |
0 |
|
|
|
|
|
|
|
|
|
|
|
|
|
|
|
|
|
|
|
|
|
| 0 |
|
|
3 |
|
|
|
|
|
|
|
|
|
|
|
|
|
|
|
|
|
|
|
|
|
| 3 |
| FS |
6 |
|
|
|
|
|
|
|
|
|
|
|
|
|
|
|
|
|
|
|
|
|
| 6 |
| |
9 |
|
|
|
|
|
|
|
|
|
|
|
|
|
|
|
|
|
|
|
|
|
| 9 |
| kHz |
12 |
|
|
|
|
|
|
|
|
|
|
|
|
|
|
|
|
|
|
|
|
|
| 12 |
| CLOCK |
18 |
|
|
|
|
|
|
|
|
|
|
|
|
|
|
|
|
|
|
|
|
|
| 18 |
| |
24 |
|
|
|
|
|
|
|
|
|
|
|
|
|
|
|
|
|
|
|
|
|
| 24 |
| INT |
30 |
|
|
|
|
|
|
|
|
|
|
|
|
|
|
|
|
|
|
|
|
|
| 30 |
|
|
42 |
|
|
|
|
|
|
|
|
|
|
|
|
|
|
|
|
|
|
|
|
|
| 42 |
|
|
∞ |
|
|
|
|
|
|
|
|
|
|
|
|
|
|
|
|
|
|
|
|
|
| ∞ |
|
|
1 | 2 | 3 | 4 | 5 | 6 | 7 | 8 | 9 | 10 | 11 | 12 | 13 | 14 | 15 | 16 | 17 | 18 | 19 | 20 | 21 | 22 | 23 | 24 |
|
|
6.Exit from the SETUP mode by pressing the [EXIT/ NO] key or [STOP] button twice.
The recorder will change to the time base display prior to entering the SETUP mode.
12