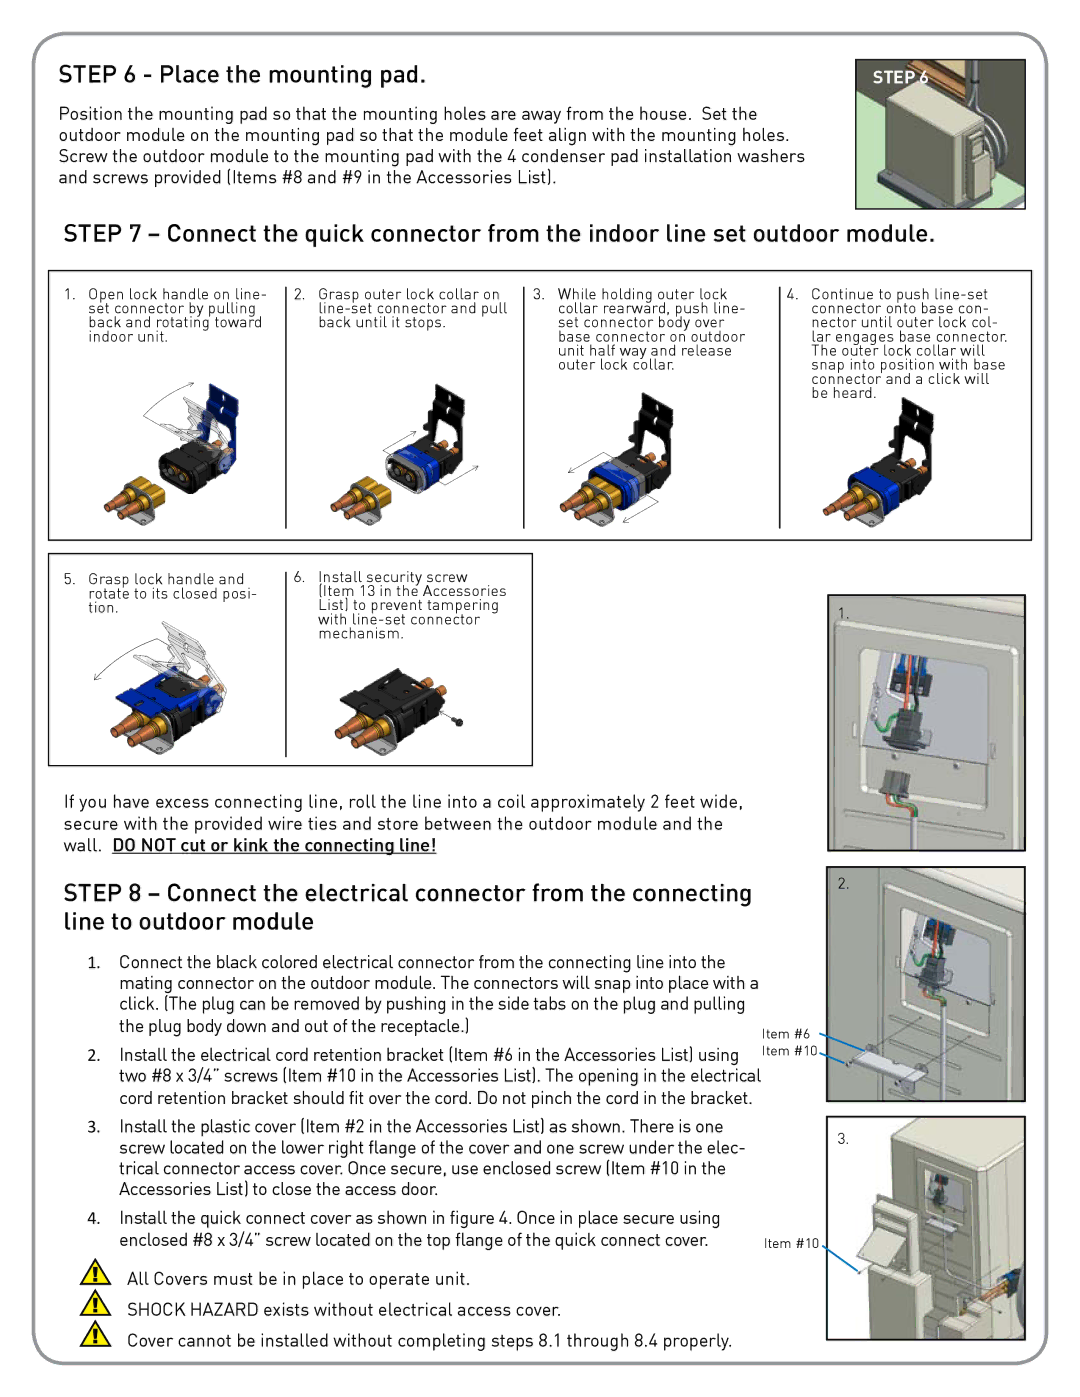
STEP 6 - Place the mounting pad.

Position the mounting pad so that the mounting holes are away from the house. Set the outdoor module on the mounting pad so that the module feet align with the mounting holes. Screw the outdoor module to the mounting pad with the 4 condenser pad installation washers and screws provided (Items #8 and #9 in the Accessories List).

STEP 6

STEP 7 – Connect the quick connector from the indoor line set outdoor module.

1.Open lock handle on line- set connector by pulling back and rotating toward indoor unit.

2.Grasp outer lock collar on line-set connector and pull back until it stops.

3.While holding outer lock collar rearward, push line- set connector body over base connector on outdoor unit half way and release outer lock collar.

4.Continue to push line-set connector onto base con- nector until outer lock col- lar engages base connector. The outer lock collar will snap into position with base connector and a click will be heard.

5. Grasp lock handle and


6. Install security screw


rotate to its closed posi-


(Item 13 in the Accessories

tion.


List) to prevent tampering


with line-set connector


mechanism.


If you have excess connecting line, roll the line into a coil approximately 2 feet wide, secure with the provided wire ties and store between the outdoor module and the wall. DO NOT cut or kink the connecting line!

STEP 8 – Connect the electrical connector from the connecting line to outdoor module

1.Connect the black colored electrical connector from the connecting line into the mating connector on the outdoor module. The connectors will snap into place with a click. (The plug can be removed by pushing in the side tabs on the plug and pulling

the plug body down and out of the receptacle.)

Item #6


2. Install the electrical cord retention bracket (Item #6 in the Accessories List) using Item #10 two #8 x 3/4” screws (Item #10 in the Accessories List). The opening in the electrical

cord retention bracket should fit over the cord. Do not pinch the cord in the bracket.

3.Install the plastic cover (Item #2 in the Accessories List) as shown. There is one screw located on the lower right flange of the cover and one screw under the elec- trical connector access cover. Once secure, use enclosed screw (Item #10 in the Accessories List) to close the access door.

4.Install the quick connect cover as shown in figure 4. Once in place secure using

enclosed #8 x 3/4” screw located on the top flange of the quick connect cover.

Item #10

All Covers must be in place to operate unit.

SHOCK HAZARD exists without electrical access cover.

Cover cannot be installed without completing steps 8.1 through 8.4 properly.

1.

2.

3.

Page 6
Image 6
Friedrich BR1224W3A installation instructions Place the mounting pad, Plug body down and out of the receptacle

BR1224W3A specifications

The Friedrich BR1224W3A is a highly efficient and advanced window air conditioning unit designed to provide optimal cooling and comfort in various environments. Offering a blend of cutting-edge technology and user-friendly features, this model stands out in today’s market for its capability to deliver powerful cooling while maintaining energy efficiency.

One of the primary features of the Friedrich BR1224W3A is its impressive cooling capacity. With a BTU rating of 12,000, it is well-suited for cooling spaces up to 550 square feet, making it ideal for medium-sized rooms such as bedrooms, living areas, or small offices. The unit is designed to cool quickly and efficiently, ensuring that users can enjoy a comfortable environment even during the hottest summer months.

This model incorporates advanced inverter technology, which allows it to adjust its cooling output according to the room’s temperature. This variable speed operation not only enhances comfort by providing a more consistent temperature but also helps to reduce energy consumption by minimizing the on-and-off cycle. As a result, the Friedrich BR1224W3A is ENERGY STAR certified, making it a sustainable choice for environmentally-conscious consumers.

Another notable feature is the unit's quiet operation. It is engineered with a sound-dampening design that minimizes noise, making it perfect for nighttime use or in quiet settings. With a low decibel level, users can enjoy a peaceful environment without the disruptive sounds often associated with standard window air conditioners.

The BR1224W3A also comes equipped with a programmable timer and multiple cooling modes, allowing users to tailor the cooling experience to their specific needs. The unit features an intuitive remote control, making it easy to adjust settings from across the room. Additionally, it includes a washable and reusable filter that helps maintain clean air quality while also reducing maintenance costs.

In terms of installation, the Friedrich BR1224W3A is designed for easy setup in standard window openings. Its compact design ensures a secure fit, while the side panels can be expanded to close gaps and improve energy efficiency. Overall, the Friedrich BR1224W3A combines exceptional performance, innovative technology, and user-friendly features, making it a top choice for those seeking reliable and efficient cooling solutions.