NOTICE: All pipe, fittings, solvent cement, primers and procedures must conform to American National Standards Institute and American Society for Testing and Materials (ANSI/ASTM) standards.

Safety Instructions

Mortar or

Silicone Caulk

Vent Pipe

From

Water Heater

Pipe Coupling

2' x 2' Sheet Metal Shieldon Brick or Masonry Walls

Vent Terminal with 1¼2" Mesh Protective Screen Inside

Outside of

Building Wall

Horizontal Vent Installation

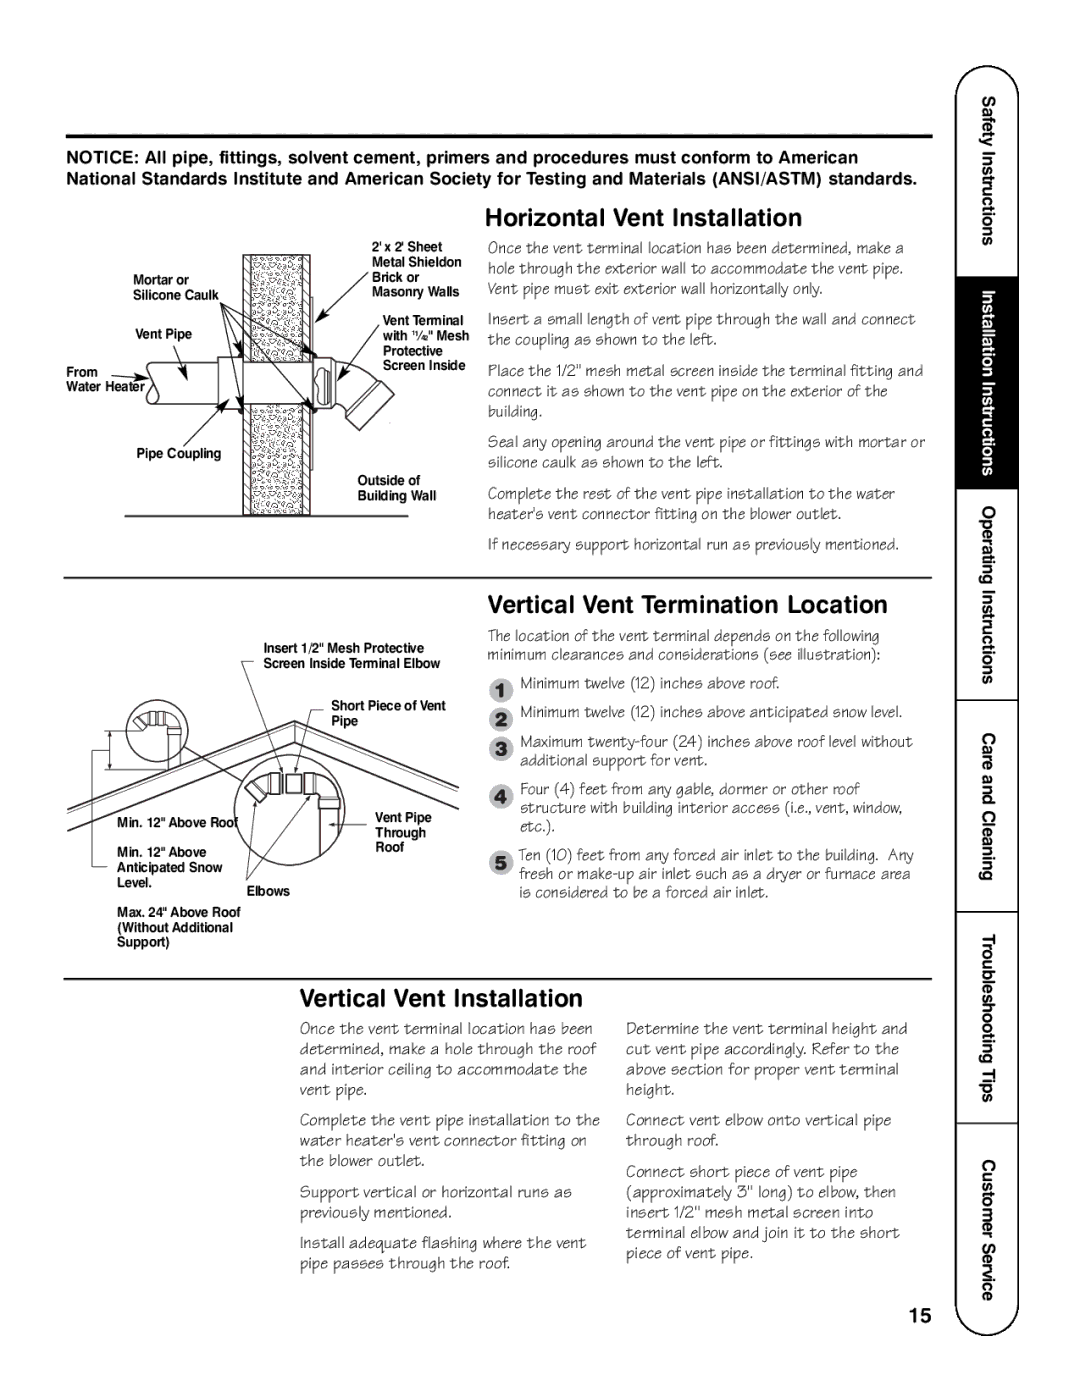
Once the vent terminal location has been determined, make a hole through the exterior wall to accommodate the vent pipe. Vent pipe must exit exterior wall horizontally only.

Insert a small length of vent pipe through the wall and connect the coupling as shown to the left.

Place the 1/2" mesh metal screen inside the terminal fitting and connect it as shown to the vent pipe on the exterior of the building.

Seal any opening around the vent pipe or fittings with mortar or silicone caulk as shown to the left.

Complete the rest of the vent pipe installation to the water heater's vent connector fitting on the blower outlet.

If necessary support horizontal run as previously mentioned.

Installation Instructions Operating

Insert 1/2" Mesh Protective

Screen Inside Terminal Elbow

Short Piece of Vent

Pipe

Min. 12" Above Roof


Vent Pipe


Through


Min. 12" Above


Roof


Anticipated Snow


Level.

Elbows


Max. 24" Above Roof


(Without Additional


Support)


Vertical Vent Termination Location

The location of the vent terminal depends on the following minimum clearances and considerations (see illustration):

Minimum twelve (12) inches above roof.

Minimum twelve (12) inches above anticipated snow level.

Maximum twenty-four (24) inches above roof level without additional support for vent.

Four (4) feet from any gable, dormer or other roof structure with building interior access (i.e., vent, window, etc.).

Ten (10) feet from any forced air inlet to the building. Any fresh or make-up air inlet such as a dryer or furnace area is considered to be a forced air inlet.

Instructions Care and Cleaning

Vertical Vent Installation

Once the vent terminal location has been determined, make a hole through the roof and interior ceiling to accommodate the vent pipe.

Complete the vent pipe installation to the water heater's vent connector fitting on the blower outlet.

Support vertical or horizontal runs as previously mentioned.

Install adequate flashing where the vent pipe passes through the roof.

Determine the vent terminal height and cut vent pipe accordingly. Refer to the above section for proper vent terminal height.

Connect vent elbow onto vertical pipe through roof.

Connect short piece of vent pipe (approximately 3" long) to elbow, then insert 1/2" mesh metal screen into terminal elbow and join it to the short piece of vent pipe.

Troubleshooting Tips Customer Service

15

Page 15
Image 15
GE AP13787 Horizontal Vent Installation, Vertical Vent Termination Location, Vertical Vent Installation

AP13787 specifications

The GE AP13787 is a smart and innovative appliance that has quickly gained attention for its advanced features and modern technologies. This product exemplifies GE's commitment to providing consumers with high-quality and efficient home solutions. The GE AP13787 stands out in the market, particularly due to its combination of functionality, energy efficiency, and user-friendly design.

One of the primary features of the GE AP13787 is its cutting-edge smart technology, which integrates seamlessly with smart home systems. This appliance is equipped with Wi-Fi connectivity, allowing users to control it remotely through a smartphone application. This capability enhances convenience, as consumers can monitor and adjust settings from anywhere, whether they are at home or on the go. The smart diagnosis feature also adds value, enabling users to troubleshoot potential issues quickly, minimizing downtime, and ensuring the appliance operates optimally.

In addition to its smart capabilities, the GE AP13787 boasts energy-efficient performance, an increasingly vital consideration for eco-conscious consumers. The appliance is designed to reduce energy consumption without sacrificing performance, helping users save on utility bills while also promoting sustainability. Its Energy Star certification is a testament to its efficiency, reflecting GE’s emphasis on responsible manufacturing and environmental stewardship.

Another notable characteristic of the GE AP13787 is its spacious and thoughtful design. It features ample storage and organization options, enabling users to maximize their kitchen space effectively. With adjustable shelves, clear bins, and easy-access compartments, finding and storing food items becomes a hassle-free experience.

Moreover, the GE AP13787 includes advanced cooling technologies that ensure optimal food preservation. Its Precision Temperature Management system keeps food at ideal temperatures, while the advanced air circulation technology promotes even cooling throughout the appliance. This feature is especially beneficial for maintaining the quality of perishables, extending their shelf life.

Overall, the GE AP13787 delivers a blend of modern technology, energy efficiency, and practical design. It is a perfect addition to any contemporary kitchen, catering to the demands of today’s consumers who seek convenience and quality. As the market for smart home appliances continues to grow, products like the GE AP13787 illustrate how innovation can enhance everyday living while being mindful of environmental impact.