Step-by-step installation instructions.

Electronic Faucet Installation for Model GXSV10C

Be sure there is room underneath the sink to make the needed connections. Select one of the following places to install the faucet:

IN an existing sink spray attachment or soap dispenser hole.

IN a hole to be drilled in the sink top.

IN a hole to be drilled in the countertop, next to the sink.

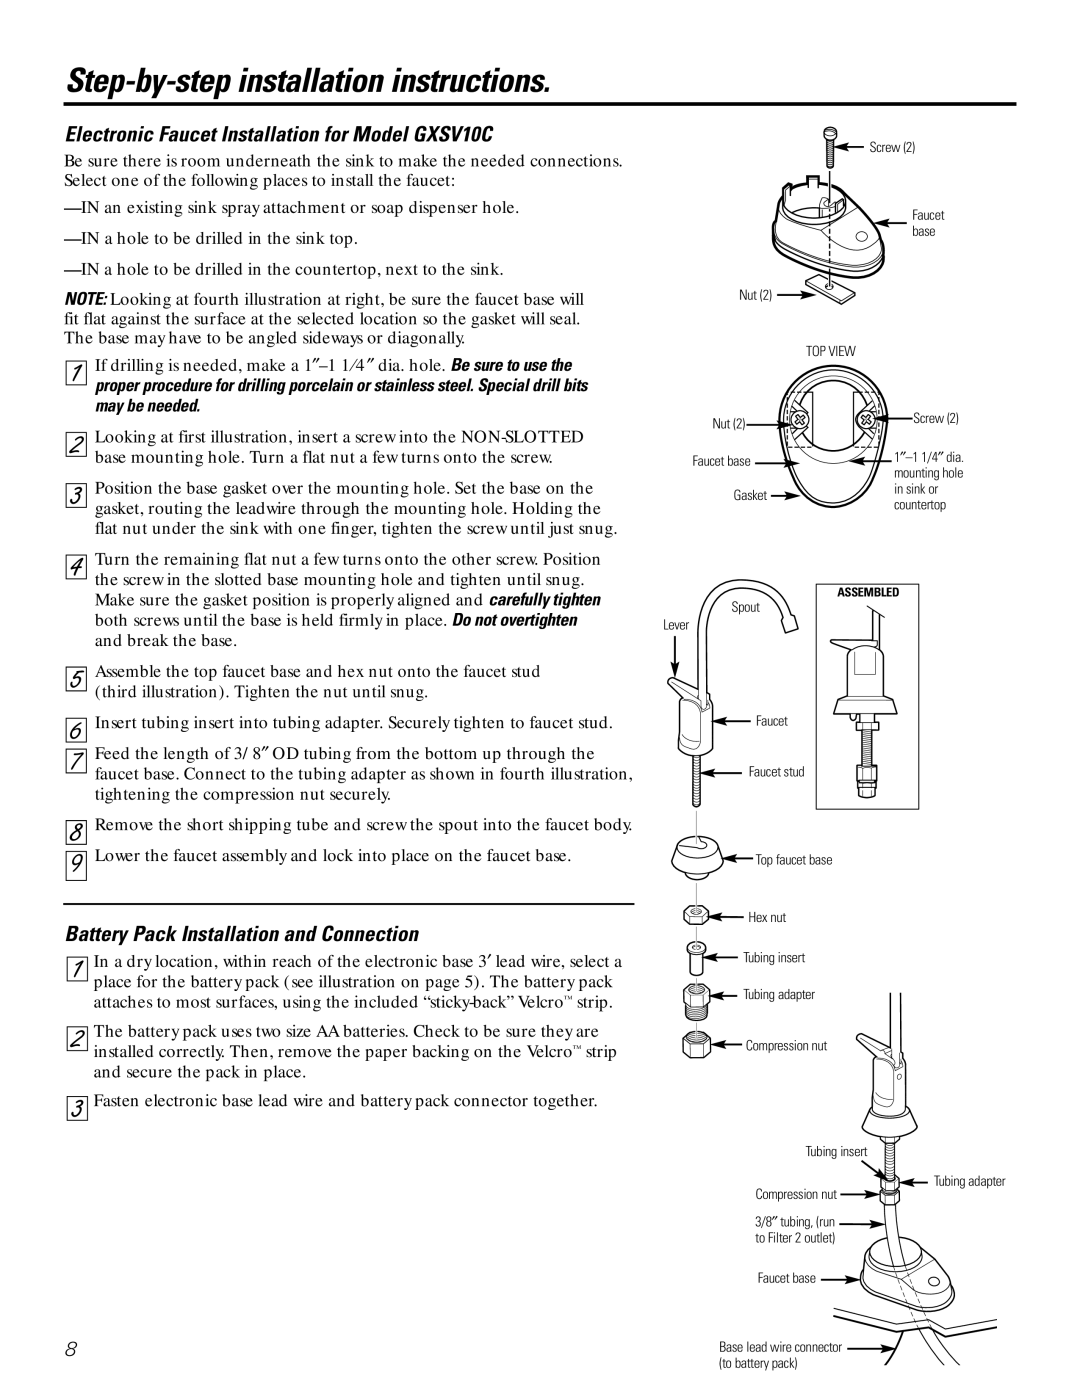
NOTE: Looking at fourth illustration at right, be sure the faucet base will fit flat against the surface at the selected location so the gasket will seal. The base may have to be angled sideways or diagonally.

1 If drilling is needed, make a 1″–1 1⁄4 ″ dia. hole. Be sure to use the proper procedure for drilling porcelain or stainless steel. Special drill bits may be needed.


2

Looking at first illustration, insert a screw into the NON-SLOTTED


base mounting hole. Turn a flat nut a few turns onto the screw.


Position the base gasket over the mounting hole. Set the base on the


3


gasket, routing the leadwire through the mounting hole. Holding the


flat nut under the sink with one finger, tighten the screw until just snug.


Turn the remaining flat nut a few turns onto the other screw. Position


4


the screw in the slotted base mounting hole and tighten until snug.


Make sure the gasket position is properly aligned and carefully tighten


both screws until the base is held firmly in place. Do not overtighten


and break the base.


Assemble the top faucet base and hex nut onto the faucet stud


5


(third illustration). Tighten the nut until snug.


Insert tubing insert into tubing adapter. Securely tighten to faucet stud.

6


Feed the length of 3/8″ OD tubing from the bottom up through the


7


faucet base. Connect to the tubing adapter as shown in fourth illustration,


tightening the compression nut securely.


Remove the short shipping tube and screw the spout into the faucet body.

8


Lower the faucet assembly and lock into place on the faucet base.

9


Battery Pack Installation and Connection


In a dry location, within reach of the electronic base 3′ lead wire, select a


1


place for the battery pack (see illustration on page 5). The battery pack


attaches to most surfaces, using the included “sticky-back” Velcrostrip.


The battery pack uses two size AA batteries. Check to be sure they are


2


installed correctly. Then, remove the paper backing on the Velcrostrip


and secure the pack in place.

3 Fasten electronic base lead wire and battery pack connector together.

8

Screw (2)

Faucet base

Nut (2)

TOP VIEW

Nut (2) Screw (2)

Faucet base


1–1 1/4dia.


mounting hole

Gasket


in sink or


countertop


ASSEMBLED

Spout

Lever

Faucet

Faucet stud

Top faucet base

Hex nut

Tubing insert

Tubing adapter

Compression nut

Tubing insert

Tubing adapter

Compression nut

3/8tubing, (run to Filter 2 outlet)

Faucet base

Base lead wire connector (to battery pack)

Page 8
Image 8
GE GXSL03C Electronic Faucet Installation for Model GXSV10C, Battery Pack Installation and Connection

GXSL03C, GXSV10C specifications

The GE GXSL03C and GXSV10C are two models in General Electric's range of water filtration systems, known for their innovative features and advanced technologies. Designed to provide clean and safe drinking water, these systems cater to a variety of needs, from residential households to more extensive applications.

The GE GXSL03C model is particularly notable for its compact design and efficiency. It incorporates a reverse osmosis filtration system, which is highly effective in removing impurities, harmful contaminants, and sediments from water. This model is equipped with a five-stage filtration process that includes pre-filters, post-filters, and a thin-film composite membrane, ensuring a thorough purification. It has a maximum flow rate that allows for convenient water delivery, making it suitable for daily use.

On the other hand, the GE GXSV10C boasts a higher capacity and is designed specifically for larger households or small businesses. This model also employs advanced filtration technology, including a multi-stage process that removes chlorine, lead, and other unwanted substances. A key feature of the GXSV10C is its built-in smart technology, which monitors the status of filters and indicates when replacements are due. This ensures optimal performance and convenience for users.

Both models highlight user-friendly designs, featuring easy-to-replace filters and straightforward installation processes. They come with detailed instructions and typically include necessary accessories for setup. Moreover, the compact nature of these systems allows for flexible installation options, including under-sink locations or in utility areas.

Durability is another strong characteristic of both the GXSL03C and GXSV10C. They are constructed from high-quality materials designed to withstand common wear and tear while maintaining performance over time. Additionally, GE backs these products with reliable customer service and support, ensuring users can easily access help when needed.

In summary, the GE GXSL03C and GXSV10C present powerful water purification solutions featuring advanced filtration technologies, user-friendly designs, and durability. Their focus on efficiency and performance makes them excellent choices for consumers seeking improved water quality in their homes or businesses. With these systems, customers can enjoy peace of mind knowing they are investing in reliable water filtration solutions.