Connections

Tips

Depending on the capabilities of your TV and other equip- ment, there are a variety of ways to connect the DVD+VCR. Choose from the connections described on pages 11-14. Please refer to the manuals of your TV, VCR, Stereo System or other devices as necessary to make the best connections for your specific equipment.

Caution

Make sure the DVD+VCR is connected directly to your TV, and that your TV is tuned to the correct video input channel. Do not connect the DVD+VCR’s DVD/VCR AUDIO OUT jack to the phono in jack (record deck) of your audio system.

Do not connect your DVD+VCR via your VCR. The DVD image could be distorted by the copy protection system.

Connecting Antenna/Cable TV to

DVD+VCR

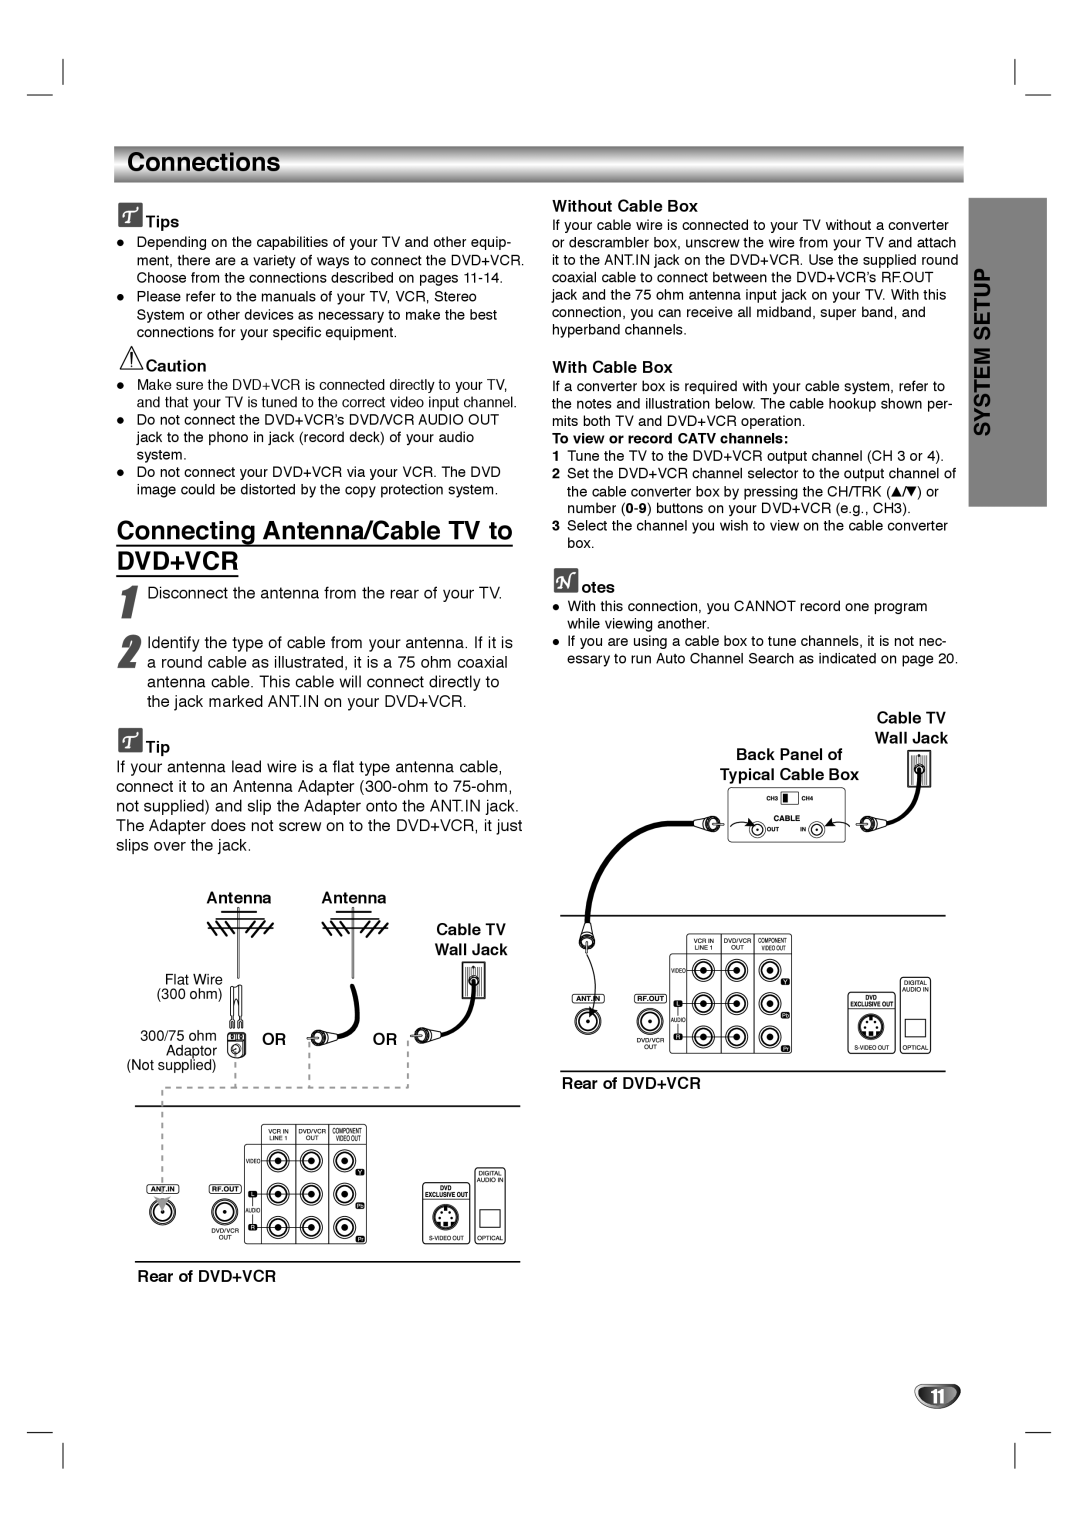
1 Disconnect the antenna from the rear of your TV.

2 Identify the type of cable from your antenna. If it is a round cable as illustrated, it is a 75 ohm coaxial antenna cable. This cable will connect directly to the jack marked ANT.IN on your DVD+VCR.

Tip

If your antenna lead wire is a flat type antenna cable, connect it to an Antenna Adapter (300-ohm to 75-ohm, not supplied) and slip the Adapter onto the ANT.IN jack. The Adapter does not screw on to the DVD+VCR, it just slips over the jack.

Antenna Antenna

Cable TV

Wall Jack

Flat Wire


(300 ohm)


300/75 ohm

OR

OR

Adaptor


(Not supplied)


Rear of DVD+VCR

Without Cable Box

If your cable wire is connected to your TV without a converter or descrambler box, unscrew the wire from your TV and attach it to the ANT.IN jack on the DVD+VCR. Use the supplied round coaxial cable to connect between the DVD+VCR’s RF.OUT jack and the 75 ohm antenna input jack on your TV. With this connection, you can receive all midband, super band, and hyperband channels.

With Cable Box

If a converter box is required with your cable system, refer to the notes and illustration below. The cable hookup shown per- mits both TV and DVD+VCR operation.

To view or record CATV channels:

1Tune the TV to the DVD+VCR output channel (CH 3 or 4).

2Set the DVD+VCR channel selector to the output channel of the cable converter box by pressing the CH/TRK (v/V) or number (0-9) buttons on your DVD+VCR (e.g., CH3).

3Select the channel you wish to view on the cable converter box.

otes

With this connection, you CANNOT record one program while viewing another.

If you are using a cable box to tune channels, it is not nec- essary to run Auto Channel Search as indicated on page 20.

Cable TV

Wall Jack

Back Panel of

Typical Cable Box

Rear of DVD+VCR

SYSTEM SETUP

11

Page 11
Image 11
GoVideo HT2015, HT2010 manual Connections, Connecting Antenna/Cable TV to

HT2015, HT2010 specifications

The GoVideo HT2010 and HT2015 are innovative products designed to deliver high-quality video playback and recording experiences for both personal and professional use. These models cater to varied needs, featuring advanced technologies that facilitate their ease of use and expand their applicability in different contexts.

The HT2010 is a versatile device that offers impressive playback capabilities with support for multiple video formats, ensuring users can enjoy their favorite movies and shows without the hassle of converting files. It is equipped with a vibrant display that renders sharp images and vivid colors, enhancing the viewing experience. The device also incorporates surround sound technology, which allows for an immersive audio environment, making it ideal for home theaters or on-the-go entertainment.

One of the main highlights of the HT2010 is its user-friendly interface. The intuitive controls allow users to navigate through menus effortlessly and access various features with ease. Additionally, the device supports USB connectivity, making it simple to transfer files or connect to external storage devices. This feature is particularly useful for users who wish to play content directly from their USB drives without the need for additional equipment.

On the other hand, the GoVideo HT2015 builds upon the strengths of the HT2010, introducing several upgraded features. Notably, it supports 4K Ultra HD resolution, providing stunning visuals that bring media content to life with higher clarity and detail. This model also incorporates a sleek design, making it an aesthetically pleasing addition to any entertainment setup.

The HT2015 further enhances usability with its built-in streaming capabilities. Users can access popular streaming services directly, eliminating the need for additional devices. The improved processing power ensures smooth playback even when streaming content in high definition.

Both models emphasize connectivity, featuring Wi-Fi and Bluetooth options that facilitate easy pairing with other devices. This makes it simple to share content wirelessly or connect to speakers for an upgraded audio experience.

In summary, the GoVideo HT2010 and HT2015 stand out for their impressive features, cutting-edge technology, and user-friendly design. While the HT2010 serves as a reliable option for standard video playback needs, the HT2015 takes it a step further with 4K capabilities and integrated streaming, making both products excellent choices for avid video enthusiasts.