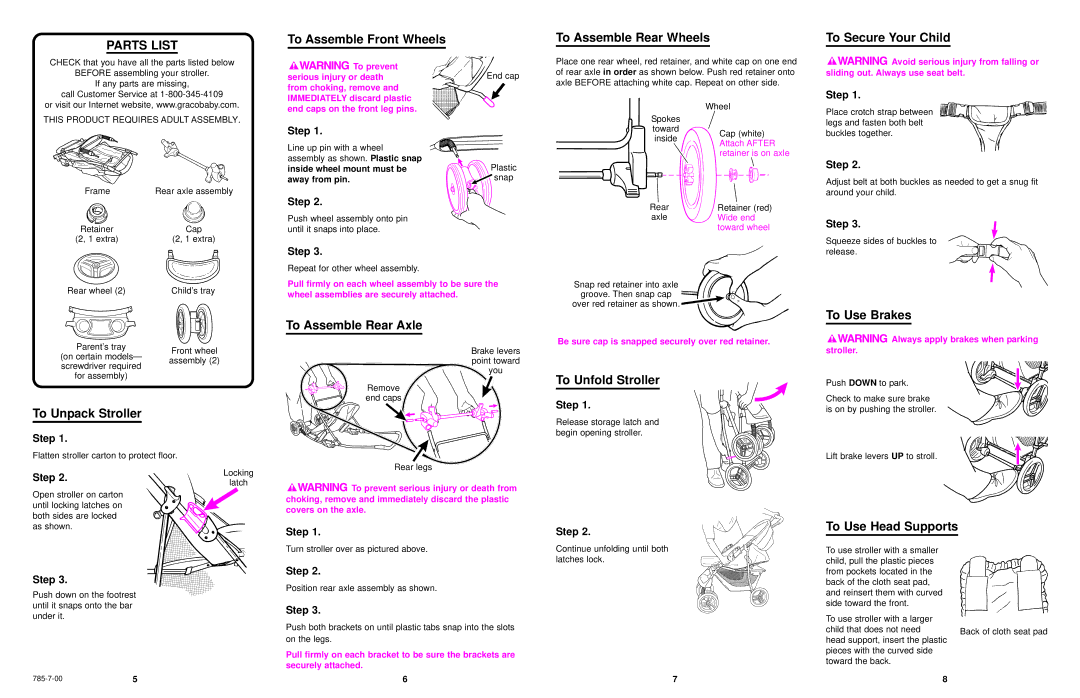
PARTS LIST
CHECK that you have all the parts listed below
BEFORE assembling your stroller.
If any parts are missing,
call Customer Service at
To Assemble Front Wheels
To prevent | End cap |
serious injury or death |
from choking, remove and IMMEDIATELY discard plastic
To Assemble Rear Wheels
Place one rear wheel, red retainer, and white cap on one end of rear axle in order as shown below. Push red retainer onto axle BEFORE attaching white cap. Repeat on other side.
To Secure Your Child
![]()
![]()
![]()
![]() Avoid serious injury from falling or sliding out. Always use seat belt.
Avoid serious injury from falling or sliding out. Always use seat belt.
Step 1.
or visit our Internet website, www.gracobaby.com.
THIS PRODUCT REQUIRES ADULT ASSEMBLY.
end caps on the front leg pins.
Step 1.
Spokes toward inside
Wheel
Cap (white)
Attach AFTER
Place crotch strap between legs and fasten both belt buckles together.
Frame | Rear axle assembly | ||
|
|
| |
|
|
|
|
Retainer |
| Cap | |
(2, 1 extra) | (2, 1 extra) | ||
Line up pin with a wheel assembly as shown. Plastic snap inside wheel mount must be away from pin.
Step 2.
Push wheel assembly onto pin until it snaps into place.
Step 3.
Repeat for other wheel assembly.
Plastic ![]() snap
snap
Rear
axle
retainer is on axle
Retainer (red) Wide end toward wheel
Step 2.
Adjust belt at both buckles as needed to get a snug fit around your child.
Step 3.
Squeeze sides of buckles to release.
Rear wheel (2) | Child’s tray |
Pull firmly on each wheel assembly to be sure the wheel assemblies are securely attached.
Snap red retainer into axle
groove. Then snap cap
over red retainer as shown.
To Use Brakes
Parent’s tray | Front wheel | |
(on certain models— | ||
assembly (2) | ||
screwdriver required | ||
| ||
for assembly) |
|
To Unpack Stroller
Step 1.
Flatten stroller carton to protect floor.
Step 2. | Locking | |
latch | ||
|
Open stroller on carton until locking latches on both sides are locked as shown.
Step 3.
Push down on the footrest until it snaps onto the bar under it.
To Assemble Rear Axle
Brake levers point toward you
Remove end caps
Rear legs
![]()
![]()
![]()
![]() To prevent serious injury or death from choking, remove and immediately discard the plastic covers on the axle.
To prevent serious injury or death from choking, remove and immediately discard the plastic covers on the axle.
Step 1.
Turn stroller over as pictured above.
Step 2.
Position rear axle assembly as shown.
Step 3.
Push both brackets on until plastic tabs snap into the slots on the legs.
Pull firmly on each bracket to be sure the brackets are securely attached.
6
Be sure cap is snapped securely over red retainer.
To Unfold Stroller
Step 1.
Release storage latch and begin opening stroller.
Step 2.
Continue unfolding until both latches lock.
7


 Always apply brakes when parking stroller.
Push DOWN to park.
Check to make sure brake is on by pushing the stroller.
Lift brake levers UP to stroll.
To Use Head Supports
To use stroller with a smaller child, pull the plastic pieces from pockets located in the back of the cloth seat pad, and reinsert them with curved side toward the front.
To use stroller with a larger
child that does not need Back of cloth seat pad head support, insert the plastic
pieces with the curved side toward the back.
8