Manuel Dutilisateur Manual DEL Propietario
Adult Assembly Required
Using Graco Infant Carrier with Stroller
Livres 1,4 kg
Utiliser LE PORTE-BÉBÉ Graco Avec Poussette
Page
Usar EL Transportador Graco CON EL Cochecito
Verifique que tiene
Parts list Liste des pièces Lista de las piezas
To Open Stroller Ouvrir la poussette Abrir el cochecito
Basket Le panier La canasta
Front Wheels Les roues avant Las ruedas delanteras
Advertencia de
Rear Axle L’essieu arrière El eje trasero
Rear Wheels Les roues arrières Las ruedas traseras
Snap Enclenchez ¡CHASQUIDO
Parent Tray Le plateau pour adulte Bandeja para padres
Advertencia
Child’s Tray Le plateau pour enfant Bandeja para niños
Snap Enclenchez ¡CHASQUIDO
Advertencia
Brakes Les freins Los frenos
To Secure Child Attacher l’enfant Para asegurar al niño
Swivel Wheels Les roues pivotantes Las ruedas giratorias
Point Harness Harnais à 5 point Arnés de 5 puntos
Point Buckle Boucle à 3 point Hebilla de 3 puntos
Page
Mise EN Garde Advertencia
To raise, pull recline strap up
™ ›
Page
Snap Enclenchez ¡CHASQUIDO
Over Carrier
Page
Care and Maintenance
Soins et entretien
SI LAS Ruedas Hacen RUIDO, use un aceite liviano
Cuidado y mantenimiento
Page
Page
Graco Limited Warranty
Garantie limitée de Graco
Garantía limitada de Graco
Or/ou
Replacement Parts USA Piezas de repuesto EE.UU
$10.00
Must be filled in Debe completarse
Infant Restraint Carrier
Do not install or use This infant restraint until you
Important Information
Additional Information
Properly securing your child in the infant restraint
Your child’s safety depends on
Properly reclining the infant restraint
Properly routing the vehicle seat belt or Latch
Register Your Infant Restraint
Registration Information
Recall Information
It today
If You Need Help
Front View
Features and Components
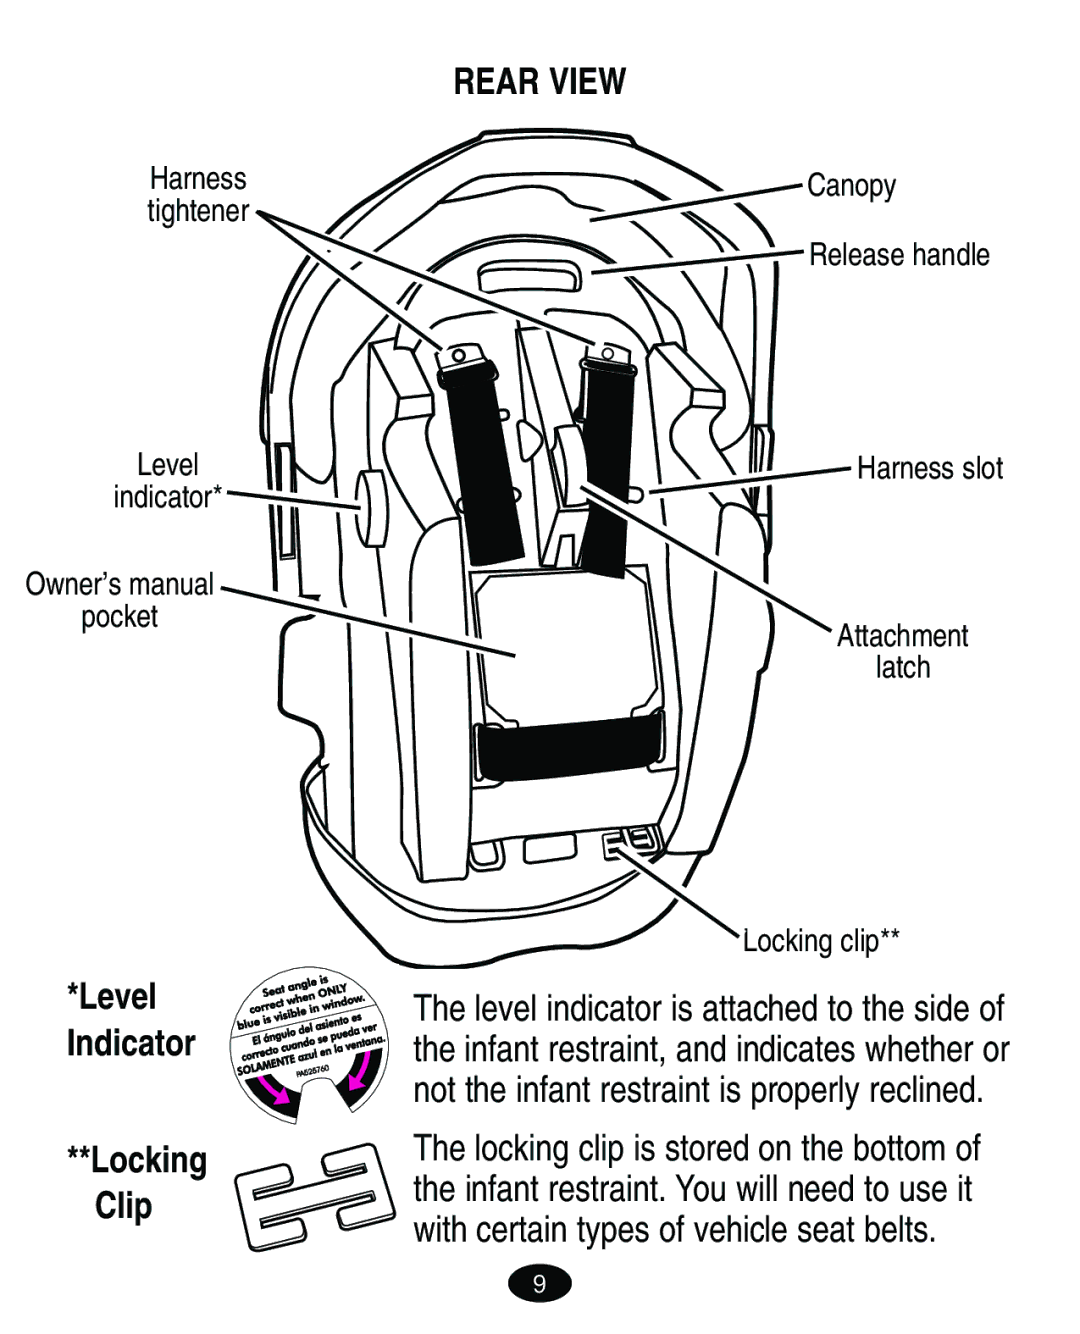
Rear View
Removing and Attaching Base
Adjusting Handle
Never use positions B or C in the vehicle
Attaching Canopy
Head Support on certain models
Removing Canopy
Pull the canopy fabric back
Do not Place this Infant Restraint in a Vehicle
Important Information
Never Leave Your Child Unattended
Page
Additional Warnings for Use as Carrier
Weight 20 lbs kg or less Height 26 inches 66 cm or less
Height and Weight Limits
Your child Must meet all requirements
Vehicle Seat Requirements
Infant Restraint Location
Whenever possible, secure the infant
Watch the child. If the driver is the only
Vehicle seat must face forward
Vehicle Seat Belt Requirements
Passive Restraint Lap Belt with Motorized Shoulder Belt
Unsafe Vehicle Belt Systems
Lap Belts Forward of Seat Crease
Lap Belts with Automatic Locking Retractor ALR
Safe Vehicle Belt Systems
Connect lap and shoulder belts with locking clip as shown
To Install Locking Clip
Latch Locations
Visible, they may be marked with the symbol
Positioning Harness Straps
Using Infant Restraint
Sudden stop or crash
Harness straps to other harness slots
Check that straps are not twisted
Thread straps through tighteners exactly as shown
Securing Child in Infant Restraint
Safety Check
Installing the Infant Restraint/Base Using Vehicle Belt
Base with seat belt
Thread the seat belt
Infant restraint with seat belt
Page
For ease of installation, extend Latch
Using Latch to install Base
Reclining Infant Restraint/Base
When using the base
Final Safety Check Every time you drive with your child
Airplane Use
Additional Information
Storing Latch
Use only in forward-facing aircraft seat
Cleaning and Maintenance
Page
Parts List Price
Replacement Parts
Toll-free1-800-345-4109
Exton, PA
Ship to
Page
Asiento de Seguridad infantil Portabebés
Funciones y componentes
Ubicación del sistema de seguridad para niños
Instalación del sistema de seguridad para niños/base
De su vehículo
Advertencias a padres y otros usuarios
El mismo
Graco Children’s Products Inc
Información sobre el registro
Llame al
Canadá 1-800-667-8184 Montreal
Si necesita ayuda
Vista Delantera
Funciones y componentes
Vista Trasera
Ajuste de la manija
Sacar y conectar la base
Ambos botones de ajuste de
Través del túnel cosido
Colocación de la capota
Apoyacabezas en ciertos modelos
Quite la capota
Jale la tela de la capota hacia atrás
Advertencias para uso como sistema de seguridad para niños
Información importante
Infla, puede golpear al niño y al sistema de
Nunca Deje a SU Niño Solo
Advertencias para el uso con un cochecito
No cuelgue cordones sobre o encima del transportador
Advertencias adicionales para el uso como transportador
No ponga cordones a los juguetes
Su niño Debe cumplir con todos los requisitos
Limitaciones de peso y estatura
Cuando sea posible, sujete el sistema
Ubicación del sistema de seguridad para niños
Requisitos del cinturón de seguridad del vehículo
Emergency Locking Retractor, ELR
El Latch
Cinturón de seguridad abdominal con
Sistemas Seguros de cinturones de vehículos
Para instalar la traba de seguridad
Ubicación del Latch
Colocación de las correas del arnés
Usar el asiento de seguridad infantil
Verificación DE Seguridad
Saque la correa de la ranura
Sujetar el niño en el sistema de seguridad para niños
Verifique que las correas del arnés no estén dobladas
18 a
Sistema de seguridad para niños con cinturón de seguridad
Pase el cinturón de seguridad
Page
Uso del Latch para instalar la base
Inclinación del sistema de seguridad para niños/base
Zona de color azul
Cuando usa la base
Para niños
Uso en aviones
Información adicional
� La Hebilla puede limpiarse con un trapo húmedo
Limpieza y mantenimiento
Notas
Lista de piezas
Piezas de repuesto
En ciertos modelos
Envíe a