Startup

CAUTION

The wallet sized warning card provided with the gun should be kept with the operator at all times. The card contains important information on reducing the risk of a fluid injection injury, and treatment information should an injection injury occur. Additional copies of this card are available at no cost.

WARNING

Pressure Relief Procedure

To reduce the risk of injury, including fluid injection, splashing in the eyes or on the skin, injury from mov- ing parts, or electric shock, always follow this proce- dure whenever you shut off the sprayer, when check- ing or servicing any part of the spray system, when installing, cleaning or changing spray tips, and when- ever you stop spraying.

1.Shut off the sprayer and unplug it.

2.Hold a metal part of the gun firmly to the side of a grounded metal pail, and trigger the gun into the pail to relieve pressure.

3.Lock the trigger safety lever.

4.Turn the bypass valve counterclockwise one turn to drain paint back into the pail.

If you suspect that the spray tip or hose is completely clogged, or that pressure has not been fully relieved after following the steps above, very slowly loosen the tip guard retaining nut or hose end coupling and relieve pressure gradually, then loosen completely. Now clear the tip or hose obstruction.

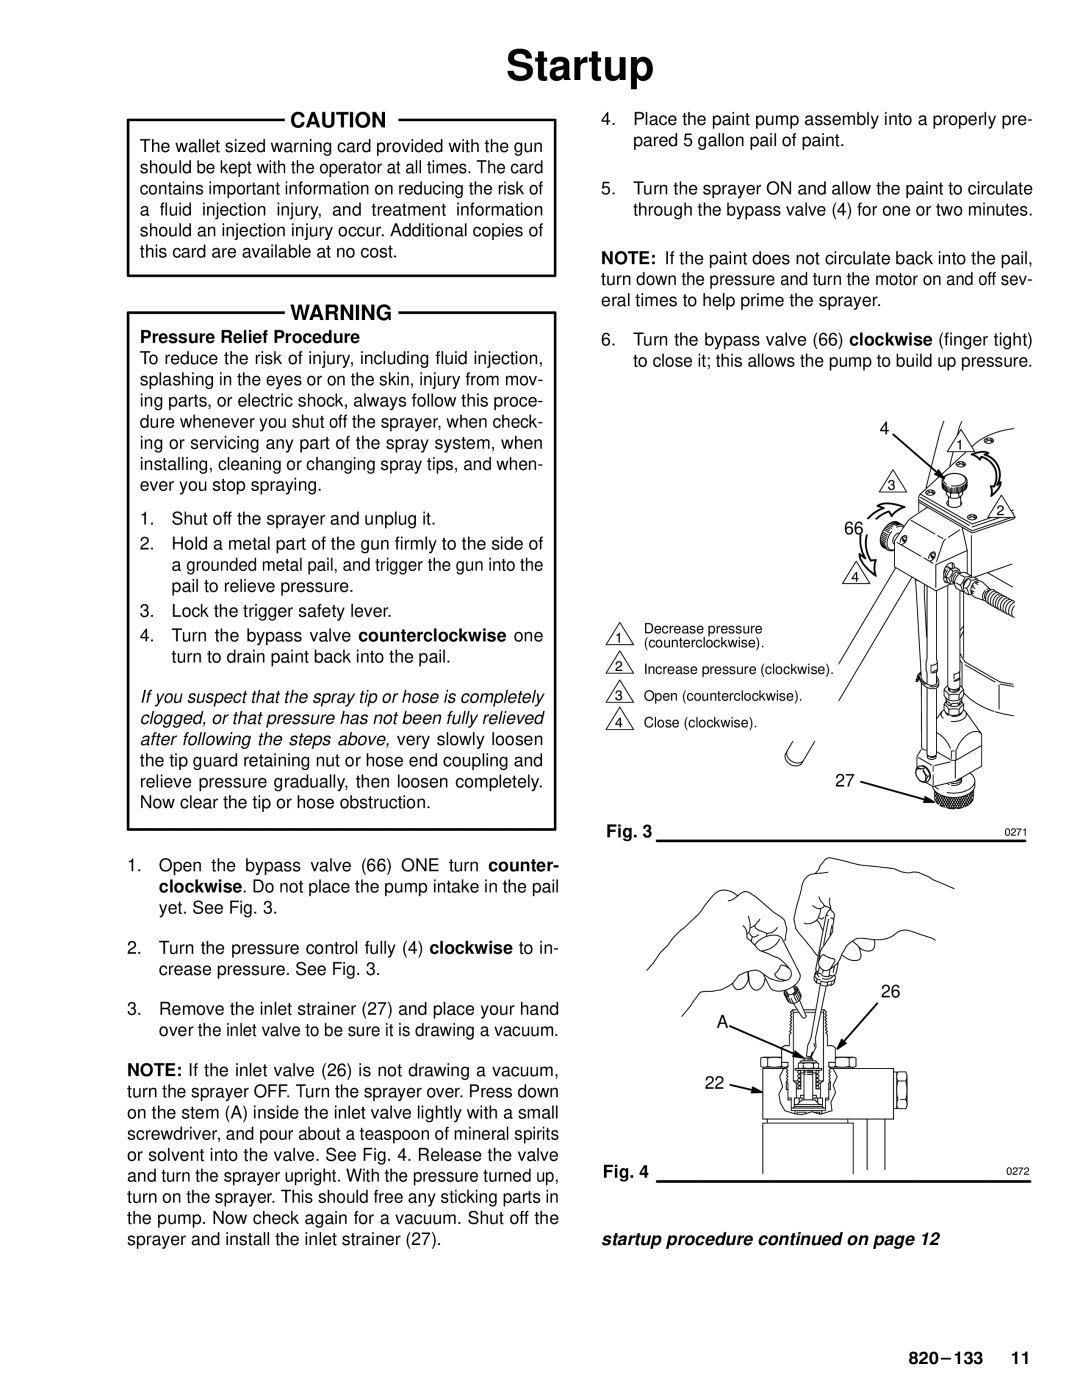
1.Open the bypass valve (66) ONE turn counter- clockwise. Do not place the pump intake in the pail yet. See Fig. 3.

2.Turn the pressure control fully (4) clockwise to in- crease pressure. See Fig. 3.

3.Remove the inlet strainer (27) and place your hand over the inlet valve to be sure it is drawing a vacuum.

NOTE: If the inlet valve (26) is not drawing a vacuum, turn the sprayer OFF. Turn the sprayer over. Press down on the stem (A) inside the inlet valve lightly with a small screwdriver, and pour about a teaspoon of mineral spirits or solvent into the valve. See Fig. 4. Release the valve and turn the sprayer upright. With the pressure turned up, turn on the sprayer. This should free any sticking parts in the pump. Now check again for a vacuum. Shut off the sprayer and install the inlet strainer (27).

4.Place the paint pump assembly into a properly pre- pared 5 gallon pail of paint.

5.Turn the sprayer ON and allow the paint to circulate through the bypass valve (4) for one or two minutes.

NOTE: If the paint does not circulate back into the pail, turn down the pressure and turn the motor on and off sev- eral times to help prime the sprayer.

6.Turn the bypass valve (66) clockwise (finger tight) to close it; this allows the pump to build up pressure.

4

1

3

2

66

4

Decrease pressure

1(counterclockwise).

2

Increase pressure (clockwise).


3 Open (counterclockwise).

4 Close (clockwise).

27

Fig. 3

￿271

26

A

22

Fig. 4

￿272

startup procedure continued on page 12


Page 11
Image 11
Graco PT2500 owner manual Startup, Pressure Relief Procedure

PT2500 specifications

The Graco PT2500 is a powerful and versatile paint sprayer designed for both professional contractors and DIY enthusiasts looking for a reliable tool for their painting projects. With a robust construction and advanced technologies, the PT2500 stands out in the market for its efficiency and performance.

One of the main features of the Graco PT2500 is its high output capacity. This paint sprayer is equipped with a powerful motor that can deliver consistent pressure, allowing for smooth and even application of paint, stains, and varnishes. It is capable of handling a wide variety of coatings, making it suitable for both interior and exterior projects.

Additionally, the PT2500 features Graco’s ProConnect system, which allows for easy pump replacement without the need for tools. This system minimizes downtime and ensures that users can get back to their projects quickly, making it an ideal choice for professionals who need to maintain productivity on the job site.

The PT2500 incorporates advanced RAC X SwitchTip technology. This innovative feature enables users to reverse the tip for quick unclogging, which saves time and ensures a continuous workflow. The switchable tips also allow for various spray patterns, accommodating different project requirements with ease.

Another notable characteristic is the lightweight and portable design of the Graco PT2500. Weighing less than many competitors in its class, this sprayer can be easily transported and maneuvered around the job site or within the home. The included cart provides stability and allows for easy movement, making it ideal for larger projects or jobs that require accessibility.

Furthermore, the Graco PT2500 comes with a built-in filter that helps prevent debris from clogging the spraying nozzle, ensuring a smooth finish every time. It also includes adjustable pressure controls, enabling users to customize the spray pattern and pressure according to the specific requirements of their painting task.

In conclusion, the Graco PT2500 is a feature-rich paint sprayer that combines portability, innovative technology, and user-friendly design. Whether tackling major renovations or simple home improvement projects, this sprayer provides the reliability and performance that users expect from Graco products. With its advanced features, the PT2500 is an excellent investment for anyone looking to achieve professional-quality results in their painting endeavors.