Startup

7.Release the trigger safety lever and trigger the gun onto a piece of paper to check the spray pattern. Ad- just the pressure setting to obtain the best atomiza- tion and spray pattern. Always use the lowest pressure necessary. Excessive pressure cause premature tip wear and pump wear.

NOTE: If you cannot obtain a good spray pattern or ade- quate atomization, your paint may be too thick. Thin the paint according to the manufacturer's recommendations until you can get good atomization.

8.Whenever you stop spraying, even for a moment, al- ways set the trigger safety lever to prevent acciden- tally trigger the gun.

9.Whenever you stop spraying for more than a mo- ment, or if you must leave the sprayer unattended, shut it off and follow the Pressure Relief Procedure on page 11.

NOTE: The sprayer will not restart if it was left pressur- ized after shutting the sprayer off. Relieve the pressure, then start the sprayer.

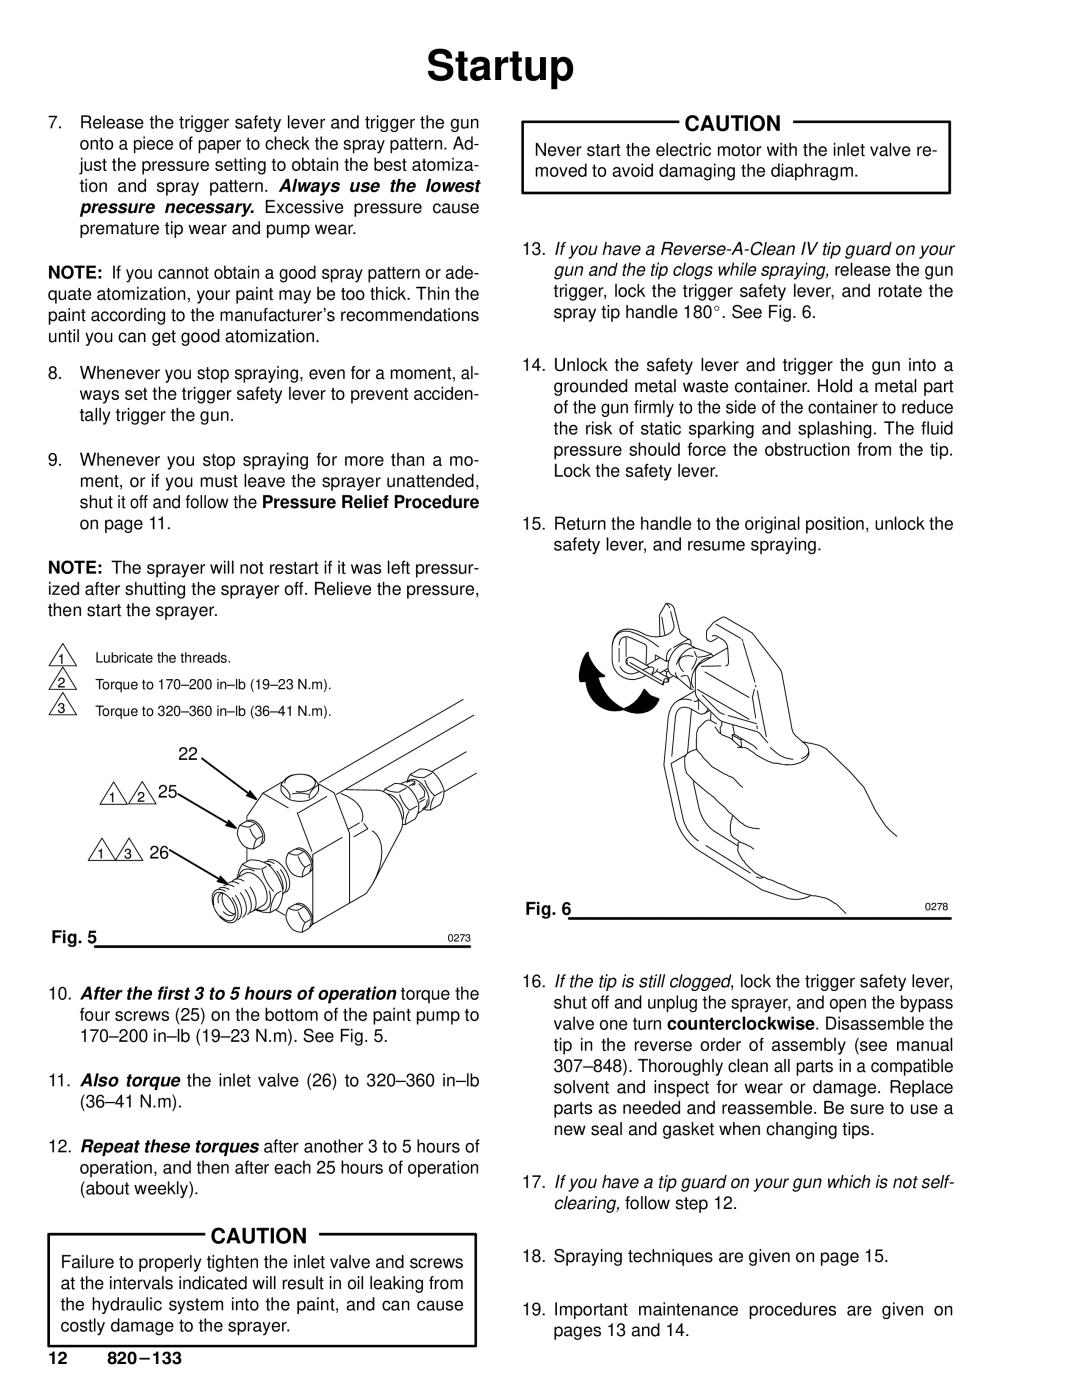
1Lubricate the threads.

2Torque to 170±200 in±lb (19±23 N.m).

3Torque to 320±360 in±lb (36±41 N.m).

22

1 2 25

13 26

Fig. 5

￿273

10.After the first 3 to 5 hours of operation torque the four screws (25) on the bottom of the paint pump to 170±200 in±lb (19±23 N.m). See Fig. 5.

11.Also torque the inlet valve (26) to 320±360 in±lb (36±41 N.m).

12.Repeat these torques after another 3 to 5 hours of operation, and then after each 25 hours of operation (about weekly).

CAUTION

Failure to properly tighten the inlet valve and screws at the intervals indicated will result in oil leaking from the hydraulic system into the paint, and can cause costly damage to the sprayer.


CAUTION

Never start the electric motor with the inlet valve re- moved to avoid damaging the diaphragm.

13.If you have a Reverse-A-Clean IV tip guard on your gun and the tip clogs while spraying, release the gun trigger, lock the trigger safety lever, and rotate the spray tip handle 180_. See Fig. 6.

14.Unlock the safety lever and trigger the gun into a grounded metal waste container. Hold a metal part of the gun firmly to the side of the container to reduce the risk of static sparking and splashing. The fluid pressure should force the obstruction from the tip. Lock the safety lever.

15.Return the handle to the original position, unlock the safety lever, and resume spraying.

Fig. 6

￿278

16.If the tip is still clogged, lock the trigger safety lever, shut off and unplug the sprayer, and open the bypass valve one turn counterclockwise. Disassemble the tip in the reverse order of assembly (see manual 307±848). Thoroughly clean all parts in a compatible solvent and inspect for wear or damage. Replace parts as needed and reassemble. Be sure to use a new seal and gasket when changing tips.

17.If you have a tip guard on your gun which is not self- clearing, follow step 12.

18.Spraying techniques are given on page 15.

19.Important maintenance procedures are given on pages 13 and 14.

Page 12
Image 12
Graco PT2500 owner manual

PT2500 specifications

The Graco PT2500 is a powerful and versatile paint sprayer designed for both professional contractors and DIY enthusiasts looking for a reliable tool for their painting projects. With a robust construction and advanced technologies, the PT2500 stands out in the market for its efficiency and performance.

One of the main features of the Graco PT2500 is its high output capacity. This paint sprayer is equipped with a powerful motor that can deliver consistent pressure, allowing for smooth and even application of paint, stains, and varnishes. It is capable of handling a wide variety of coatings, making it suitable for both interior and exterior projects.

Additionally, the PT2500 features Graco’s ProConnect system, which allows for easy pump replacement without the need for tools. This system minimizes downtime and ensures that users can get back to their projects quickly, making it an ideal choice for professionals who need to maintain productivity on the job site.

The PT2500 incorporates advanced RAC X SwitchTip technology. This innovative feature enables users to reverse the tip for quick unclogging, which saves time and ensures a continuous workflow. The switchable tips also allow for various spray patterns, accommodating different project requirements with ease.

Another notable characteristic is the lightweight and portable design of the Graco PT2500. Weighing less than many competitors in its class, this sprayer can be easily transported and maneuvered around the job site or within the home. The included cart provides stability and allows for easy movement, making it ideal for larger projects or jobs that require accessibility.

Furthermore, the Graco PT2500 comes with a built-in filter that helps prevent debris from clogging the spraying nozzle, ensuring a smooth finish every time. It also includes adjustable pressure controls, enabling users to customize the spray pattern and pressure according to the specific requirements of their painting task.

In conclusion, the Graco PT2500 is a feature-rich paint sprayer that combines portability, innovative technology, and user-friendly design. Whether tackling major renovations or simple home improvement projects, this sprayer provides the reliability and performance that users expect from Graco products. With its advanced features, the PT2500 is an excellent investment for anyone looking to achieve professional-quality results in their painting endeavors.