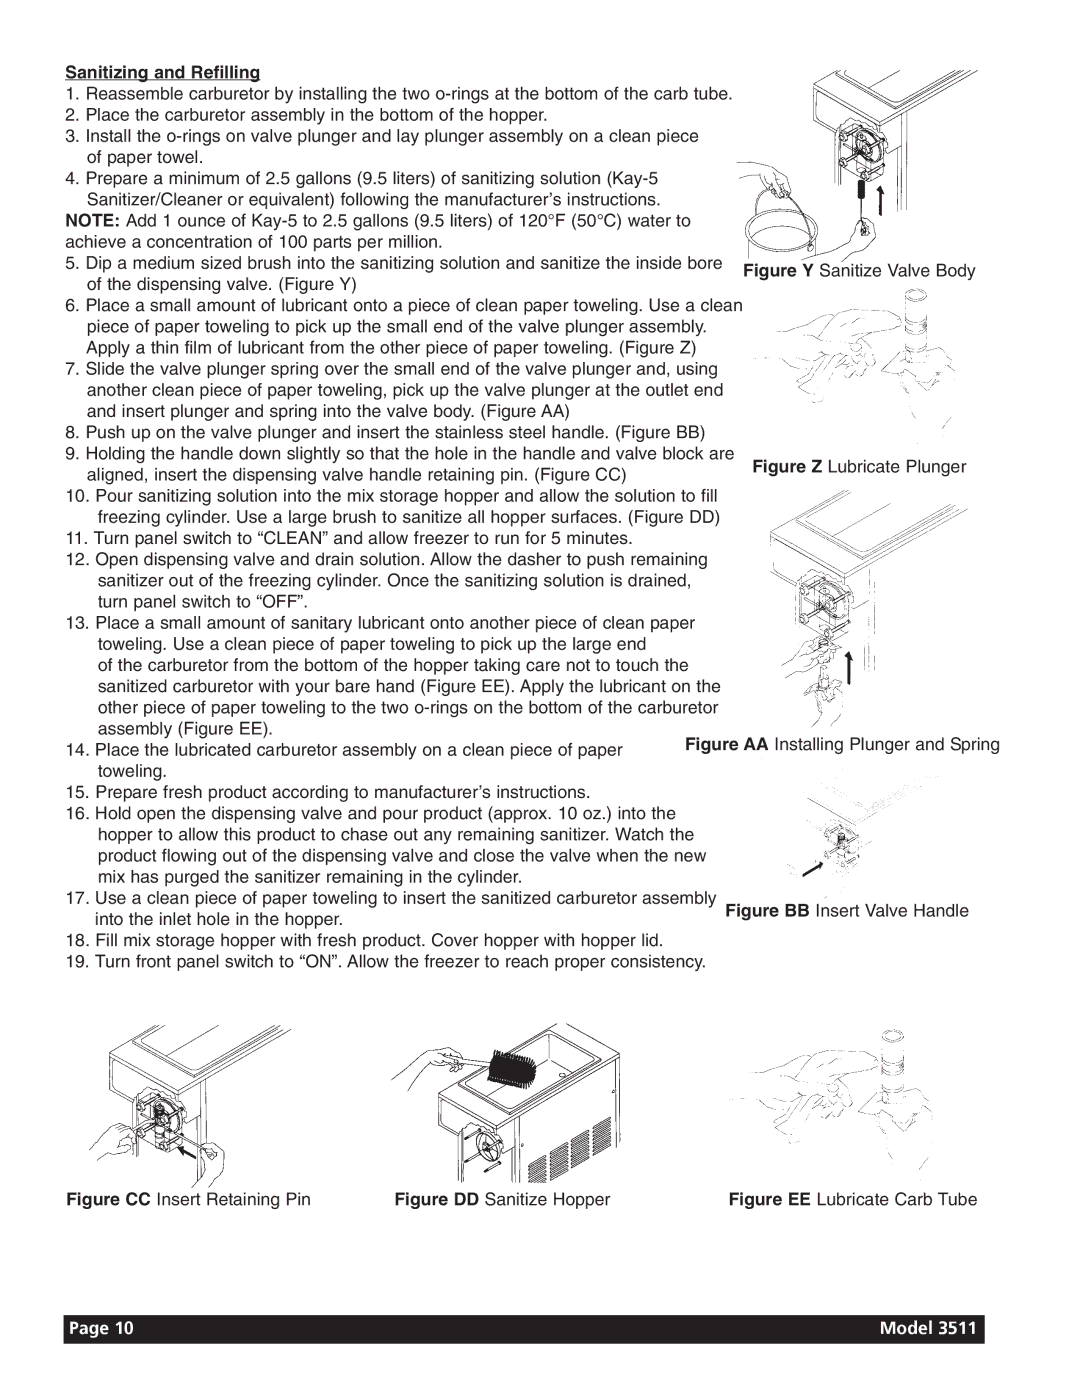
Figure BB Insert Valve Handle
Figure EE Lubricate Carb Tube
Model 3511
Figure AA Installing Plunger and Spring
Figure Y Sanitize Valve Body
Figure Z Lubricate Plunger

Sanitizing and Refilling

1.Reassemble carburetor by installing the two o-rings at the bottom of the carb tube.

2.Place the carburetor assembly in the bottom of the hopper.

3.Install the o-rings on valve plunger and lay plunger assembly on a clean piece of paper towel.

4.Prepare a minimum of 2.5 gallons (9.5 liters) of sanitizing solution (Kay-5 Sanitizer/Cleaner or equivalent) following the manufacturer’s instructions.

NOTE: Add 1 ounce of Kay-5 to 2.5 gallons (9.5 liters) of 120°F (50°C) water to achieve a concentration of 100 parts per million.

5.Dip a medium sized brush into the sanitizing solution and sanitize the inside bore of the dispensing valve. (Figure Y)

6.Place a small amount of lubricant onto a piece of clean paper toweling. Use a clean piece of paper toweling to pick up the small end of the valve plunger assembly. Apply a thin film of lubricant from the other piece of paper toweling. (Figure Z)

7.Slide the valve plunger spring over the small end of the valve plunger and, using another clean piece of paper toweling, pick up the valve plunger at the outlet end and insert plunger and spring into the valve body. (Figure AA)

8.Push up on the valve plunger and insert the stainless steel handle. (Figure BB)

9.Holding the handle down slightly so that the hole in the handle and valve block are aligned, insert the dispensing valve handle retaining pin. (Figure CC)

10.Pour sanitizing solution into the mix storage hopper and allow the solution to fill freezing cylinder. Use a large brush to sanitize all hopper surfaces. (Figure DD)

11.Turn panel switch to “CLEAN” and allow freezer to run for 5 minutes.

12.Open dispensing valve and drain solution. Allow the dasher to push remaining sanitizer out of the freezing cylinder. Once the sanitizing solution is drained, turn panel switch to “OFF”.

13.Place a small amount of sanitary lubricant onto another piece of clean paper toweling. Use a clean piece of paper toweling to pick up the large end

of the carburetor from the bottom of the hopper taking care not to touch the sanitized carburetor with your bare hand (Figure EE). Apply the lubricant on the other piece of paper toweling to the two o-rings on the bottom of the carburetor assembly (Figure EE).

14.Place the lubricated carburetor assembly on a clean piece of paper

toweling.

15.Prepare fresh product according to manufacturer’s instructions.

16.Hold open the dispensing valve and pour product (approx. 10 oz.) into the hopper to allow this product to chase out any remaining sanitizer. Watch the product flowing out of the dispensing valve and close the valve when the new mix has purged the sanitizer remaining in the cylinder.

17.Use a clean piece of paper toweling to insert the sanitized carburetor assembly into the inlet hole in the hopper.

18.Fill mix storage hopper with fresh product. Cover hopper with hopper lid.

19.Turn front panel switch to “ON”. Allow the freezer to reach proper consistency.

Figure CC Insert Retaining Pin

Figure DD Sanitize Hopper

Page 10

Page 12
Image 12
Grindmaster 3511 manual Sanitizing and Refilling, Figure CC Insert Retaining Pin

3511 specifications

The Grindmaster 3511 is a state-of-the-art commercial coffee grinder that has become a staple in cafes, restaurants, and specialty coffee shops around the world. Known for its exceptional performance and reliability, the Grindmaster 3511 showcases several key features and technological advancements that cater to the demands of both baristas and coffee enthusiasts.

One of the most notable features of the Grindmaster 3511 is its precision grinding capabilities. The grinder is equipped with high-quality flat burrs that ensure a uniform grind size, which is essential for optimal extraction and the development of rich and flavorful coffee profiles. With adjustable grind settings, users can easily switch from espresso to French press grinds, accommodating various brewing methods and preferences.

The Grindmaster 3511 has a robust construction designed for heavy use in commercial settings. The grinder’s durable materials and components ensure longevity and consistent performance, allowing it to withstand the rigors of daily operation. This reliability is complemented by an efficient motor that operates quietly, making it suitable for environments where customer experience is paramount.

In terms of technology, the Grindmaster 3511 features an intuitive digital interface that simplifies the grinding process. The built-in timer allows baristas to set precise grind times, ensuring consistent doses for each brew. This precision is crucial in maintaining the quality and flavor of the coffee, which can vary significantly with inconsistent grind sizes.

Additionally, the Grindmaster 3511 is designed with user-friendly maintenance features. The removable grind chamber and easy access to critical components make cleaning and upkeep straightforward, promoting hygiene and prolonging the life of the grinder. This ease of maintenance is particularly beneficial for busy establishments where time is of the essence.

Moreover, the Grindmaster 3511 integrates safety features such as an automatic shut-off system, which helps prevent overheating and protects the motor during prolonged use. This attention to safety and efficiency ensures that the grinder not only meets but exceeds industry standards.

Overall, the Grindmaster 3511 stands out for its combination of precision, durability, and ease of use. Its advanced grinding technology and thoughtful design make it a valuable investment for any coffee business aiming to deliver high-quality beverages consistently. With the Grindmaster 3511, users can expect a reliable grinding experience that enhances the overall coffee-making process.