INSTALLATION | GB |
|
|
INSTALLATION | GB |
|
|
Adapting the cooker to another type of gas
This operation may only be carried out by an appropriately authorised fitter.
The cooker is supplied with natural gas (G20/20mbar).If the cooker is to be supplied
with differs from the gas provided for the
cooker by the manufacturer, burner nozzles must be exchanged and the flame needs to be adjusted.
Burner
In order to adapt the cooker to burn a different type of gas, you should:
Exchange nozzles (see tables below), Adjust the “economical” flame.
If you need to replace the natural gas (G20/20mbar) nozzle, please contact the service center.
![]()
![]()
![]() Caution!
Caution!
The cookers provided by the manufacturer have burners which are
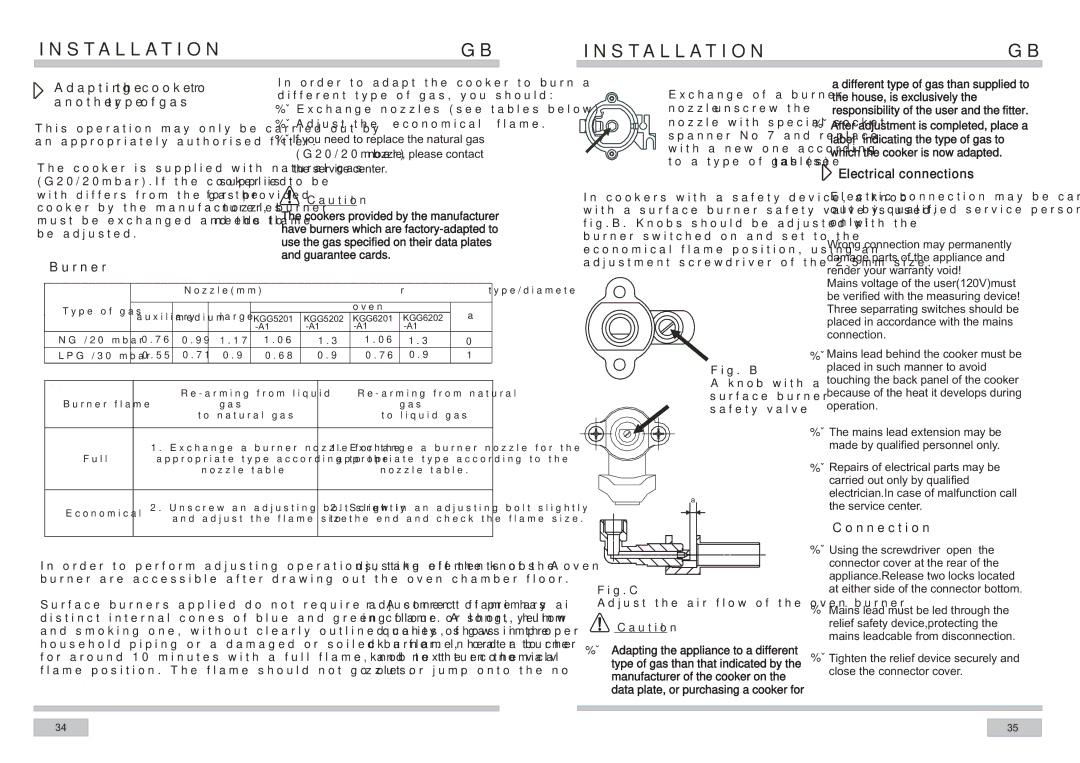
Exchange of a burner nozzle unscrew the nozzle with special socket spanner No 7 and replace with a new one according to a type of gas (seetables)
In cookers with a safety device, a knob with a surface burner safety valve is used, fig.B. Knobs should be adjusted with the burner switched on and set to the economical flame position, using an adjustment screwdriver of the 2.5mm size.
a different type of gas than supplied to the house, is exclusively the responsibility of the user and the fitter. After adjustment is completed, place a label indicating the type of gas to which the cooker is now adapted.
 Electrical connections
Electric connection may be carried out by qualified service personnel only!
Wrong connection may permanently damage parts of the appliance and render your warranty void!
|
|
|
| Nozzle(mm) |
|
|
| type/diameter |
| ||||||
|
|
|
|
|
|
|
|
|
|
|
|
|
|
|
|
Type of gas |
| auxiliary | medium | large |
|
|
|
|
| oven |
|
|
| a | |
|
| KGG5201 |
| KGG5202 | KGG6201 |
| KGG6202 |
| |||||||
|
|
|
|
|
| ||||||||||
|
|
|
|
|
|
|
|
|
|
| |||||
NG /20 mbar |
| 0.76 |
| 0.99 | 1.17 |
| 1.06 |
| 1.3 | 1.06 |
| 1.3 |
| 0 | |
LPG /30 mbar |
| 0.55 |
| 0.71 | 0.9 |
| 0.68 |
| 0.9 | 0.76 |
| 0.9 |
| 1 | |
|
|
|
|
|
|
|
|
|
|
|
|
|
| ||
|
|
|
|
|
|
|
|
|
|
|
|
|
|
|
|
|
|
|
|
|
|
| |||||||||
Burner flame |
|
|
| gas |
|
|
|
|
| gas |
| ||||
|
|
|
| to natural gas |
|
| to liquid gas |
| |||||||
|
|
|
|
|
|
|
|
|
|
|
| ||||
|
| 1. Exchange a burner nozzle for the |
| 1. Exchange a burner nozzle for the | |||||||||||
Full | appropriate type according to the |
| appropriate type according to the | ||||||||||||
|
|
|
| nozzle table |
|
|
|
| nozzle table. |
| |||||
|
|
|
|
|
|
|
|
|
|
|
| ||||
Economical | 2. Unscrew an adjusting bolt slightly |
| 2. Screw in an adjusting bolt slightly | ||||||||||||
| and adjust the flame size. |
| to the end and check the flame size. | ||||||||||||
|
|
|
| ||||||||||||
|
|
|
|
|
|
|
|
|
|
|
|
|
|
|
|
In order to perform adjusting operations, take off the knobs. Adjusting elements of the oven burner are accessible after drawing out the oven chamber floor.
Surface burners applied do not require adjustment of primary air. A correct flame has distinct internal cones of blue and green colour. A short, humming flame or long, yellow and smoking one, without clearly outlined cones, shows improper quality of gas in the household piping or a damaged or soiled burner. In order to check a flame, heat a burner for around 10 minutes with a full flame, and next turn the valve knob to the economical flame position. The flame should not go out or jump onto the nozzles.
Fig. B
A knob with a surface burner safety valve
a |
Fig.C
Adjust the air flow of the oven burner
![]()
![]()
![]() Caution!
Caution!
Adapting the appliance to a different type of gas than that indicated by the manufacturer of the cooker on the data plate, or purchasing a cooker for
Mains voltage of the user(120V)must be verified with the measuring device! Three separrating switches should be placed in accordance with the mains connection.
Mains lead behind the cooker must be placed in such manner to avoid touching the back panel of the cooker because of the heat it develops during operation.
The mains lead extension may be made by qualified personnel only.
Repairs of electrical parts may be carried out only by qualified electrician.In case of malfunction call the service center.
Connection
Using the screwdriver open the connector cover at the rear of the appliance.Release two locks located at either side of the connector bottom.
Mains lead must be led through the relief safety device,protecting the mains leadcable from disconnection.
Tighten the relief device securely and close the connector cover.
34
35